Failamp is a simple audio & video mediaplayer implemented in Python, using the built-in Qt playlist and media handling features. It is modelled, very loosely on the original Winamp, although nowhere near as complete (hence the fail).
The Main Window
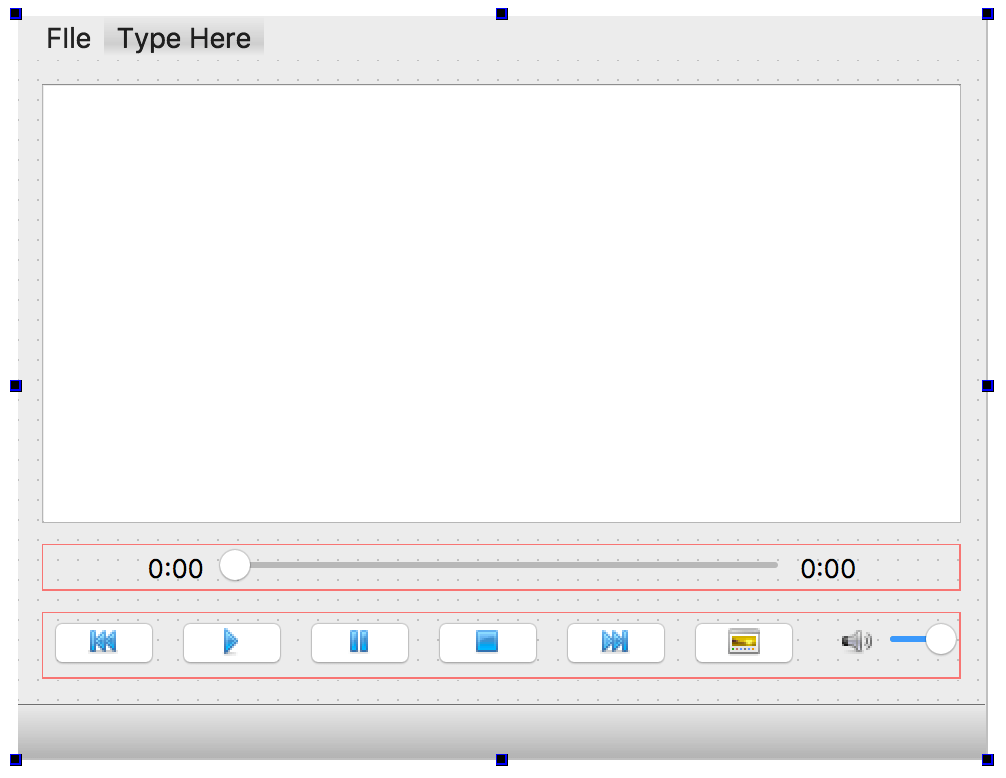
The main window UI was built using Qt Designer. The screenshot below shows the constructed layout, with the default colour scheme as visible within Designer.
 Mediaplayer Design in Qt Designer
The layout is constructed in a QVBoxLayout which in turn contains the playlist view (QListView) and two QHBoxLayout horizontal layouts which contain the time slider and time indicators and the control buttons respectively.
Player
First we need to setup the Qt media player controller QMediaPlayer. This controller handles load and playback of media files automatically, we just need to provide it with the appropriate signals.
We create a persistent player which we'll use globally. We setup an error handler by connecting our custom erroralert slot to the error signal.
    class MainWindow(QMainWindow, Ui_MainWindow):
        def __init__(self, *args, **kwargs):
            super().__init__(*args, **kwargs)
            self.setupUi(self)

            self.player = QMediaPlayer()
            self.player.error.connect(self.erroralert)
The generic media player controls can all be connected to the player directly, using the appropriate slots on self.player.
Purchasing Power Parity
Developers in [[ country ]] get [[ discount.discount_pc ]]% OFF on all books & courses with code [[ discount.coupon_code ]] # Connect control buttons/slides for media player.
self.playButton.pressed.connect(self.player.play)
self.pauseButton.pressed.connect(self.player.pause)
self.stopButton.pressed.connect(self.player.stop)
We also have two slots for volume control and time slider position. Updating either of these will alter the playback automatically, without any handling on by us.
            self.volumeSlider.valueChanged.connect(self.player.setVolume)
            self.timeSlider.valueChanged.connect(self.player.setPosition)
Finally we connect up our timer display methods to the player position signals, allowing us to automatically update the display as the play position changes.
            self.player.durationChanged.connect(self.update_duration)
            self.player.positionChanged.connect(self.update_position)
When you drag the slider, this sends a signal to update the play position, which in turn sends a signal to update the time display. Chaining operations off each other allows you to keep your app components independent, one of the great things about signals.
Qt Multimedia also provides a simple playlist controller. This does not provide the widget itself, just a simple interface for queuing up tracks (we handle the display using our own QListView).
Playlist
Helpfully, the playlist can be passed to the player, which wil then use it to automatically select the track to play once the current one is complete.
            self.playlist = QMediaPlaylist()
            self.player.setPlaylist(self.playlist)
The previous and next control buttons are connected to the playlist and will perform skip/restart/back as expected (all handled by QMediaPlaylist). Because the playlist is connected to the player, this will automatically trigger the player to play the appropriate track.
            self.previousButton.pressed.connect(self.playlist.previous)
            self.nextButton.pressed.connect(self.playlist.next)
The display of the playlist is handled by a QListView object. This is a view component from Qt's model/view architecture, which is used to efficiently display data held in data models. In our case, we are storing the data in a playlist object QMediaPlaylist from the Qt Multimedia module.
The PlaylistModel is our custom model for taking data from the QMediaPlaylist and mapping
it to the view. We instantiate the model and pass it into our view.
            self.model = PlaylistModel(self.playlist)
            self.playlistView.setModel(self.model)
            self.playlist.currentIndexChanged.connect(self.playlist_position_changed)
            selection_model = self.playlistView.selectionModel()
            selection_model.selectionChanged.connect(self.playlist_selection_changed)
Opening and dropping
We have a single file operation — open a file — which adds the file to the playlist. We also accept drag and drop, which is covered later.
            self.open_file_action.triggered.connect(self.open_file)
            self.setAcceptDrops(True)
Video
Finally, we add the viewer for video playback. If we don't add this the player will still play
videos, but just play the audio component. Video playback is handled by a specific QVideoWidget. To enable playback we just pass this widget to the players .setVideoOutput method.
            self.viewer = ViewerWindow(self)
            self.viewer.setWindowFlags(self.viewer.windowFlags() | Qt.WindowStaysOnTopHint)
            self.viewer.setMinimumSize(QSize(480,360))

            videoWidget = QVideoWidget()
            self.viewer.setCentralWidget(videoWidget)
            self.player.setVideoOutput(videoWidget)
Finally we just enable the toggles for the viewer to show/hide on demand.
            self.viewButton.toggled.connect(self.toggle_viewer)
            self.viewer.state.connect(self.viewButton.setChecked)
Playlist model
As mentioned we're using a QListView object from Qt's model/view architecture for playlist display, with data held in the QMediaPlaylist. Since the data store is already handled for us, all we need to handle is the mapping from the playlist to the view.
In this case the requirements are pretty basic — we need:
- a method
rowCountto return the total number of rows in the playlist, via.mediaCount() - a method
datawhich returns data for a specific row, in this case we're only displaying the filename
You could extend this to access media file metadata and show the track name instead.
class PlaylistModel(QAbstractListModel):
    def __init__(self, playlist, *args, **kwargs):
        super().__init__(*args, **kwargs)
        self.playlist = playlist

    def data(self, index, role):
        if role == Qt.DisplayRole:
            media = self.playlist.media(index.row())
            return media.canonicalUrl().fileName()

    def rowCount(self, index):
        return self.playlist.mediaCount()
By storing a reference to the playlist in __init__ the can get the other data easily at any time. Changes to the playlist in the application will be automatically reflected in the view.
The playlist and the player can handle track changes automatically, and we have the controls for skipping. However, we also want users to be able to select a track to play in the playlist, and we want the selection in the playlist view to update automatically as the tracks progress.
For both of these we need to define our own custom handlers. The first is for updating the playlist position in response to playlist selection by the user —
        def playlist_selection_changed(self, ix):
            # We receive a QItemSelection from selectionChanged.
            i = ix.indexes()[0].row()
            self.playlist.setCurrentIndex(i)
The next is to update the selection in the playlist as the track progresses. We specifically check for -1 since this value is sent by the playlist when there are not more tracks to play — either we're at the end of the playlist, or the playlist is empty.
PyQt/PySide 1:1 Coaching with Martin Fitzpatrick — Get one on one help with your Python GUI projects. Working together with you I'll identify issues and suggest fixes, from bugs and usability to architecture and maintainability.
        def playlist_position_changed(self, i):
            if i > -1:
                ix = self.model.index(i)
                self.playlistView.setCurrentIndex(ix)
Drag, drop and file operations
We enabled drag and drop on the main window by setting self.setAcceptDrops(True). With this enabled, the main window will raise the dragEnterEvent and dropEvent events when we perform drag-drop operations.
This enter/drop duo is the standard approach to drag-drop in desktop UIs. The enter event recognises what is being dropped and either *accepts* or *rejects*. Only if accepted can a drop occur.
The dragEnterEvent checks whether the dragged object is droppable on our application. In this implementation we're very lax — we only check that the drop is file (by path). By default QMimeData has checks built in for html, image, text and path/URL types, but not audio or video. If we want these we would have to implement them ourselves.
We could add a check here for specific file extension based on what we support.
        def dragEnterEvent(self, e):
            if e.mimeData().hasUrls():
                e.acceptProposedAction()
The dropEvent iterates over the URLs in the provided data, and adds them to the playlist.
If we're not playing, dropping the file triggers autoplay from the newly added file.
        def dropEvent(self, e):
            for url in e.mimeData().urls():
                self.playlist.addMedia(
                    QMediaContent(url)
                )

            self.model.layoutChanged.emit()

            # If not playing, seeking to first of newly added + play.
            if self.player.state() != QMediaPlayer.PlayingState:
                i = self.playlist.mediaCount() - len(e.mimeData().urls())
                self.playlist.setCurrentIndex(i)
                self.player.play()
The single operation defined is to open a file, which adds it to the current playlist. We predefine a number of standard audio and video file types — you can easily add more, as long as they are supported by the QMediaPlayer controller, they will work fine.
        def open_file(self):
            path, _ = QFileDialog.getOpenFileName(self, "Open file", "", "mp3 Audio (*.mp3);;mp4 Video (*.mp4);;Movie files (*.mov);;All files (*.*)")

            if path:
                self.playlist.addMedia(
                    QMediaContent(
                        QUrl.fromLocalFile(path)
                    )
                )

            self.model.layoutChanged.emit()
Position duration
The QMediaPlayer controller emits signals when the current playback duration and position are updated. The former is changed when the current media being played changes, e.g. when we progress to the next track. The second is emitted repeatedly as the play position updates during playback.
Both receive an int64 (64 bit integer) which represents the time in milliseconds. This same scale is used by all signals so there is no conversion between them, and we can simply pass the value to our slider to update.
        def update_duration(self, duration):
            self.timeSlider.setMaximum(duration)

            if duration >= 0:
                self.totalTimeLabel.setText(hhmmss(duration))
One slightly tricky thing occurs where we update the slider position. We want to update the slider as the track progresses, however updating the slider triggers the update of the position (so the user can drag to a position in the track). This can trigger weird behaviour and a possible endless loop.
To work around it we just block the signals while we make the update, and re-enable the after.
        def update_position(self, position):
            if position >= 0:
                self.currentTimeLabel.setText(hhmmss(position))

            # Disable the events to prevent updating triggering a setPosition event (can cause stuttering).
            self.timeSlider.blockSignals(True)
            self.timeSlider.setValue(position)
            self.timeSlider.blockSignals(False)
Timer
Finally, we need a method to convert a time in milliseconds in to an h:m:s or m:s display. For this we can use a series of divmod calls with the milliseconds for each time division. This returns the number of complete divisions (div) and the remainder (mod). The slight tweak is to only show the hour part when the time is longer than an hour.
    def hhmmss(ms):
        # s = 1000
        # m = 60000
        # h = 3600000
        s = round(ms / 1000)
        m, s = divmod(s, 60)
        h, m = divmod(m, 60)
        return ("%d:%02d:%02d" % (h,m,s)) if h else ("%d:%02d" % (m,s))
If you try this on Windows you may notice that the duration reported is incorrect. This is because of an issue with the legacy DirectShow media driver on Windows, which is unfortunately enabled by default. If you switch to windowsmediafoundation instead you get accurate duration reporting and better media file support. Usually an easy choice. To enable it, just add the following to your application, somewhere before you create the QApplication instance. os.environ['QT_MULTIMEDIA_PREFERRED_PLUGINS'] = 'windowsmediafoundation' You'll need to import os first. For more information, see the Qt documentation on Windows multimedia.
Video viewer
The video viewer is a simple QMainWindow with the addition of a toggle handler to show/display the window. We also add a hook into the closeEvent to update the toggle button, while overriding the default behaviour — closing the window will not actually close it, just hide it.
    class ViewerWindow(QMainWindow):
        state = pyqtSignal(bool)

        def closeEvent(self, e):
            # Emit the window state, to update the viewer toggle button.
            self.state.emit(False)

        def toggle_viewer(self, state):
            if state:
                self.viewer.show()
            else:
                self.viewer.hide()
Styling the windows
To mimic the style of Winamp (badly) we're using the Fusion application style as a base, then applying a dark theme. The Fusion style is nice Qt cross-platform application style. The dark theme has been borrowed from this Gist from user QuantumCD.
        app.setStyle("Fusion")

        palette = QPalette() # Get a copy of the standard palette.
        palette.setColor(QPalette.Window, QColor(53, 53, 53))
        palette.setColor(QPalette.WindowText, Qt.white)
        palette.setColor(QPalette.Base, QColor(25, 25, 25))
        palette.setColor(QPalette.AlternateBase, QColor(53, 53, 53))
        palette.setColor(QPalette.ToolTipBase, Qt.white)
        palette.setColor(QPalette.ToolTipText, Qt.white)
        palette.setColor(QPalette.Text, Qt.white)
        palette.setColor(QPalette.Button, QColor(53, 53, 53))
        palette.setColor(QPalette.ButtonText, Qt.white)
        palette.setColor(QPalette.BrightText, Qt.red)
        palette.setColor(QPalette.Link, QColor(42, 130, 218))
        palette.setColor(QPalette.Highlight, QColor(42, 130, 218))
        palette.setColor(QPalette.HighlightedText, Qt.black)
        app.setPalette(palette)

        # Additional CSS styling for tooltip elements.
        app.setStyleSheet("QToolTip { color: #ffffff; background-color: #2a82da; border: 1px solid white; }")
This covers all the elements used in this Failamp. If you want to use this is another app you may need to add additional CSS tweaks, like that added for QToolTip.
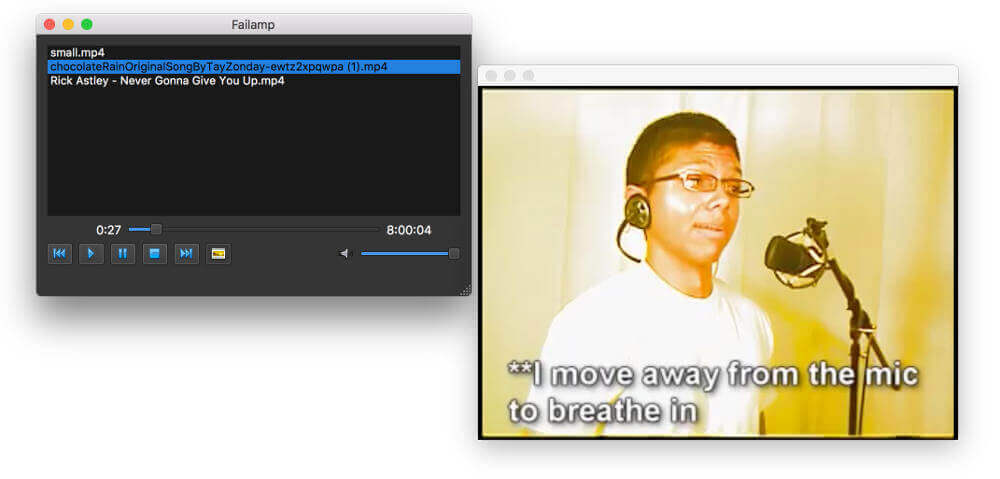
This gives us the final result —
 mediaplayer-demo.jpg
Suggestions for improvements
If you want to take the app further, here are some suggestions of things to do.
Packaging Python Applications with PyInstaller by Martin Fitzpatrick — This step-by-step guide walks you through packaging your own Python applications from simple examples to complete installers and signed executables.
- Auto-displaying the video viewer when viewing video (and auto-hiding when not)
- Docking of windows so they can be snapped together — like the original Winamp.
- Graphic equalizer/display —
QMediaPlayerdoes provide a stream of the audio data which is playing. Withnumpyfor FFT we should be able to create a nice nice visual.

