Calculators are one of the simplest desktop applications, found by default on every window system. Over time these have been extended to support scientific and programmer modes, but fundamentally they all work the same.
In this project we implement a basic working desktop calculator using PyQt. This implementation uses a stack for holding inputs, operator and state. Basic memory operations are also implemented.
The User Interface
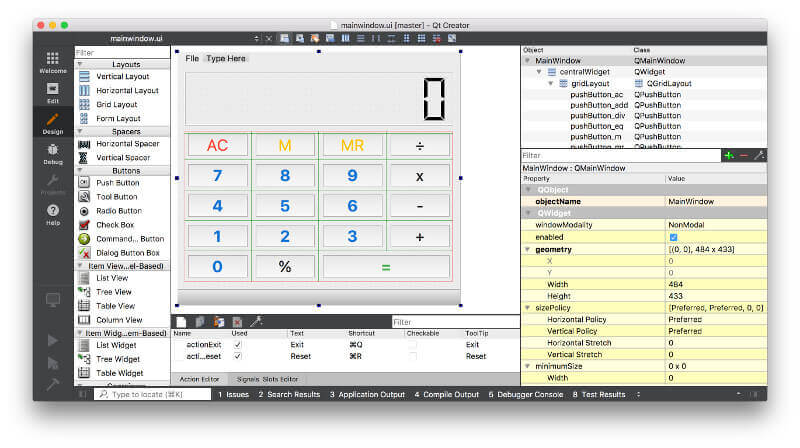
The user interface for Calculon was created in Qt Designer. The layout of the mainwindow uses a QVBoxLayout with the LCD display added to the top, and a QGridLayout to the bottom.
We use the grid layout is used to position all the buttons for the calculator. Each button takes a single space on the grid, except for the equals sign which is set to span two squares.
 Defining the layout for the calculator in Qt Designer.
Each button is defined with a keyboard shortcut which triggers a .pressed signal — e.g. 3 for the 3 key. The actions for each button are defined in code and connected to this signal. By making this small addition it's possible to use the calculator with a numeric pad.
If you want to edit the design in Qt Designer, remember to regenerate the MainWindow.py file using pyuic5 mainwindow.ui -o MainWindow.py.
PyQt/PySide 1:1 Coaching with Martin Fitzpatrick — Get one on one help with your Python GUI projects. Working together with you I'll identify issues and suggest fixes, from bugs and usability to architecture and maintainability.
Actions
To make the buttons do something we need to connect them up to specific handlers. The connections defined are shown first below, and then the handlers covered in detail.
First we connect all the numeric buttons to the same handler. In *__Qt Designer*__ we named all the buttons using a standard format, as `pushButton_nX` where `X` is the number. This makes it simple to iterate over each one and connect it up.
We use [a function wrapper on the signal](/article/qt-transmit-extra-data-with-signals) to send additional data with each trigger — in this case the number which was pressed.
for n in range(0, 10):
    getattr(self, 'pushButton_n%s' % n).pressed.connect(lambda v=n: self.input_number(v))
The next block of signals to connect are for standard calculator operations, including add, multiply, subtraction and divide. Again these are hooked up to the same slot, and consist of a wrapped signal to transmit the operation (a specific Python operator type).
self.pushButton_add.pressed.connect(lambda: self.operation(operator.add))
self.pushButton_sub.pressed.connect(lambda: self.operation(operator.sub))
self.pushButton_mul.pressed.connect(lambda: self.operation(operator.mul))
self.pushButton_div.pressed.connect(lambda: self.operation(operator.truediv))  # operator.div for Python2.7
In addition to the numbers and operators, we have a number of custom behaviours to wire up — percentage (to convert the previously typed number to a percentage amount), equals, reset and memory actions.
self.pushButton_pc.pressed.connect(self.operation_pc)
self.pushButton_eq.pressed.connect(self.equals)

self.pushButton_ac.pressed.connect(self.reset)

self.pushButton_m.pressed.connect(self.memory_store)
self.pushButton_mr.pressed.connect(self.memory_recall)
Now the buttons and actions are wired up, we can implement the logic in the slot methods for handling these events.
Operations
Calculator operations are handled using three components — the stack, the state and the current operation.
The stack
The stack is a short memory store of maximum 2 elements, which holds the numeric values with which we're currently calculating. When the user starts entering a new number it is added to the end of the stack (which, if the stack is empty, is also the beginning). Each numeric press multiplies the current stack end value by 10, and adds the value pressed.
:::python
def input_number(self, v):
    if self.state == READY:
        self.state = INPUT
        self.stack[-1] = v
    else:
        self.stack[-1] = self.stack[-1] * 10 + v

    self.display()
This has the effect of numbers filling from the right as expected, e.g.
| Value pressed | Calculation | Stack |
|---|---|---|
| 0 | ||
| 2 | 0 * 10 + 2 | 2 |
| 3 | 2 * 10 + 3 | 23 |
| 5 | 23 * 10 + 5 | 235 |
The state
A state flag, to toggle between ready and input states. This affects the behaviour while entering numbers. In ready mode, the value entered is set direct onto the stack at the current position. In input mode the above shift+add logic is used.
This is required so it is possible to type over a result of a calculation, rather than have new numbers added to the result of the previous calculation.
:::python
def input_number(self, v):
    if self.state == READY:
        self.state = INPUT
        self.stack[-1] = v
    else:
        self.stack[-1] = self.stack[-1] * 10 + v

    self.display()
You'll see switches between READY and INPUT states elsewhere in the code.
Create GUI Applications with Python & Qt5 by Martin Fitzpatrick — (PyQt5 Edition) The hands-on guide to making apps with Python — Over 10,000 copies sold!
The current_op
The current_op variable stores the currently active operation, which will be applied when the user presses equals. If an operation is already in progress, we first calculate the result of that operation, pushing the result onto the stack, and then apply the new one.
Starting a new operation also pushes 0 onto the stack, making it now length 2, and switches to INPUT mode. This ensures any subsequent number input will start from zero.
:::python
def operation(self, op):
    if self.current_op:  # Complete the current operation
        self.equals()

    self.stack.append(0)
    self.state = INPUT
    self.current_op = op
The operation handler for percentage calculation works a little differently. This instead operates directly on the current contents of the stack. Triggering the operation_pc takes the last value in the stack and divides it by 100.
:::python
def operation_pc(self):
    self.state = INPUT
    self.stack[-1] *= 0.01
    self.display()
Equals & Memory operations
The core of the calculator is the handler which actually does the maths. All operations (with the exception of percentage) are handled by the equals handler, which is triggered either by pressing the equals key, Enter or another operation key while an op is in progress.
Equals
The equals handler takes the current_op and applies it to the values in the stack (2 values, unpacked using *self.stack) to get the result. The result is put back in the stack as a single value, and we return to a READY state.
Errors (exceptions, e.g. for division by zero) are caught and an error message is displayed if necessary.
:::python
def equals(self):
    # Support to allow '=' to repeat previous operation
    # if no further input has been added.
    if self.state == READY and self.last_operation:
        s, self.current_op = self.last_operation
        self.stack.append(s)

    if self.current_op:
        self.last_operation = self.stack[-1], self.current_op

        try:
            self.stack = [self.current_op(*self.stack)]
        except Exception:
            self.lcdNumber.display('Err')
            self.stack = [0]
        else:
            self.current_op = None
            self.state = READY
            self.display()
Support has also been added for repeating previous operations by pressing the equals key again. This is done by storing the value and operator when equals is triggered, and re-using them if equals is pressed again without leaving READY mode (no user input).
Memory
Finally, we can define the handlers for the memory actions. For Calculon we've defined only two memory actions — store and recall. Store takes the current value from the LCD display, and copies it to self.memory. Recall takes the value in self.memory and puts in the final place on our stack.
def memory_store(self):
    self.memory = self.lcdNumber.value()

def memory_recall(self):
    self.state = INPUT
    self.stack[-1] = self.memory
    self.display()
By setting the mode to INPUT and updating the display this behaves exactly the same as for entering a number by hand.
Challenges
The current implementation of Calculon only supports basic math operations. Most GUI desktop calculators also include support for scientific (and sometimes programmer) modes, which add a number or alternative functions.
In Calculon you could define these additional operations as a set of lambdas, which each accept the two parameters to operate on.
Switching modes (e.g. between normal and scientific) on the calculator will be tricky with the current QMainWindow-based layout. You could rework the calculator layout in QtDesigner to use a QWidget base. Each view is just a widget, and switching modes can be performed by swapping out the central widget on your running main window.

