Translation tools have existed for many years and are incredibly useful if you're learning a new language or wanting to read foreign websites. One of the most popular tools is Google Translate , but there is now another alternative: using OpenAI's ChatGPT tool to translate text.
In this tutorial, we'll build a desktop translator application using Python and Tkinter to translate natural language using ChatGPT APIs. Tkinter is part of the Python standard library, making it a great choice for building cross-platform GUI applications without additional dependencies.
 Example translation of text via OpenAI
- Prerequisites
- Installing the Required Packages
- Building the Tkinter Main Window
- Creating the GUI for the Translator App
- Getting a List of Languages for Translation
- Building the Text Input and Output UI
- Getting an OpenAI API Key
- Implementing the Translation Functionality with OpenAI
- Complete Source Code
- Conclusion
Prerequisites
To follow along with this tutorial, you should have a basic understanding of Python programming and familiarity with creating simple GUIs. You'll also need a free OpenAI account to access the ChatGPT API.
Installing the Required Packages
Our Translator uses the openai library to perform the actual translation via OpenAI's ChatGPT tool. Tkinter is already available in the Python standard library.
The first task will be to set up a Python virtual environment. Open the terminal, and run the following commands:
- Windows
- macOS/Linux
> mkdir translator
> cd translator
> python -m venv venv
> .\venv\Scripts\activate

> python -m pip install openai
$ mkdir translator
$ cd translator/
$ python -m venv venv
$ source venv/bin/activate

(venv) $ python -m pip install openai
Working through these instructions, first we create a root directory for the Translator app. Next we create and activate a Python virtual environment for the project. Finally, we install the openai package.
Next, create a file named translator.py in the root of your project. Also add a folder called images/ where you'll store the icons for the application. The folder structure should look like this:
translator/
│
├── images/
│   ├── arrow.png
│   └── logo.png
│
└── translator.py
The images for this project can be downloaded here.
The images/ folder contains the two icons that you'll use for the application. The translator.py is the app's source file.
Create GUI Applications with Python & Qt5 by Martin Fitzpatrick — (PySide2 Edition) The hands-on guide to making apps with Python — Save time and build better with this book. Over 15K copies sold.
Building the Tkinter Main Window
Open the translator.py file with your favorite Python code editor. We'll start by creating our main window:
import tkinter as tk


class TranslatorApp(tk.Tk):
    def __init__(self):
        super().__init__()
        self.title("Language Translator")
        self.resizable(width=False, height=False)

if __name__ == "__main__":
    app = TranslatorApp()
    app.mainloop()
This code imports Tkinter and then defines the application's main class, which we have called TranslatorApp. This class will hold the application's main window and allow us to run the main loop.
Importing tkinter under the alias tk is a common convention in Tkinter code.
Inside the class we define the __init__() method, which handles initialization of the class. In this method, we first call the initializer __init__() of the parent class, tk.Tk, to initialize the app's window. Then, we set the window's title using the title() method. To make the window unresizable, we use the resizable() method with width and height set to False.
At the bottom of the code, we have the if __name__ == "__main__" idiom to check whether the file is being run directly as an executable program. Inside the condition block we first create an instance of TranslatorApp and then run the application's main loop or event loop.
If you run this code, you'll get an empty Tkinter window on your desktop:
$ python translator.py
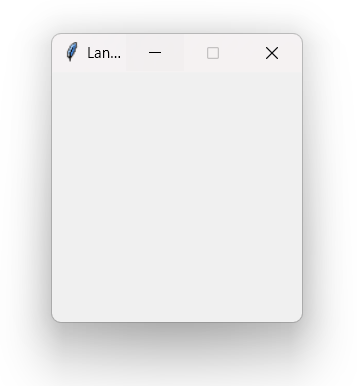 The empty Tkinter window
Creating the GUI for the Translator App
Now that the main window is set up, let's start adding widgets to build the GUI. To do this, we'll create a method called setup_ui(), as shown below:
import tkinter as tk


class TranslatorApp(tk.Tk):
    def __init__(self):
        super().__init__()
        self.title("Language Translator")
        self.resizable(width=False, height=False)
        self.setup_ui()

    def setup_ui(self):
        frame = tk.Frame(self)
        frame.pack(padx=10, pady=10)


if __name__ == "__main__":
    app = TranslatorApp()
    app.mainloop()
The setup_ui() method will define the application's GUI. In this method, we first create a frame widget using the tk.Frame class whose master argument is set to self (the application's main window). Next, we position the frame inside the main window using the pack() geometry manager, using padx and pady arguments to set some padding around the frame.
Finally, we add the call to self.setup_ui() to the __init__() method.
We'll continue to develop the UI by adding code to the setup_ui() method.
Adding a Logo to the Application
Next, we'll add the app's logo. In the setup_ui() method add the following code below the frame definition:
import tkinter as tk


class TranslatorApp(tk.Tk):
    def __init__(self):
        super().__init__()
        self.title("Language Translator")
        self.resizable(width=False, height=False)
        self.setup_ui()

    def setup_ui(self):
        frame = tk.Frame(self)
        frame.pack(padx=10, pady=10)

        self.logo = tk.PhotoImage(file="images/logo.png")
        tk.Label(frame, image=self.logo).grid(row=0, column=0, sticky="w")


if __name__ == "__main__":
    app = TranslatorApp()
    app.mainloop()
This code loads the logo using the tk.PhotoImage class. To resize it, we use the subsample() method. Then, we add the logo to the frame using a tk.Label widget. The label takes the frame and the logo as arguments. Finally, to position the logo, we use the grid() geometry manager with appropriate values for the row, column, and sticky arguments.
The sticky argument determines which side of a cell the widget should align -- North (top), South (bottom), East (right) or West (left). Here we're aligning it on the West or left of the cell with "w":
![]() Tkinter window with the OpenAI logo in it
Tkinter window with the OpenAI logo in it
Getting a List of Languages for Translation
We need a list of languages to show in the dropdown. There are various lists available online. But since we're using OpenAI for the translations, why not use it to give us the list of languages too. Since this is just for testing purposes, let's grab the top 20 human languages (by first and second language speakers).
We can prompt ChatGPT with something like:
Give me a list of the top 20 human languages with the most first and second language speakers in Python list format
..and it will return the following list:
languages = [
    "English",
    "Mandarin Chinese",
    "Hindi",
    "Spanish",
    "French",
    "Standard Arabic",
    "Bengali",
    "Russian",
    "Portuguese",
    "Urdu"
]
I'm going to add Dutch to the list, because it's my second language. Feel free to add your own languages to the list.
Adding the Language Selection Interface
Let's start adding some inputs to the UI. First we'll create the language selection drop down boxes using Tkinter's ttk.Combobox widget:
import tkinter as tk
import tkinter.ttk as ttk

LANGUAGES = [
    "English",
    "Mandarin Chinese",
    "Hindi",
    "Spanish",
    "French",
    "Standard Arabic",
    "Bengali",
    "Russian",
    "Portuguese",
    "Urdu",
    "Dutch", # Gekoloniseerd.
]


DEFAULT_SOURCE = "English"
DEFAULT_DEST = "Dutch"


class TranslatorApp(tk.Tk):
    def __init__(self):
        super().__init__()
        self.title("Language Translator")
        self.resizable(width=False, height=False)
        self.setup_ui()

    def setup_ui(self):
        frame = tk.Frame(self)
        frame.pack(padx=10, pady=10)

        self.logo = tk.PhotoImage(file="images/logo.png")
        tk.Label(frame, image=self.logo).grid(row=0, column=0, sticky="w")

        # Source language combobox
        self.from_language = ttk.Combobox(frame, values=LANGUAGES)
        self.from_language.current(LANGUAGES.index(DEFAULT_SOURCE))
        self.from_language.grid(row=1, column=0, sticky="we")

        # Arrow icon
        self.arrows = tk.PhotoImage(file="images/arrow.png").subsample(15, 15)
        tk.Label(frame, image=self.arrows).grid(row=1, column=1)

        # Destination language combobox
        self.to_language = ttk.Combobox(frame, values=LANGUAGES)
        self.to_language.current(LANGUAGES.index(DEFAULT_DEST))
        self.to_language.grid(row=1, column=2, sticky="we")


if __name__ == "__main__":
    app = TranslatorApp()
    app.mainloop()
We have added our language list as the constant LANGUAGES. We also define the default languages for when the application starts up, using constants DEFAULT_SOURCE and DEFAULT_DEST.
Next, we create two combo boxes to hold the list of source and destination languages. The combo boxes are created using the ttk.Combobox class. One to the left and another to the right. Between the combo boxes, we've also added an arrow icon loaded using the tk.PhotoImage class. Again, we've added the icon to the app's window using ttk.Label.
Both combo boxes take frame and values as arguments. The values argument populates the combo boxes with languages. To specify the default language, we use the current() method, looking up the position of our default languages in the languages list with .index().
To position the combo boxes inside the frame, we use the grid() geometry manager with the appropriate arguments. Run the application, and you will see the following window:
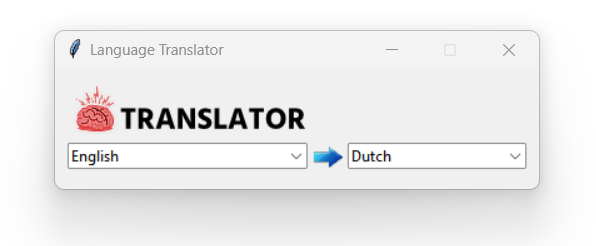 Source and destination languages
With the source and destination combo boxes in place, let's add three more widgets: two scrollable text widgets and a button. The scrollable text on the left will hold the source text, while the scrollable text on the right will hold the translated text. The button will allow us to run the actual translation.
Building the Text Input and Output UI
Get back to the code editor and update the setup_ui() method as follows. Note that we also need to import the ScrolledText class:
import tkinter as tk
import tkinter.ttk as ttk
from tkinter.scrolledtext import ScrolledText

LANGUAGES = [
    "English",
    "Mandarin Chinese",
    "Hindi",
    "Spanish",
    "French",
    "Standard Arabic",
    "Bengali",
    "Russian",
    "Portuguese",
    "Urdu",
    "Dutch",
]


DEFAULT_SOURCE = "English"
DEFAULT_DEST = "Dutch"


class TranslatorApp(tk.Tk):
    def __init__(self):
        super().__init__()
        self.title("Language Translator")
        self.resizable(width=False, height=False)
        self.setup_ui()

    def setup_ui(self):
        frame = tk.Frame(self)
        frame.pack(padx=10, pady=10)

        self.logo = tk.PhotoImage(file="images/logo.png").subsample(5, 5)
        tk.Label(frame, image=self.logo).grid(row=0, column=0, sticky="w")

        # Source language combobox
        languages = [lang.title() for lang in LANGUAGES.values()]
        self.from_language = ttk.Combobox(frame, values=languages)
        self.from_language.current(languages.index(DEFAULT_SOURCE))
        self.from_language.grid(row=1, column=0, sticky="we")

        # Arrow icon
        self.arrows = tk.PhotoImage(file="images/arrow.png").subsample(15, 15)
        tk.Label(frame, image=self.arrows).grid(row=1, column=1)

        # Destination language combobox
        self.to_language = ttk.Combobox(frame, values=languages)
        self.to_language.current(languages.index(DEFAULT_DEST))
        self.to_language.grid(row=1, column=2, sticky="we")

        # Source text
        self.from_text = ScrolledText(
            frame,
            font=("Dotum", 16),
            width=50,
            height=20,
        )
        self.from_text.grid(row=2, column=0)

        # Translated text
        self.to_text = ScrolledText(
            frame,
            font=("Dotum", 16),
            width=50,
            height=20,
            state="disabled",
        )
        self.to_text.grid(row=2, column=2)

        # Translate button
        self.translate_button = ttk.Button(
            frame,
            text="Translate",
            command=self.translate,
        )
        self.translate_button.grid(row=3, column=0, columnspan=3, pady=10)

    def translate(self):
        pass


if __name__ == "__main__":
    app = TranslatorApp()
    app.mainloop()
In the code snippet, we use the ScrolledText class to create the two scrolled text areas. Both text areas take frame, font, width, and height as arguments. The second text area also takes state as an additional argument. Setting state to "disabled" allows us to create a read-only text area.
Then, we use the ttk.Button class to create a button with frame, text, and command as arguments. The command argument allows us to bind the button's click event to the self.translate() method, which we will define in a moment. For now, we've added a placeholder.
To position all these widgets on the app's window, we use the grid() geometry manager. Now, the app will look something like the following:
 Translator app's GUI
Our translation app's GUI is ready! Finally, we can start adding functionality to the application.
Getting an OpenAI API Key
You can use OpenAI's APIs for free, with some limitations. To get an OpenAI API key you will need to create an account. Once you have created an account go ahead and get an API key.
Click "Create new secret key" in the top right hand corner to create a key. Give the key a name (it doesn't matter what you use) and then click "Create secret key". Copy the resulting key and keep it safe. You'll need it in the next step.
Implementing the Translation Functionality with OpenAI
Now we'll implement the core language translation functionality in the translate() method. This gets the current text from the UI and then uses openai to perform the translation. We need a few more imports, and to create the OpenAI client instance at the top of the application:
import tkinter as tk
import tkinter.ttk as ttk
from tkinter.messagebox import showerror
from tkinter.scrolledtext import ScrolledText

import httpcore
from openai import OpenAI

client = OpenAI(
    api_key="<YOUR API KEY HERE>"
)
Here we've imported the showerror helper for displaying error boxes in our application. We've imported httpcore which we'll use to handle HTTP errors when accessing the API. Finally, we've added an import for the OpenAI class from openai. This is what handles the actual translation.
To use it, we create an instance of the class as OpenAI. Replace <YOUR API KEY HERE> with the API key you generated on OpenAI just now.
We'll continue by implementing the translate() method. Below we're just showing the function itself:
class TranslatorApp(tk.Tk):
    # ...
    def translate(self):
        source_language = self.from_language.get()
        destination_language = self.to_language.get()
        text = self.from_text.get(1.0, tk.END).strip()

        try:
            completion = client.chat.completions.create(
                messages=[
                    {"role": "system", "content": "You are a language interpreter."},
                    {
                        "role": "user",
                        "content": (
                            f"Translate the following text from {source_language} "
                            f"to {destination_language}, only reply with the text: "
                            f"{text}"
                        ),
                    },
                ],
                model="gpt-3.5-turbo",
            )
            reply = completion.choices[0].message.content
        except httpcore.ConnectError:
            showerror(
                title="Error",
                message="Make sure you have an internet connection",
            )
            return
        except Exception as e:
            showerror(
                title="Error",
                message=f"An unexpected error occurred: {e}",
            )
            return

        self.to_text.config(state="normal")
        self.to_text.delete(1.0, tk.END)
        self.to_text.insert(tk.END, reply)
        self.to_text.config(state="disabled")
The translate() method handles the entire translation process. It starts by retrieving the source and destination languages from the corresponding combo boxes, and the input text from the box on the left.
If any of these are not defined, we use a showerror dialog to inform the user of the problem.
Configuring the ChatGPT Prompt for Translation
Once we have the source and destination language and some text to translate, we can perform the actual translation through ChatGPT. First, we give the language model a hint about what we want it to do -- interpret language:
{"role": "system", "content": "You are a language interpreter."},
Next we build the message we want it to respond to. We ask it to translate the provided text from the source to destination language, and to respond with only the translated text. If we don't specify this, we'll get some additional description or context.
You might want to experiment with asking for the text and context separately, as that is often helpful when learning languages.
    {
        "role": "user",
        "content": (
            f"Translate the following text from {source_language} "
            f"to {destination_language}, only reply with the text: "
            f"{text}"
        ),
    },
Handling the API Response and Errors
The created completion is submitted to the API and we can retrieve the resulting text from the object:
reply = completion.choices[0].message.content
If the call to translate() finds a connection error, then we tell the user to check their internet connection. To handle any other exceptions, we catch the generic Exception class and display an error message with the exception details.
If the translation is successful, then we enable the destination scrolled area, display the translated text, and disable the area again so it remains read-only.
Complete Source Code
The complete final code for our Python translator application is shown below:
import tkinter as tk
import tkinter.ttk as ttk
from tkinter.messagebox import showerror
from tkinter.scrolledtext import ScrolledText

import httpcore
from openai import OpenAI

client = OpenAI(
    api_key="<YOUR API KEY HERE>"
)

LANGUAGES = [
    "English",
    "Mandarin Chinese",
    "Hindi",
    "Spanish",
    "French",
    "Standard Arabic",
    "Bengali",
    "Russian",
    "Portuguese",
    "Urdu",
    "Dutch",
]

DEFAULT_SOURCE = "English"
DEFAULT_DEST = "Dutch"


class TranslatorApp(tk.Tk):
    def __init__(self):
        super().__init__()
        self.title("Language Translator")
        self.resizable(width=False, height=False)
        self.setup_ui()

    def setup_ui(self):
        frame = tk.Frame(self)
        frame.pack(padx=10, pady=10)

        self.logo = tk.PhotoImage(file="images/logo.png")
        tk.Label(frame, image=self.logo).grid(row=0, column=0, sticky="w")

        # Source language combobox
        self.from_language = ttk.Combobox(frame, values=LANGUAGES)
        self.from_language.current(LANGUAGES.index(DEFAULT_SOURCE))
        self.from_language.grid(row=1, column=0, sticky="we")

        # Arrow icon
        self.arrows = tk.PhotoImage(file="images/arrow.png").subsample(15, 15)
        tk.Label(frame, image=self.arrows).grid(row=1, column=1)

        # Destination language combobox
        self.to_language = ttk.Combobox(frame, values=LANGUAGES)
        self.to_language.current(LANGUAGES.index(DEFAULT_DEST))
        self.to_language.grid(row=1, column=2, sticky="we")

        # Source text
        self.from_text = ScrolledText(
            frame,
            font=("Dotum", 16),
            width=50,
            height=20,
        )
        self.from_text.grid(row=2, column=0)

        # Translated text
        self.to_text = ScrolledText(
            frame,
            font=("Dotum", 16),
            width=50,
            height=20,
            state="disabled",
        )
        self.to_text.grid(row=2, column=2)

        # Translate button
        self.translate_button = ttk.Button(
            frame,
            text="Translate",
            command=self.translate,
        )
        self.translate_button.grid(row=3, column=0, columnspan=3, pady=10)

    def translate(self):
        source_language = self.from_language.get()
        destination_language = self.to_language.get()
        text = self.from_text.get(1.0, tk.END).strip()

        try:
            completion = client.chat.completions.create(
                messages=[
                    {"role": "system", "content": "You are a language interpreter."},
                    {
                        "role": "user",
                        "content": (
                            f"Translate the following text from {source_language} "
                            f"to {destination_language}, only reply with the text: "
                            f"{text}"
                        ),
                    },
                ],
                model="gpt-3.5-turbo",
            )
            reply = completion.choices[0].message.content
        except httpcore.ConnectError:
            showerror(
                title="Error",
                message="Make sure you have an internet connection",
            )
            return
        except Exception as e:
            showerror(
                title="Error",
                message=f"An unexpected error occurred: {e}",
            )
            return

        self.to_text.config(state="normal")
        self.to_text.delete(1.0, tk.END)
        self.to_text.insert(tk.END, reply)
        self.to_text.config(state="disabled")


if __name__ == "__main__":
    app = TranslatorApp()
    app.mainloop()
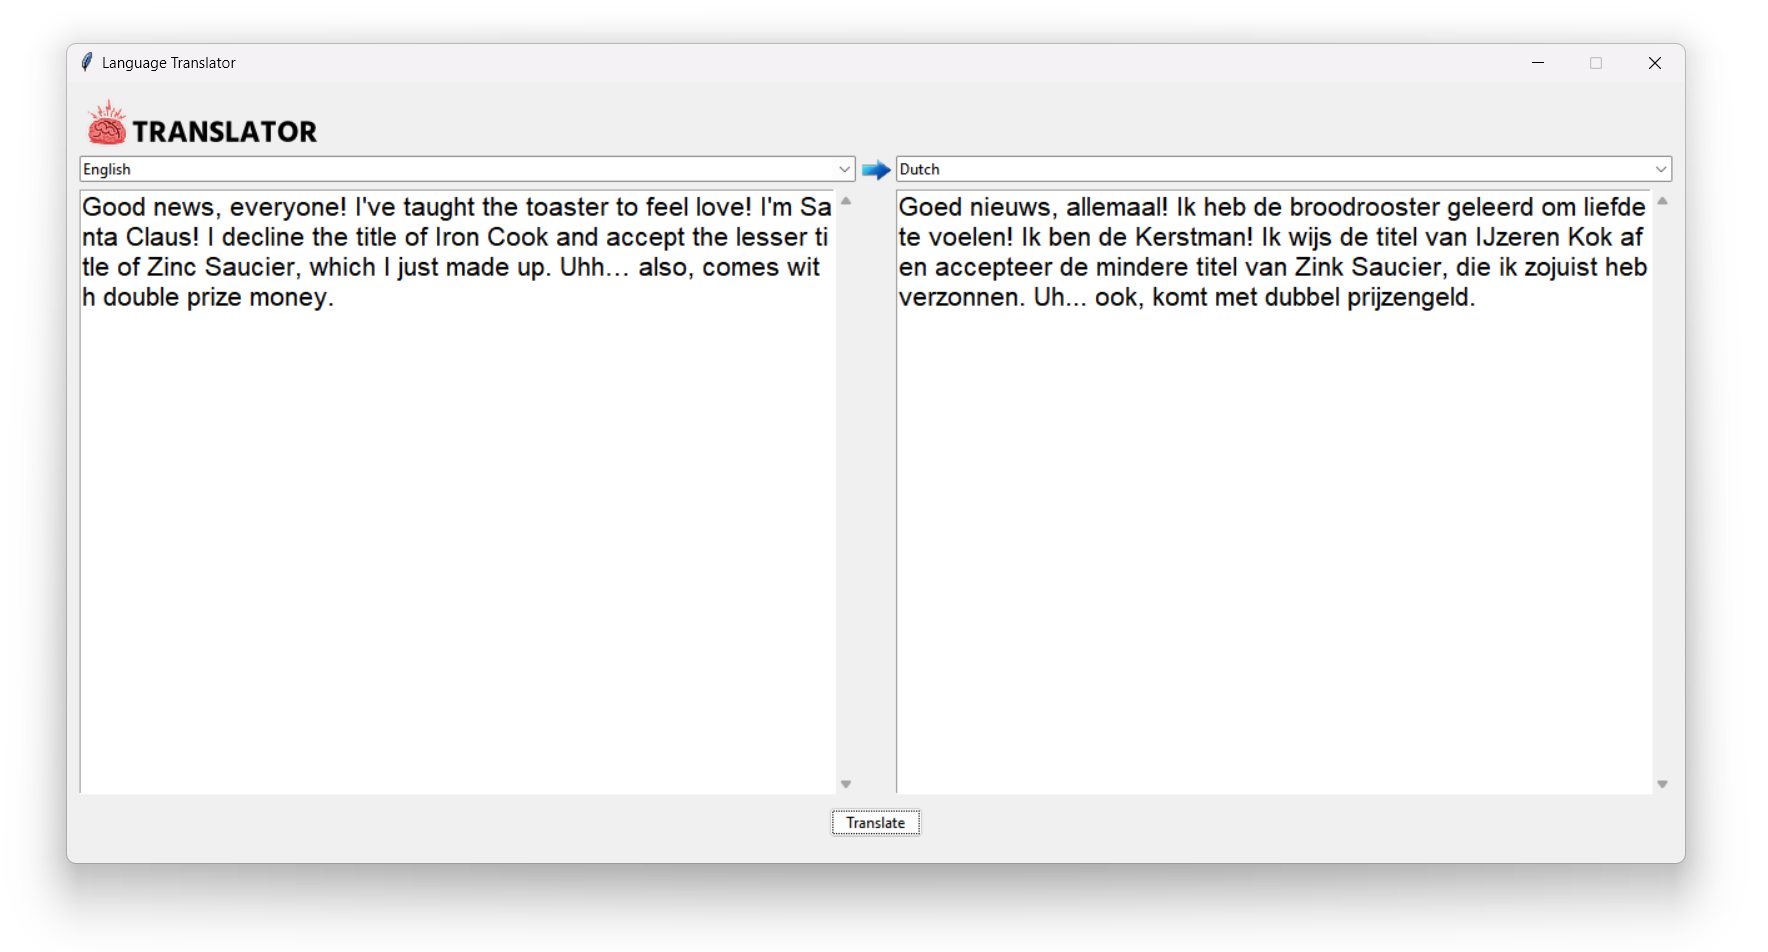
The finished app is shown below:
The completed Translator app
Conclusion
In this tutorial we built an AI-powered translator application using Python, the Tkinter GUI library, and OpenAI's ChatGPT API. We worked step by step through building the user interface using Tkinter's grid layout manager, adding language selection combo boxes, scrolled text areas for input and output, and then implemented the language translation functionality with the openai Python library.
This project demonstrates how straightforward it is to combine Python GUI programming with modern AI APIs to create practical desktop applications. You could extend this project by adding features like automatic language detection, translation history, or support for translating entire files. Try taking what you've learnt in this tutorial and applying it to your own projects!