Guasco | 2020-07-05 19:11:25 UTC | #1
Hi guys I'm finishing the graphical interface of my chat app in Qt + Python, the messages are printed in a QTextEdit and to embellish them I would like to add the speech bubble as telegram/whatsapp around, advice for doing it?
martin | 2020-07-06 12:20:18 UTC | #2
Hey @Guasco welcome to the forum.
It might be possible to do this in a QTextEdit but I wouldn't recommend it. You'll need to isolate messages as objects and lose any of the simplicity of working with the text block.
I think a better approach would be to use a QListView with each chat entry being a separate item -- that fits better with the model of text messages than a single block of text. You can then use a delegate to draw the text bubble around each one.
Have a look at the todo example in this tutorial. You can effectively use the same, just drop the todo status. For drawing you'll need to use a delegate to paint it. I can put together an example of that if you're not familiar with it?
Purchasing Power Parity
Developers in [[ country ]] get [[ discount.discount_pc ]]% OFF on all books & courses with code [[ discount.coupon_code ]]Guasco | 2020-07-06 14:06:50 UTC | #3
Yes thank you, you would be very helpful
martin | 2020-07-07 08:46:58 UTC | #5
Here you go. The following shows a QListView with a series of messages, each with a bubble. The bubbles resize to the size of the message.
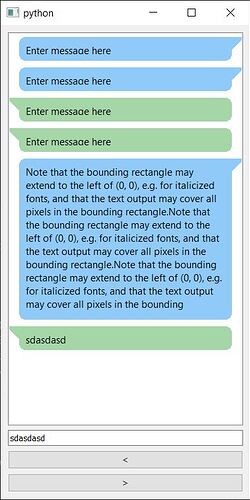
The basic UI has a text box and two arrows (just for demo purposes) which allows you to "send" and "receive" a message, drawing the appropriate bubble.
First the code (explanation follows) --
import sys

from PyQt5.QtCore import QAbstractListModel, QMargins, QPoint, QSize, Qt
from PyQt5.QtGui import QColor, QFontMetrics

# from PyQt5.QtGui import
from PyQt5.QtWidgets import (
    QApplication,
    QLineEdit,
    QListView,
    QMainWindow,
    QPushButton,
    QVBoxLayout,
    QWidget,
)

USER_ME = 0
USER_THEM = 1

BUBBLE_COLORS = {USER_ME: "#90caf9", USER_THEM: "#a5d6a7"}

BUBBLE_PADDING = QMargins(15, 5, 15, 5)
TEXT_PADDING = QMargins(25, 15, 25, 15)


class MessageDelegate(QStyledItemDelegate):
    """
    Draws each message.
    """

    def paint(self, painter, option, index):
        # Retrieve the user,message uple from our model.data method.
        user, text = index.model().data(index, Qt.DisplayRole)

        # option.rect contains our item dimensions. We need to pad it a bit
        # to give us space from the edge to draw our shape.

        bubblerect = option.rect.marginsRemoved(BUBBLE_PADDING)
        textrect = option.rect.marginsRemoved(TEXT_PADDING)

        # draw the bubble, changing color + arrow position depending on who
        # sent the message. the bubble is a rounded rect, with a triangle in
        # the edge.
        painter.setPen(Qt.NoPen)
        color = QColor(BUBBLE_COLORS[user])
        painter.setBrush(color)
        painter.drawRoundedRect(bubblerect, 10, 10)

        # draw the triangle bubble-pointer, starting from

        if user == USER_ME:
            p1 = bubblerect.topRight()
        else:
            p1 = bubblerect.topLeft()
        painter.drawPolygon(p1 + QPoint(-20, 0), p1 + QPoint(20, 0), p1 + QPoint(0, 20))

        # draw the text
        painter.setPen(Qt.black)
        painter.drawText(textrect, Qt.TextWordWrap, text)

    def sizeHint(self, option, index):
        _, text = index.model().data(index, Qt.DisplayRole)
        # Calculate the dimensions the text will require.
        metrics = QApplication.fontMetrics()
        rect = option.rect.marginsRemoved(TEXT_PADDING)
        rect = metrics.boundingRect(rect, Qt.TextWordWrap, text)
        rect = rect.marginsAdded(TEXT_PADDING)  # Re add padding for item size.
        return rect.size()


class MessageModel(QAbstractListModel):
    def __init__(self, *args, **kwargs):
        super().__init__(*args, **kwargs)
        self.messages = []

    def data(self, index, role):
        if role == Qt.DisplayRole:
            # Here we pass the delegate the user, message tuple.
            return self.messages[index.row()]

    def rowCount(self, index):
        return len(self.messages)

    def add_message(self, who, text):
        """
        Add an message to our message list, getting the text from the QLineEdit
        """
        if text:  # Don't add empty strings.
            # Access the list via the model.
            self.messages.append((who, text))
            # Trigger refresh.
            self.layoutChanged.emit()


class MainWindow(QMainWindow):
    def __init__(self):
        super().__init__()

        # Layout the UI
        l = QVBoxLayout()

        self.message_input = QLineEdit("Enter message here")

        # Buttons for from/to messages.
        self.btn1 = QPushButton("<")
        self.btn2 = QPushButton(">")

        self.messages = QListView()
        # Use our delegate to draw items in this view.
        self.messages.setItemDelegate(MessageDelegate())

        self.model = MessageModel()
        self.messages.setModel(self.model)

        self.btn1.pressed.connect(self.message_to)
        self.btn2.pressed.connect(self.message_from)

        l.addWidget(self.messages)
        l.addWidget(self.message_input)
        l.addWidget(self.btn1)
        l.addWidget(self.btn2)

        self.w = QWidget()
        self.w.setLayout(l)
        self.setCentralWidget(self.w)

    def message_to(self):
        self.model.add_message(USER_ME, self.message_input.text())

    def message_from(self):
        self.model.add_message(USER_THEM, self.message_input.text())


app = QApplication(sys.argv)
window = MainWindow()
window.show()
app.exec_()
This is built on the Qt Model Views, if you're not familiar with that it might be worth having a look at the pyqt5 model views tutorials. I used the "todo" example there as the basis for this.
The addition is to implement the QStyleItemDelegate. This allows us to draw our own custom widget view for each item in the list. This is where we draw our text and the bubbles. See this introduction to QPainter if you're not familiar with that.
The tricky part here is we need to know the size of the text in order to draw the bubble. That's handled on the delegate .sizeHint which uses font metrics to determine the size of the box. It's a bit faffy.
The data is stored in a list of tuples with user, message and the user is either 0 or 1 for "me" or "them". You can push a message into the chat using add_message.
You should be able to drop this into your application, hook up the add_message method and have it work, but let me know if you have any problems.
martin | 2020-07-07 10:30:32 UTC | #7
Sorry I don't follow, do you mean resize? Have you replaced your text edit with the list view & model?
Can you post a screenshot/the code so I can see what's happening.
Guasco | 2020-07-07 11:07:40 UTC | #9
Can I send you the zip file? I set up various images and stylesheets
martin | 2020-07-07 11:51:21 UTC | #10
Sure thing, zip would be fine.
In your code your main window subclasses from the delegate, e.g.
class ChatApp(QMainWindow, __richiamo_pubnub, MessageDelegate):
...you don't need to do that. You're creating the delegate object and passing it to the view (further down).
Either way, your example works for me & the chat bubbles resize to the text.
Guasco | 2020-07-07 12:29:26 UTC | #12
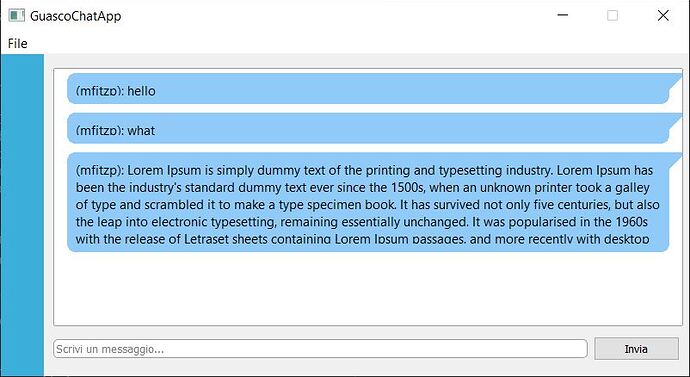
I am sending you the zip file along with a screenshot of what happens when the message gets long, but could you give me some advice on how to align the other message when another user is sending the messages? Thanks for your availability (I sent the email to codereview@learnpyqt.com)
martin | 2020-07-07 15:31:06 UTC | #13
Thanks, got it. The problem is the Qt.TextWordWrap in the code will only break between words (spaces) so in the example you have a single block no breaks it won't wrap. There is another flag Qt.TextWrapAnywhere but that will break in the middle of words.
To wrap between words and only wrap in words when there is no space, you need to use QTextOption with QTextOption.WrapAtWordBoundaryOrAnywhere. To use this we need to change the sizeHint method a bit as without a painter we need to create a QTextDocument to do the calculation.
Working code below ...the only changes are at the bottom of the .paint method and the sizeHint.
import sys

from PyQt5.QtCore import QAbstractListModel, QMargins, QPoint, QRectF, QSize, Qt
from PyQt5.QtGui import QColor, QPainter, QTextDocument, QTextOption

# from PyQt5.QtGui import
from PyQt5.QtWidgets import (
    QApplication,
    QLineEdit,
    QListView,
    QMainWindow,
    QPushButton,
    QStyledItemDelegate,
    QVBoxLayout,
    QWidget,
)

USER_ME = 0
USER_THEM = 1

BUBBLE_COLORS = {USER_ME: "#90caf9", USER_THEM: "#a5d6a7"}

BUBBLE_PADDING = QMargins(15, 5, 15, 5)
TEXT_PADDING = QMargins(25, 15, 25, 15)


class MessageDelegate(QStyledItemDelegate):
    """
    Draws each message.
    """

    def paint(self, painter, option, index):
        # Retrieve the user,message uple from our model.data method.
        user, text = index.model().data(index, Qt.DisplayRole)

        # option.rect contains our item dimensions. We need to pad it a bit
        # to give us space from the edge to draw our shape.

        bubblerect = option.rect.marginsRemoved(BUBBLE_PADDING)
        textrect = option.rect.marginsRemoved(TEXT_PADDING)

        # draw the bubble, changing color + arrow position depending on who
        # sent the message. the bubble is a rounded rect, with a triangle in
        # the edge.
        painter.setPen(Qt.NoPen)
        color = QColor(BUBBLE_COLORS[user])
        painter.setBrush(color)
        painter.drawRoundedRect(bubblerect, 10, 10)

        # draw the triangle bubble-pointer, starting from the top left/right.
        if user == USER_ME:
            p1 = bubblerect.topRight()
        else:
            p1 = bubblerect.topLeft()
        painter.drawPolygon(p1 + QPoint(-20, 0), p1 + QPoint(20, 0), p1 + QPoint(0, 20))

        toption = QTextOption()
        toption.setWrapMode(QTextOption.WrapAtWordBoundaryOrAnywhere)

        # draw the text
        painter.setPen(Qt.black)
        painter.drawText(QRectF(textrect), text, toption)

    def sizeHint(self, option, index):
        _, text = index.model().data(index, Qt.DisplayRole)
        textrect = option.rect.marginsRemoved(TEXT_PADDING)

        toption = QTextOption()
        toption.setWrapMode(QTextOption.WrapAtWordBoundaryOrAnywhere)

        doc = QTextDocument(text)
        doc.setTextWidth(textrect.width())
        doc.setDefaultTextOption(toption)
        doc.setDocumentMargin(0)

        textrect.setHeight(doc.size().height())
        textrect = textrect.marginsAdded(TEXT_PADDING)
        return textrect.size()


class MessageModel(QAbstractListModel):
    def __init__(self, *args, **kwargs):
        super().__init__(*args, **kwargs)
        self.messages = []

    def data(self, index, role):
        if role == Qt.DisplayRole:
            # Here we pass the delegate the user, message tuple.
            return self.messages[index.row()]

    def rowCount(self, index):
        return len(self.messages)

    def add_message(self, who, text):
        """
        Add an message to our message list, getting the text from the QLineEdit
        """
        if text:  # Don't add empty strings.
            # Access the list via the model.
            self.messages.append((who, text))
            # Trigger refresh.
            self.layoutChanged.emit()


class MainWindow(QMainWindow):
    def __init__(self):
        super().__init__()

        # Layout the UI
        l = QVBoxLayout()

        self.message_input = QLineEdit("Enter message here")

        # Buttons for from/to messages.
        self.btn1 = QPushButton("<")
        self.btn2 = QPushButton(">")

        self.messages = QListView()
        # Use our delegate to draw items in this view.
        self.messages.setItemDelegate(MessageDelegate())

        self.model = MessageModel()
        self.messages.setModel(self.model)

        self.btn1.pressed.connect(self.message_to)
        self.btn2.pressed.connect(self.message_from)

        l.addWidget(self.messages)
        l.addWidget(self.message_input)
        l.addWidget(self.btn1)
        l.addWidget(self.btn2)

        self.w = QWidget()
        self.w.setLayout(l)
        self.setCentralWidget(self.w)

    def message_to(self):
        self.model.add_message(USER_ME, self.message_input.text())

    def message_from(self):
        self.model.add_message(USER_THEM, self.message_input.text())


app = QApplication(sys.argv)
window = MainWindow()
window.show()
app.exec_()
Edit: fix the paint method to also use QTextDocument, e.g.
        # draw the text
        toption = QTextOption()
        toption.setWrapMode(QTextOption.WrapAtWordBoundaryOrAnywhere)

        doc = QTextDocument(text)
        doc.setTextWidth(textrect.width())
        doc.setDefaultTextOption(toption)
        doc.setDocumentMargin(0)

        painter.translate(textrect.topLeft())
        doc.drawContents(painter)
        painter.restore()
See below for the complete code.
Guasco | 2020-07-07 13:38:51 UTC | #14
now it fits correctly, but there is a small detail, some letters remain cut, I send you a screenshot
martin | 2020-07-07 13:41:20 UTC | #15
Yeah, I saw the same issue -- looking into it :) ...seems to be some issue between the calculation and the actual draw, maybe the width is not correct.
Guasco | 2020-07-07 13:51:06 UTC | #16
yes probably, however I am trying to make the message appear on the left when it is sent by another user, can you give me some advice?
martin | 2020-07-08 12:18:10 UTC | #17
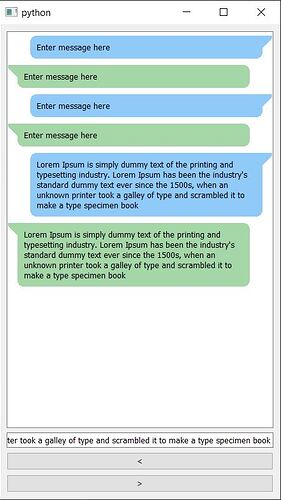
The mismatch was down to the different fonts/layout of the text in each. So I've updated it here to use the QTextDocument in the painter too. This also adds translating the bubbles side to side (just offsets the painter). Note that you also have to reduce the size of the bubbles and text blocks to make this work.
import sys

from PyQt5.QtCore import QAbstractListModel, QMargins, QPoint, QRectF, QSize, Qt
from PyQt5.QtGui import QColor, QFont, QPainter, QTextDocument, QTextOption

# from PyQt5.QtGui import
from PyQt5.QtWidgets import (
    QApplication,
    QLineEdit,
    QListView,
    QMainWindow,
    QPushButton,
    QStyledItemDelegate,
    QVBoxLayout,
    QWidget,
)

USER_ME = 0
USER_THEM = 1

BUBBLE_COLORS = {USER_ME: "#90caf9", USER_THEM: "#a5d6a7"}
USER_TRANSLATE = {USER_ME: QPoint(20, 0), USER_THEM: QPoint(0, 0)}

BUBBLE_PADDING = QMargins(15, 5, 35, 5)
TEXT_PADDING = QMargins(25, 15, 45, 15)


class MessageDelegate(QStyledItemDelegate):
    """
    Draws each message.
    """

    _font = None

    def paint(self, painter, option, index):
        painter.save()
        # Retrieve the user,message uple from our model.data method.
        user, text = index.model().data(index, Qt.DisplayRole)

        trans = USER_TRANSLATE[user]
        painter.translate(trans)

        # option.rect contains our item dimensions. We need to pad it a bit
        # to give us space from the edge to draw our shape.
        bubblerect = option.rect.marginsRemoved(BUBBLE_PADDING)
        textrect = option.rect.marginsRemoved(TEXT_PADDING)

        # draw the bubble, changing color + arrow position depending on who
        # sent the message. the bubble is a rounded rect, with a triangle in
        # the edge.
        painter.setPen(Qt.NoPen)
        color = QColor(BUBBLE_COLORS[user])
        painter.setBrush(color)
        painter.drawRoundedRect(bubblerect, 10, 10)

        # draw the triangle bubble-pointer, starting from the top left/right.
        if user == USER_ME:
            p1 = bubblerect.topRight()
        else:
            p1 = bubblerect.topLeft()
        painter.drawPolygon(p1 + QPoint(-20, 0), p1 + QPoint(20, 0), p1 + QPoint(0, 20))

        toption = QTextOption()
        toption.setWrapMode(QTextOption.WrapAtWordBoundaryOrAnywhere)

        # draw the text
        doc = QTextDocument(text)
        doc.setTextWidth(textrect.width())
        doc.setDefaultTextOption(toption)
        doc.setDocumentMargin(0)

        painter.translate(textrect.topLeft())
        doc.drawContents(painter)
        painter.restore()

    def sizeHint(self, option, index):
        _, text = index.model().data(index, Qt.DisplayRole)
        textrect = option.rect.marginsRemoved(TEXT_PADDING)

        toption = QTextOption()
        toption.setWrapMode(QTextOption.WrapAtWordBoundaryOrAnywhere)

        doc = QTextDocument(text)
        doc.setTextWidth(textrect.width())
        doc.setDefaultTextOption(toption)
        doc.setDocumentMargin(0)

        textrect.setHeight(doc.size().height())
        textrect = textrect.marginsAdded(TEXT_PADDING)
        return textrect.size()


class MessageModel(QAbstractListModel):
    def __init__(self, *args, **kwargs):
        super().__init__(*args, **kwargs)
        self.messages = []

    def data(self, index, role):
        if role == Qt.DisplayRole:
            # Here we pass the delegate the user, message tuple.
            return self.messages[index.row()]

    def setData(self, index, role, value):
        self._size[index.row()]

    def rowCount(self, index):
        return len(self.messages)

    def add_message(self, who, text):
        """
        Add an message to our message list, getting the text from the QLineEdit
        """
        if text:  # Don't add empty strings.
            # Access the list via the model.
            self.messages.append((who, text))
            # Trigger refresh.
            self.layoutChanged.emit()


class MainWindow(QMainWindow):
    def __init__(self):
        super().__init__()

        # Layout the UI
        l = QVBoxLayout()

        self.message_input = QLineEdit("Enter message here")

        # Buttons for from/to messages.
        self.btn1 = QPushButton("<")
        self.btn2 = QPushButton(">")

        self.messages = QListView()
        self.messages.setResizeMode(QListView.Adjust)
        # Use our delegate to draw items in this view.
        self.messages.setItemDelegate(MessageDelegate())

        self.model = MessageModel()
        self.messages.setModel(self.model)

        self.btn1.pressed.connect(self.message_to)
        self.btn2.pressed.connect(self.message_from)

        l.addWidget(self.messages)
        l.addWidget(self.message_input)
        l.addWidget(self.btn1)
        l.addWidget(self.btn2)

        self.w = QWidget()
        self.w.setLayout(l)
        self.setCentralWidget(self.w)

    def resizeEvent(self, e):
        self.model.layoutChanged.emit()

    def message_to(self):
        self.model.add_message(USER_ME, self.message_input.text())

    def message_from(self):
        self.model.add_message(USER_THEM, self.message_input.text())


app = QApplication(sys.argv)
window = MainWindow()
window.show()
app.exec_()
Guasco | 2020-07-07 18:24:07 UTC | #18
I sent you an email, when you can, take a look at it
martin | 2020-07-07 19:49:33 UTC | #19
Hey @Guasco the problem is where you define your constants at the top of the file.
io = 0
altri = 0
....they're both set to 0 so are indistinguishable! Should be ...
Packaging Python Applications with PyInstaller by Martin Fitzpatrick — This step-by-step guide walks you through packaging your own Python applications from simple examples to complete installers and signed executables.
io = 0
altri = 1
The actual values don't matter, they just need to be different as we use them to check elsewhere.
Guasco | 2020-07-07 20:14:06 UTC | #20
yes of course I have already tried it but it has simply made the messages appear on the left, if you can we can connect and check together by chatting
martin | 2020-07-08 07:51:31 UTC | #21
Can you try explain more clearly what you want, or take a screenshot with that is wrong?
In the zip you sent the BUBBLE_PADDING and TEXT_PADDING variables hadn't been updated. As I mentioned, these need to be changed so the side-to-side works.
io = 0
altri = 1

BUBBLE_COLORS = {io: "#90caf9", altri: "#a5d6a7"}
USER_TRANSLATE = {io: QPoint(20, 0), altri: QPoint(0, 0)}

BUBBLE_PADDING = QMargins(15, 5, 35, 5)
TEXT_PADDING = QMargins(25, 15, 45, 15)
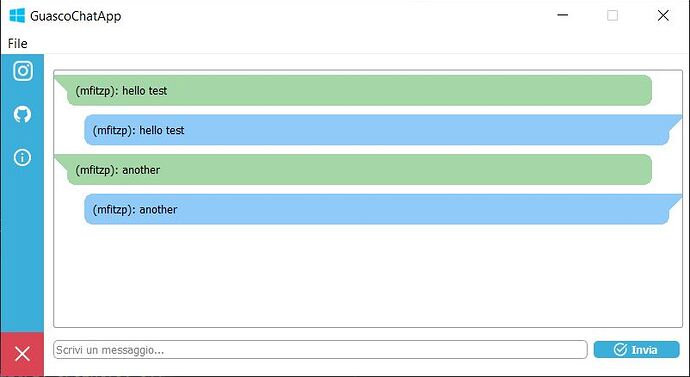
In your email you said " the style of the other users is applied to my speech bubble". I thought you meant all bubbles had the same style. If you mean you want to swap the colours/positions for you vs. them, then just edit the variables to swap them around, e.g.
BUBBLE_COLORS = {altri: "#90caf9", io: "#a5d6a7"}
USER_TRANSLATE = {altri: QPoint(20, 0), io: QPoint(0, 0)}
Those two variables are all that changes the position/color of the bubbles.
Guasco | 2020-07-08 08:30:32 UTC | #23
ok, this has improved the style of the bubbles, but I mean another thing, I will send you an email with a screenshot attached
martin | 2020-07-08 12:18:10 UTC | #24
The problem is just with the logic of where to show the messages. A few things...
        while io >= 1:
            self.timer = QTimer()
            self.timer.timeout.connect(self.messaggio_a_)
            self.timer.start(0)
        else:
            self.timer = QTimer()
            self.timer.timeout.connect(self.messaggio_da_)
            self.timer.start(0)
What are you trying to do here? Since io is defined as a constant, one will always run -- the second -- because io is never > 1, it is 0.
Are you trying to run different methods depending on whether we are the "us" or "other" user? That's backwards -- a program or user isn't "me" or "other" it's both. I'm "me" to me, but "other" to someone else.
So it's not the program/user who defines which bubble to show it's the messages. If a message is from "me" it's a "me" message, if it's not, it's a "them". You just need to check the user who sent the message vs. the user of the program and save the appropriate state.
You 'receive' all messages (even those you send) so you can just check this in a single place, and test the username against the received message.
    def messaggio_a_(self):
        while nuovo_messaggio:
            if len(nuovo_messaggio) > 0:
                self.messaggio = nuovo_messaggio.pop(0)
                message_str = self.formato_del_messaggio(self.messaggio)

                if self.messaggio.get("name") == self.nome:
                    # Is our own message.
                    self.modello.add_message(io, message_str)

                else:
                    # Is other users message.
                    self.modello.add_message(altri, message_str)
You can just start a single timer and fire it against this
        self.timer = QTimer()
        self.timer.timeout.connect(self.messaggio_a_)
        self.timer.start(0)
If you want to swap the arrows around, you can do it with this bit here
        if user == io:
            p1 = bubblerect.topLeft()
        else:
            p1 = bubblerect.topRight()
That gives the following result

Guasco | 2020-07-08 09:32:24 UTC | #25
yes, it's true, you're right, massive thanks Martin, one last thing to complete the messages, if I wanted to add the time at the bottom of the message, what would you advise me to do?
martin | 2020-07-08 10:59:30 UTC | #26
No problem :)
To show the time, you probably want to send it in the message payload. So your send method becomes (add from time import time at the top). The time.time() method returns the current unix timestamp.
    def invia_messaggio(self):
        self.pubblica(
            {
                "name": self.nome,
                "message": self.input_per_il_messaggio.text(),
                "time": time(),
            }
        )
        self.input_per_il_messaggio.clear()
When you create the messages in the model, you need to pass this through as a 3rd parameter.
                    self.modello.add_message(
                        io, message_str, self.messaggio.get("time")
                    )
...and update add_message to accept that 3rd timestamp parameter.
    def add_message(self, who, text, timestamp):
        if text:
            self.messages.append((who, text, timestamp))
            self.layoutChanged.emit()
So, at this point the time data is in your model. You just need to --
- Update the paint method to draw the time in the bubble.
- Update the
sizeHintmethod to add a bit of padding to provide space for the time.
First for sizeHint update the data call to unpack the 3rd value. We can discard it (using _) because we don't need it to calculate the height. We're just going to add 20 pixels -- the time height is always the same.
    def sizeHint(self, option, index):
        _, text, _ = index.model().data(index, Qt.DisplayRole)
        # ... keep the rest the same.
        return textrect.size() + QSize(0, 20)
In the paint we unpack the timestamp from the data returned from the model.
    def paint(self, painter, option, index):
        painter.save()
        user, text, timestamp = index.model().data(index, Qt.DisplayRole)
        # ... add timestamp param, keep the rest the same until...

        toption = QTextOption()
        toption.setWrapMode(QTextOption.WrapAtWordBoundaryOrAnywhere)

        # draw the timestamp
        font = painter.font()

        font.setPointSize(7)
        painter.setFont(font)
        painter.setPen(Qt.black)
        time_str = datetime.fromtimestamp(timestamp).strftime("%Y-%m-%d %H:%M:%S")
        painter.drawText(textrect.bottomLeft() + QPoint(0, 5), time_str)

        doc = QTextDocument(text)

        # ...continues as before.
textrect.bottomLeft() is the bottom left of our text rectangle, into which we draw our message. By taking that as our starting position for our timestamp, we'll align directly under it. We add 5px vertically for some padding.
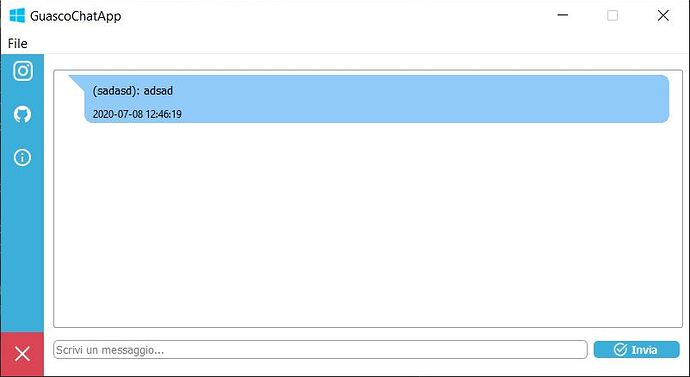
This is the same pattern for adding anything to model views -- add it to the model, update the paint & sizeHint methods to draw and create space.
The DeprecationWarning is because we're passing a float value where an int is expected. It's a new warning in Python 3.8. You can just convert to an int explicitly by wrapping in int(), e.g.
textrect.setHeight(int(doc.size().height()))
Guasco | 2020-07-08 12:23:42 UTC | #27
it works perfectly, I have set hours and minutes at the bottom right and it's really nice, I sent you an email :)
Eolinwen | 2020-07-09 16:10:01 UTC | #28
@martin
You simply answer problems that we all posed ourselves one day, without having answers, even if it is so as not to need it
Bravo. :+1:
Maybe a new chapter for the book. I wonder what this will give for miniature videos or even a pelit on a timeline. :stuck_out_tongue_winking_eye:
panickerraviish25649 | 2020-07-28 06:08:24 UTC | #29
@martin How can I add spaces between the text bubbles in your code?
PyQt/PySide 1:1 Coaching with Martin Fitzpatrick — Save yourself time and frustration. Get one on one help with your Python GUI projects. Working together with you I'll identify issues and suggest fixes, from bugs and usability to architecture and maintainability.
