Glenn Breeden wrote
I am learning Python and Qt and am interested in creating an app to take the place of a MS Word form that I use for my work service calls. Ideally, I’d like for it to be connected to a database that would allow me to populate fields from the source via drop down boxes. I also need date pickers and text fields which would be searchable at a later time. My hope here is that someone can point me in the right direction as to how to do this or if it’s even possible.
This is definitely possible with Qt, and actually fairly straightforward if you use Qt's SQL models and a widget mapper. There are some examples in the latest update to the book, and I'll be adding more here -- but in the meantime this should give you an idea.
import sys

from PyQt5.QtCore import QSize, Qt
from PyQt5.QtSql import QSqlDatabase, QSqlTableModel
from PyQt5.QtWidgets import (
    QApplication,
    QComboBox,
    QDataWidgetMapper,
    QDateTimeEdit,
    QFormLayout,
    QHBoxLayout,
    QLabel,
    QLineEdit,
    QMainWindow,
    QPushButton,
    QVBoxLayout,
    QWidget,
)

db = QSqlDatabase("QSQLITE")
db.setDatabaseName("test.sqlite")
# Create some dummy data.
db.open()
db.exec_(
    "create table if not exists mytable (title string, kind string, created datetime);"
)
db.exec_(
    "insert into mytable (title, kind, created) values ('first title', 'Two', datetime('2020-06-02 12:45:11') );"
)
db.exec_(
    "insert into mytable (title, kind, created) values ('2nd item', 'Three', datetime('2019-06-02 12:45:11') );"
)


class MainWindow(QMainWindow):
    def __init__(self):
        super().__init__()

        form = QFormLayout()

        # Define fields.
        self.title = QLineEdit()

        self.kind = QComboBox()
        self.kind.addItems(["One", "Two", "Three"])

        self.date = QDateTimeEdit()

        form.addRow(QLabel("Title"), self.title)
        form.addRow(QLabel("Type of item"), self.kind)
        form.addRow(QLabel("Date"), self.date)

        self.model = QSqlTableModel(db=db)

        self.mapper = QDataWidgetMapper()  # Syncs widgets to the database.
        self.mapper.setModel(self.model)

        self.mapper.addMapping(self.title, 0)  # Map to column number
        self.mapper.addMapping(self.kind, 1)
        self.mapper.addMapping(self.date, 2)

        self.model.setTable("mytable")
        self.model.select()  # Query the database

        self.mapper.toFirst()  # Jump to first record

        self.setMinimumSize(QSize(400, 400))

        controls = QHBoxLayout()

        prev_rec = QPushButton("Previous")
        prev_rec.clicked.connect(self.mapper.toPrevious)

        next_rec = QPushButton("Next")
        next_rec.clicked.connect(self.mapper.toNext)

        save_rec = QPushButton("Save Changes")
        save_rec.clicked.connect(self.mapper.submit)

        controls.addWidget(prev_rec)
        controls.addWidget(next_rec)
        controls.addWidget(save_rec)

        layout = QVBoxLayout()

        layout.addLayout(form)
        layout.addLayout(controls)

        widget = QWidget()
        widget.setLayout(layout)
        self.setCentralWidget(widget)


app = QApplication(sys.argv)
window = MainWindow()
window.show()
app.exec_()
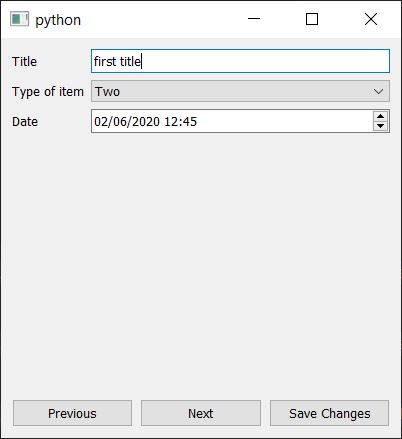
This produces the following form which is linked to the database. The database is pre-populated with some dummy data. You can navigate between records and save changes.

Packaging Python Applications with PyInstaller by Martin Fitzpatrick — This step-by-step guide walks you through packaging your own Python applications from simple examples to complete installers and signed executables.
