Setting up a good development environment for Python GUI programming can make the coding process friendly and provide the necessary tools to maintain the codebase for many years to come. Choosing the right tools and being comfortable with them is a critical step for any Python developer.
Code editors are among the most common and used development tools. They're where we write the code. While most modern code editors support features like syntax highlighting, which shows visual cues to differentiate parts of the source code, we often need to rely on external tools to help us debug and look for errors, install packages, manage Python environments, and so on.
To have all these features in a single program, you'll need an integrated development environment (IDE). Although there are several Python IDEs, in this article, we'll be exploring PyCharm, which is a powerful IDE for Python developers. We'll walk through setting up PyCharm and building a simple PyQt6 GUI application from scratch.
- Install Python
- Install PyCharm
- Create a New PyQt6 Project in PyCharm
- Get Familiar With PyCharm's Interface
- Install PyQt6 in PyCharm
- Write a PyQt6 GUI Application in PyCharm
- Run Python GUI Code in PyCharm
- Configure a Python Virtual Environment in PyCharm
- Use Git for Version Control in PyCharm
- Explore Other Useful PyCharm Features for GUI Development
- Summary
Install Python
Before installing PyCharm, we need to make sure that Python is installed on the development machine. If it isn't installed yet, then we can go to the official download page and grab the specific installer for either Windows or macOS.
Make sure to select the Add Python to PATH option during the installation process.
On Linux systems, you can check if Python is already installed by running python3 --version in a terminal. If this command returns an error, then you need to install Python from your distribution's repository or from the source.
If you're running a Debian-based distribution, such as Ubuntu and Linux Mint, you can install Python by running sudo apt install python3. It may be necessary to run sudo apt install python3-pip python3-venv, so that PyCharm can use pip and venv to install packages and manage virtual environments.
Install PyCharm
We have a few different ways to install PyCharm. The recommended way is to head over to the official download page and grab the standalone installer for Windows, macOS, or Linux. Then, you'll need to run the installer and follow the on-screen instructions.
If you're using a Linux distro that supports Snaps, you can also install it by running sudo snap install pycharm-community --classic in your terminal.
PyCharm has a Community edition, which is free and open-source. It also has a Professional edition, which is paid. While this tutorial uses PyCharm Community edition, the covered topics apply to both editions. Check out the comparison between both editions for the details.
Create GUI Applications with Python & Qt6 by Martin Fitzpatrick — (PyQt6 Edition) The hands-on guide to making apps with Python — Save time and build better with this book. Over 15K copies sold.
Alternatively, you could install PyCharm via the Toolbox app, which makes it easier to update or rollback to any version of PyCharm. This app can also be used to install and manage other JetBrains products.
NOTE: For more platform-specific information, check out PyCharm's installation guide.
Create a New PyQt6 Project in PyCharm
To demonstrate PyCharm's workflow, we'll create a basic Python GUI app using PyQt. Before we start writing code, we need to first launch PyCharm and create a new project. Creating a project helps you differentiate between files, code, packages, and settings.
Go ahead and launch PyCharm. Depending on your operating system, you can run PyCharm by going to the Start Menu on Windows, Launchpad on macOS, or by running the pycharm executable (under install-folder/bin) on Linux. However, if you installed PyCharm using Toolbox, then open the Toolbox app and launch PyCharm from there.
Read the PyCharm documentation to learn how to run PyCharm from the command-line interface.
When we launch PyCharm, the first thing we'll see is its Welcome to PyCharm window:
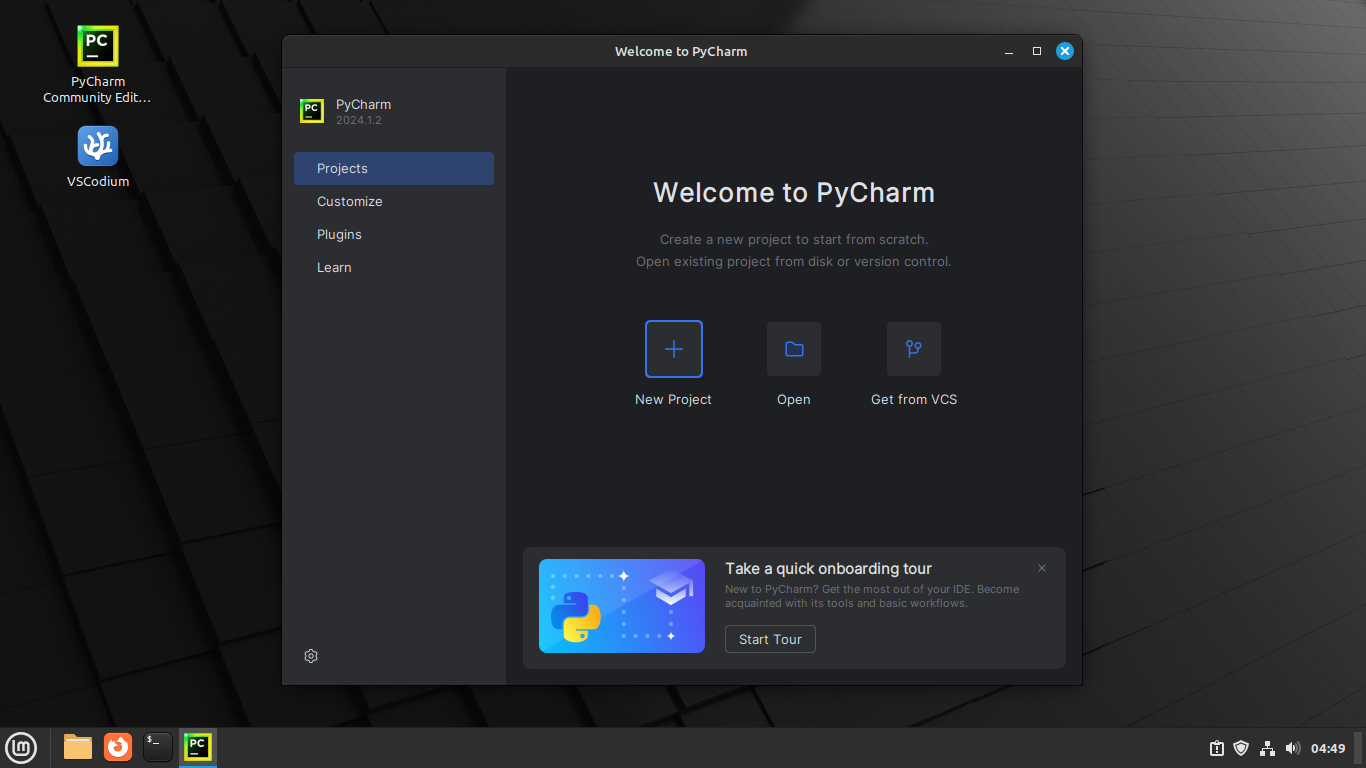 PyCharm's Welcome window
Here's where we can create new projects or open existing ones—either stored locally on our computer or in online code repositories like GitHub.
To continue, click the New Project button and then choose a project's name and location folder in the New Project window. You can also define the Python environment to use but keep the default configuration for now:
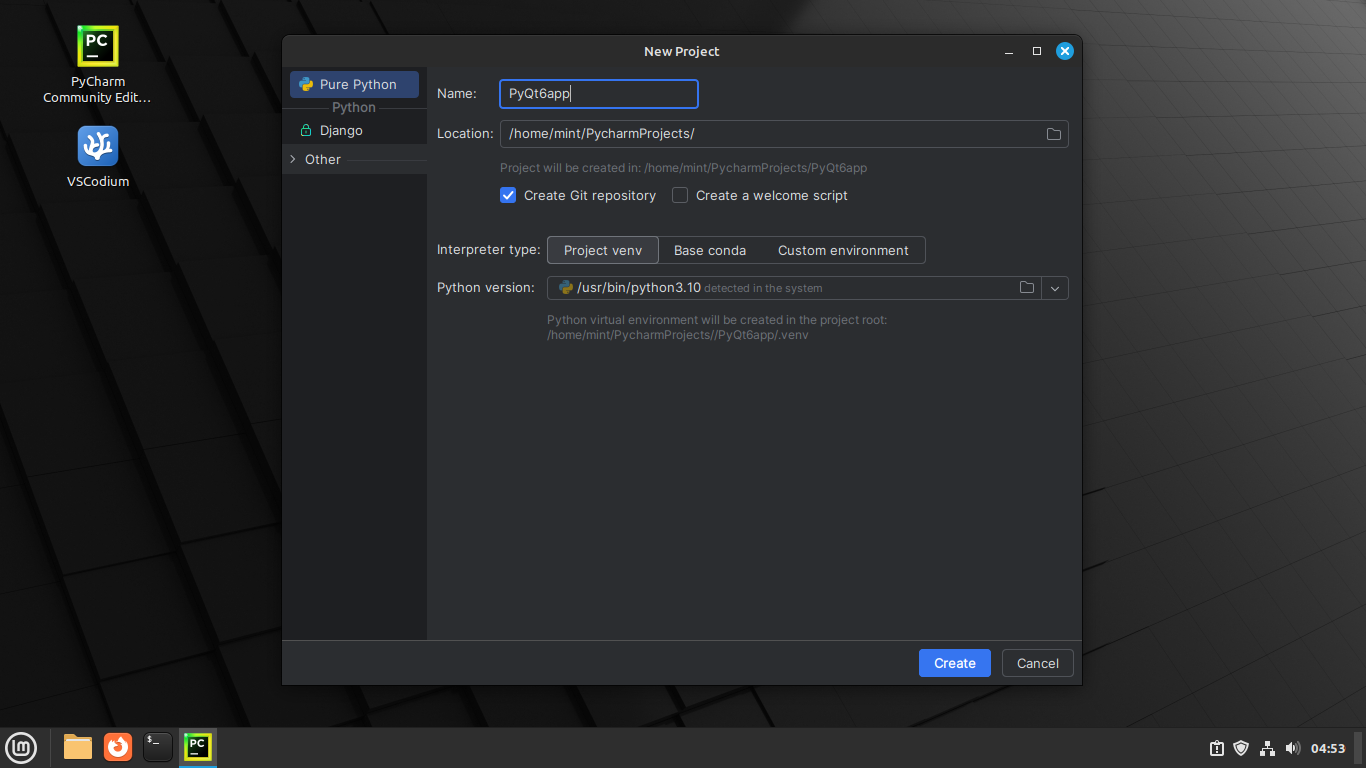 PyCharm's New Project window
Finally, click the Create button on the lower, right corner to create the project and open it in PyCharm's main window, also known as Project Window.
Get Familiar With PyCharm's Interface
The Project Window is where we'll spend most of our time in PyCharm. It's where we manage files, write code, install packages, and do everything related to the project we are working on.
NOTE: This article covers PyCharm's modern user interface. You can also use the classic user interface by going to File -> Settings and disabling New UI under Appearance & behavior. On macOS, you can access the Settings menu from the Menu Bar at the top of your screen.
Let's examine the components of PyCharm's interface and see what they do:
 PyCharm's Project Window
The Project Window interface has the following four main components:
- Window Header
- Editor
- Sidebar
- Status bar
In the following sections, we'll explore these UI components in more detail.
Window Header
The Window Header is at the very top of PyCharm's Project Window and gives us quick access to some commonly used features, most notably the Run button. Using the Run button, we can run or debug our Python project directly from PyCharm — without having to type the relevant Python command in a terminal.
The Window Header looks something like this:
 PyCharm's Window Header
Other significant components of the Window Header are the Main Menu and the Project widget.
PyCharm's Main Menu is accessible by clicking on the hamburger menu, whereas the Project widget displays the name of the current project and allows us to switch between projects as well as create new ones.
On macOS, however, we don't have a hamburger menu in the Window Header but we can still access PyCharm's Main Menu through the Menu Bar at the top of the screen, like with other macOS apps.
Editor
The Editor is where we actually read, write, and edit code. It has a scrollbar on the right to help us navigate large files. It also has a Gutter on the left, which displays line numbers for the file. The Gutter also provides us with context-dependent actions like running code or temporarily hiding functions and classes:
 PyCharm's Editor window
At the top, the Editor has a tabbed interface to display the open files and switch between them at any time. To switch to another open file, we can either click the relevant tab or press CTRL + TAB to scroll through all of them. If necessary, we can also open files from external folders that are outside the project's folder by attaching that folder to the current project.
The Editor can open any plaintext file format, such as .py and .md, for editing. It also supports viewing both raster and vector image formats, such as PNG and SVG. However, note that most binary files, such as video, audio, and executable files are not supported by the Editor and will be opened outside of PyCharm.
Sidebar and Tool Windows
The Sidebar has buttons to open and close tool windows, which are displayed at the bottom or left side of PyCharm's Project Window:
 PyCharm's sidebar and the Project tool window
The Project tool window is normally open by default. It displays the folder structure of the current project and allows us to open, create, and delete files and folders. If you have any external folders attached to the current project, the Project tool window will also display the structure of those folders.
PyCharm also has tool windows for running code, installing packages from PyPI using a graphical interface, and using version control software. Throughout the rest of this article, we'll learn how to use these tool windows as we build our sample Python GUI app.
Status Bar
The Status Bar is the horizontal bar at the bottom of PyCharm's workspace. It indicates the status of both our project and the entire IDE:
![]() PyCharm's status bar
PyCharm's status bar
It provides information about the file that's currently opened in the Editor, such as its encoding, line separator, cursor position, and indentation type. It also gives quick access to the Python Interpreter settings, which we'll cover in more detail later.
Install PyQt6 in PyCharm
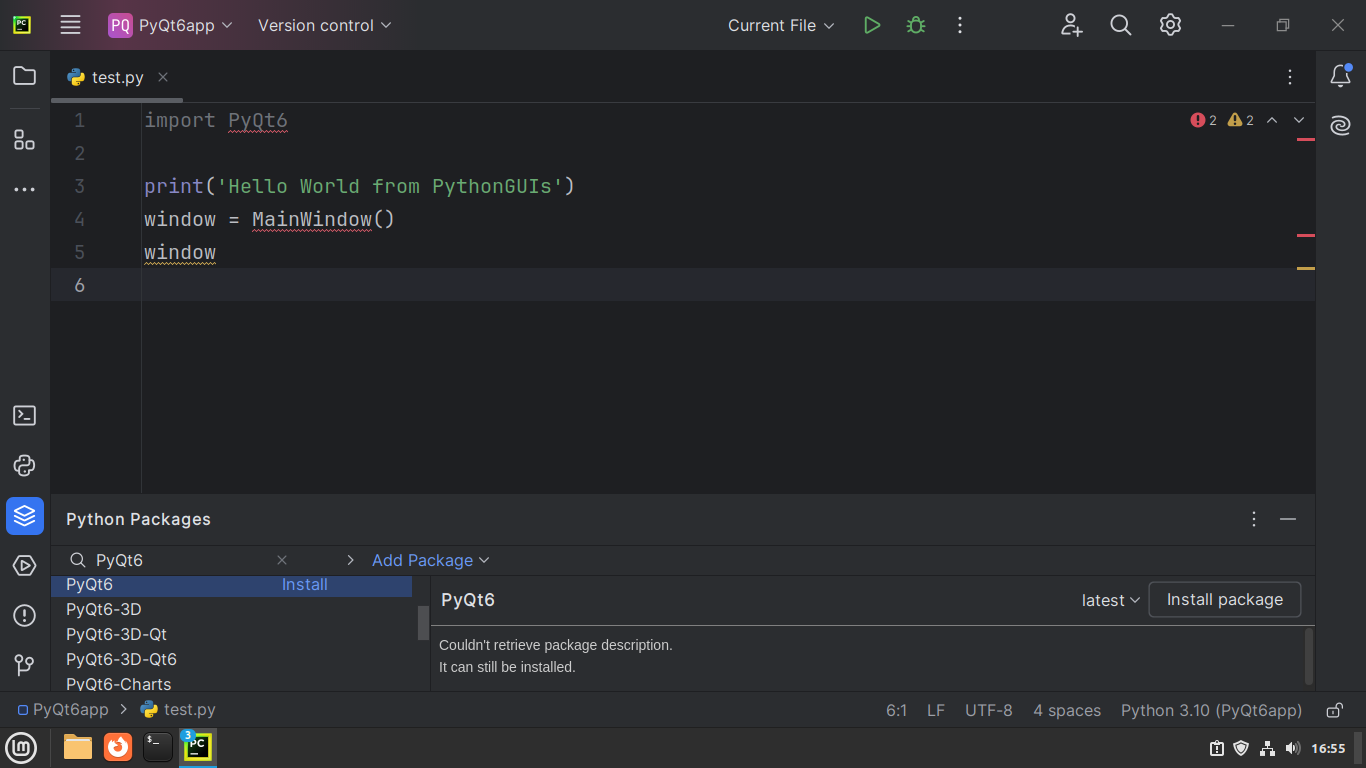
One thing we need to do before starting our GUI app is to install the PyQt library. We'll use this library to build the app's GUI. This library doesn't come with Python but can be installed from the PyPI software repository using the pip command.
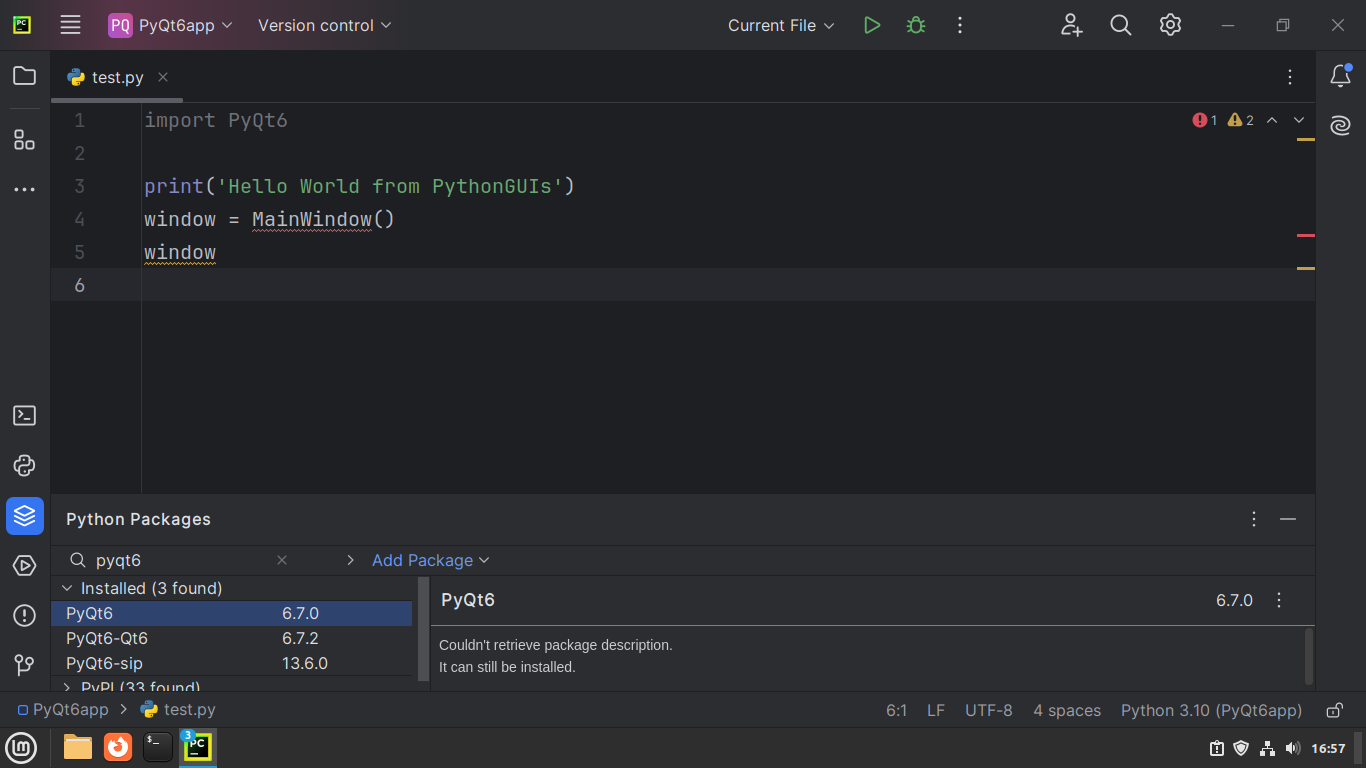
However, PyCharm simplifies the installation by providing a tool window for us to search, install, and manage Python packages. To open the Python Packages tool window, go to the Sidebar and look for the Python Packages button, which is shown in blue in the following screenshot:
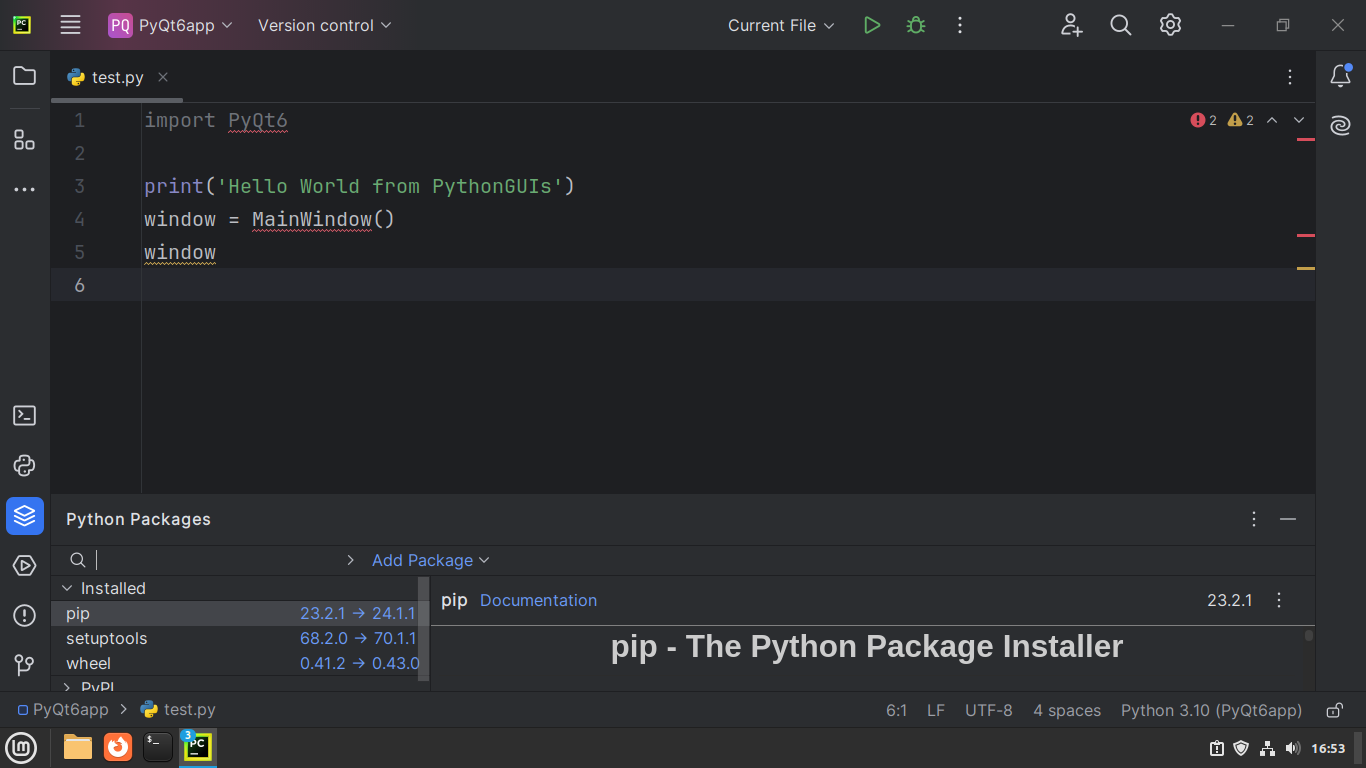 PyCharm's Python Packages tool window
Using the search field, look for the PyQt6 package. We can have a look at the README file (on the right side) for each package by clicking on the package's name (on the left side). Once we've found the package, we can click Install next to the package's name and choose the package version we want to install.
A README file typically provides information about what a package does, how to install and use the package, what license the package is distributed under, and so on.
When we clear the search field, PyQt6 should now be listed as Installed:
 PyCharm's Python Packages tool window with PyQt6 ready to be installed
If a newer version of an installed package is available, then PyCharm will indicate it by displaying a link with the current and next version (next to the package name) that we can click to upgrade:
 PyCharm's Python Packages tool window with PyQt6 installed
You can also uninstall a Python package. To do this, click the package's name and go to the kebab menu on the top-right corner of the README preview section. Then, click Delete Package to uninstall the package:
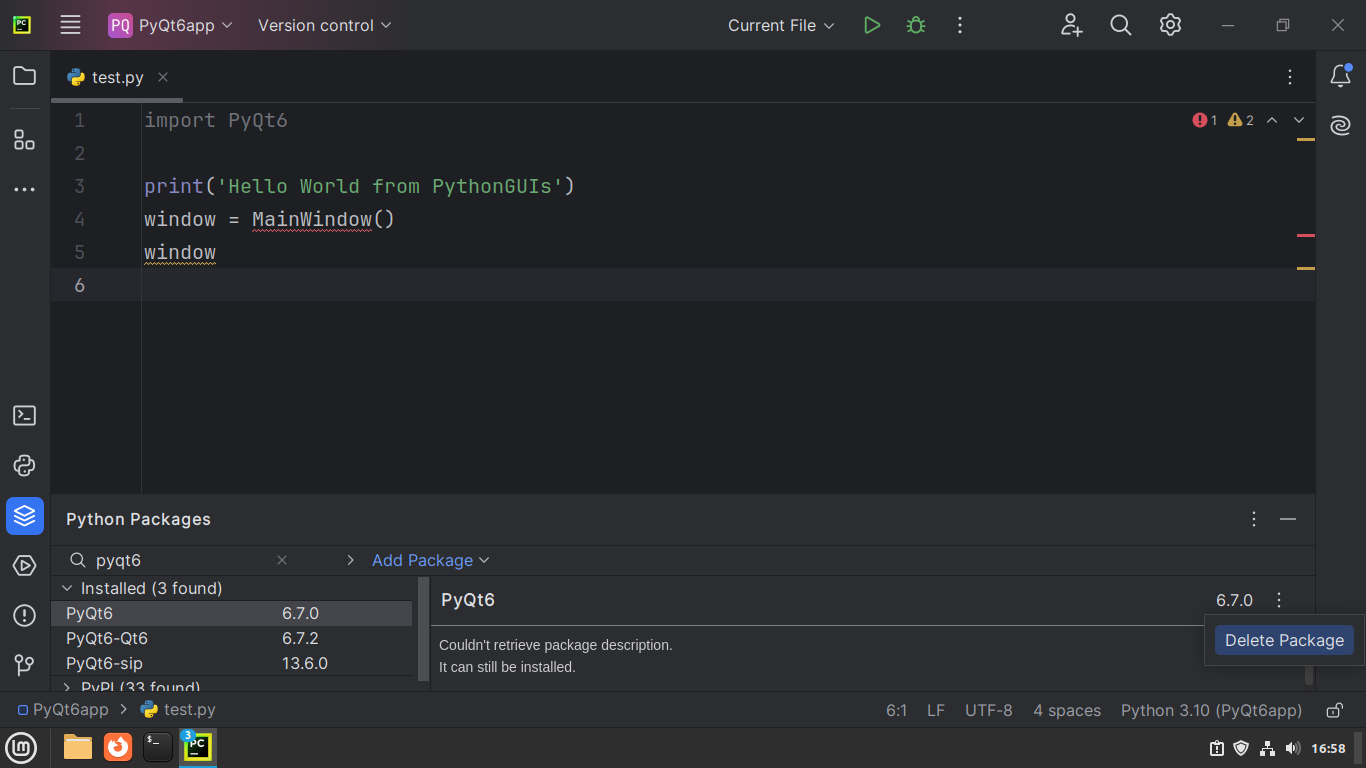 PyCharm's Python Packages tool window showing how to uninstall a package
Uninstalling Python packages from a virtual environment isn't something that we do often but PyCharm has a nice interface to do it if we need to.
Write a PyQt6 GUI Application in PyCharm
In this section, we will focus on writing and editing code in PyCharm to build our sample GUI app. For its GUI, the app will have one window with a Press Me button. To start coding though, we need a Python file.
NOTE: This guide will not cover PyQt extensively. To learn more about this library, check out the Creating your first app with PyQt6 tutorial.
To create a file, go to the Projects tool window and right-click the project's folder to open its context menu. Then, go to New and select Python File as the desired file type:
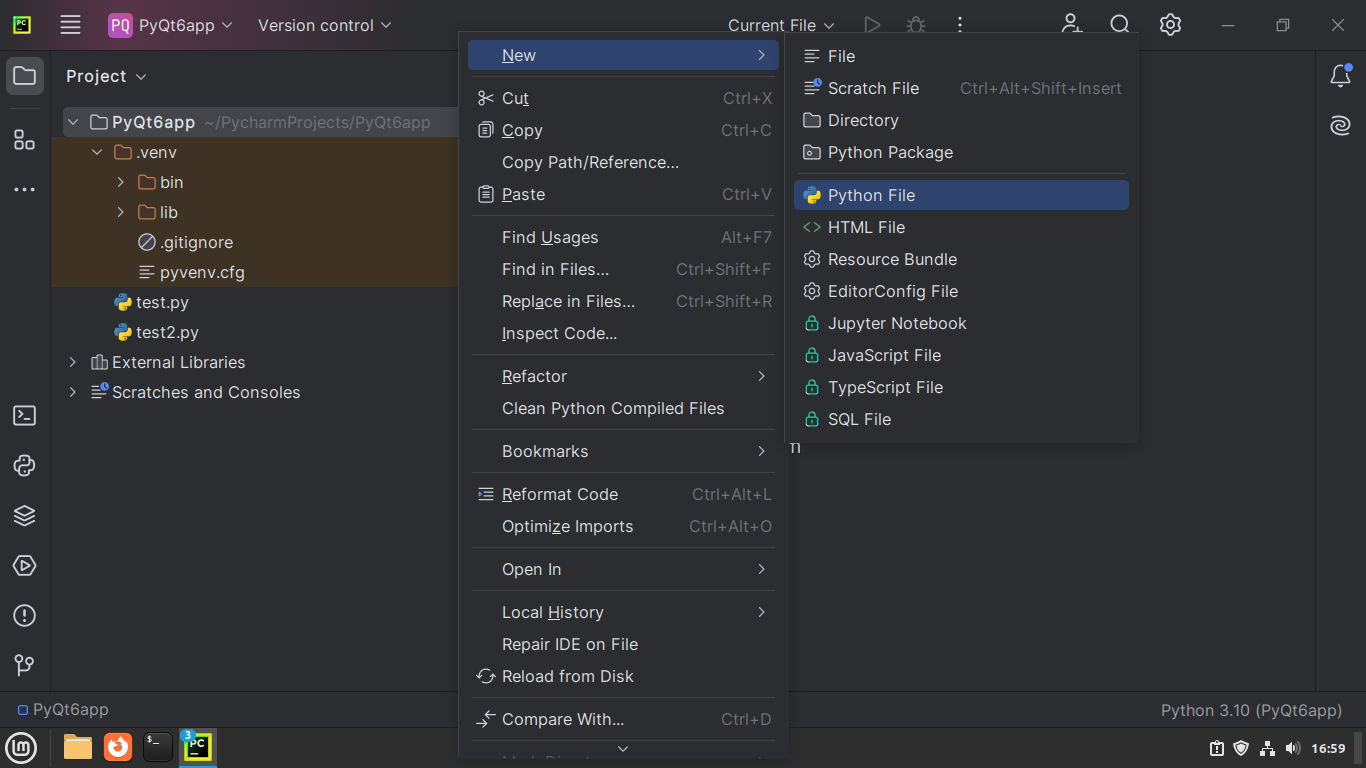 PyCharm's context menu to create a new Python file
This action will open a dialog where PyCharm will ask you to enter a filename. For this project, we will just name the file as app and press ENTER:
 PyCharm's dialog to name a new Python file
The Project tool window will now list a file named app.py under the project's folder. To open that file in the Editor, double-click on the filename and you'll see a blank Python file:
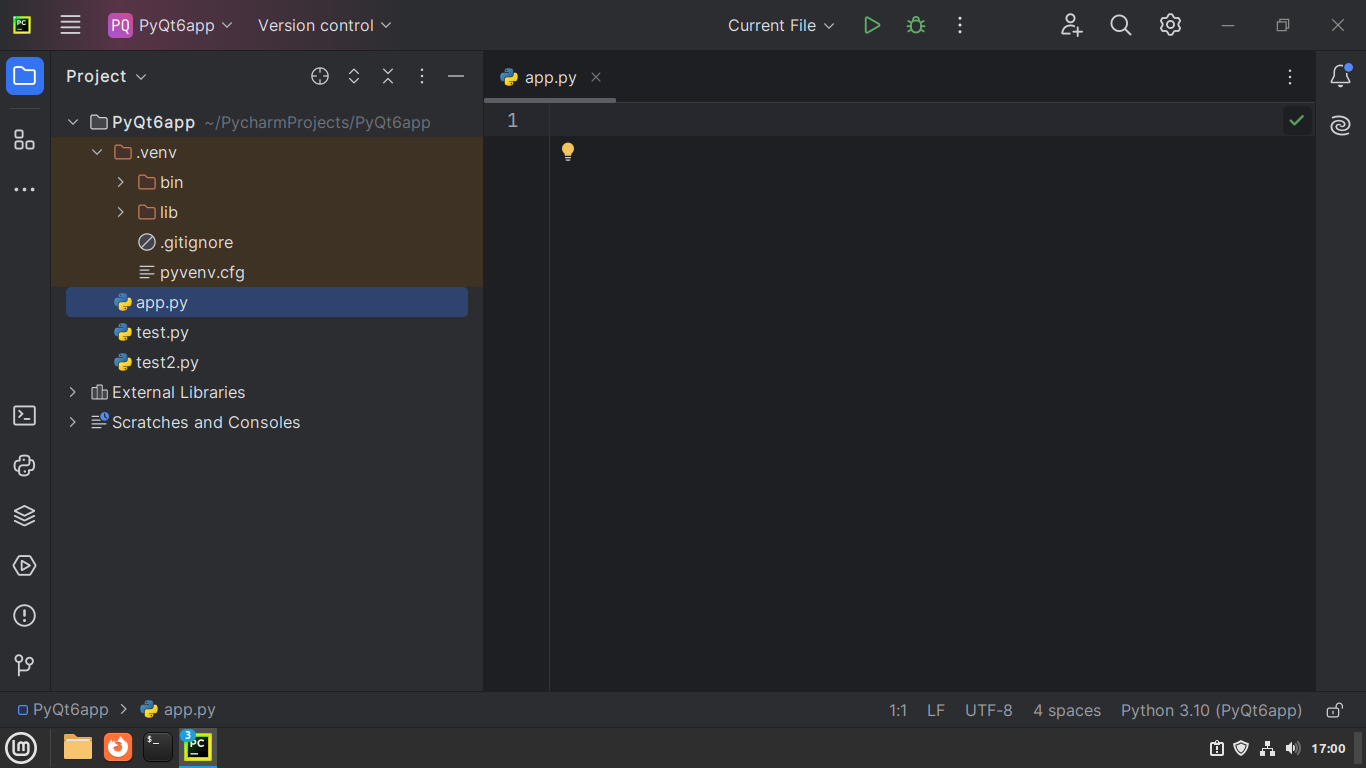 The
The app.py file opened in PyCharm's Editor
The Editor works like any other standard text editor or code editor. We enter text using the keyboard and press ENTER to create a new line. We can use the Gutter to track the line number we are currently on.
Now that we have a Python file in our project folder, we can start coding. First, we will import the required Python modules, packages, and classes:
import sys
from PyQt6.QtCore import QSize, Qt
from PyQt6.QtWidgets import QApplication, QMainWindow, QPushButton
As we type the import statements in the Editor, PyCharm will offer suggestions for matching keywords and Python packages using a pop-up:
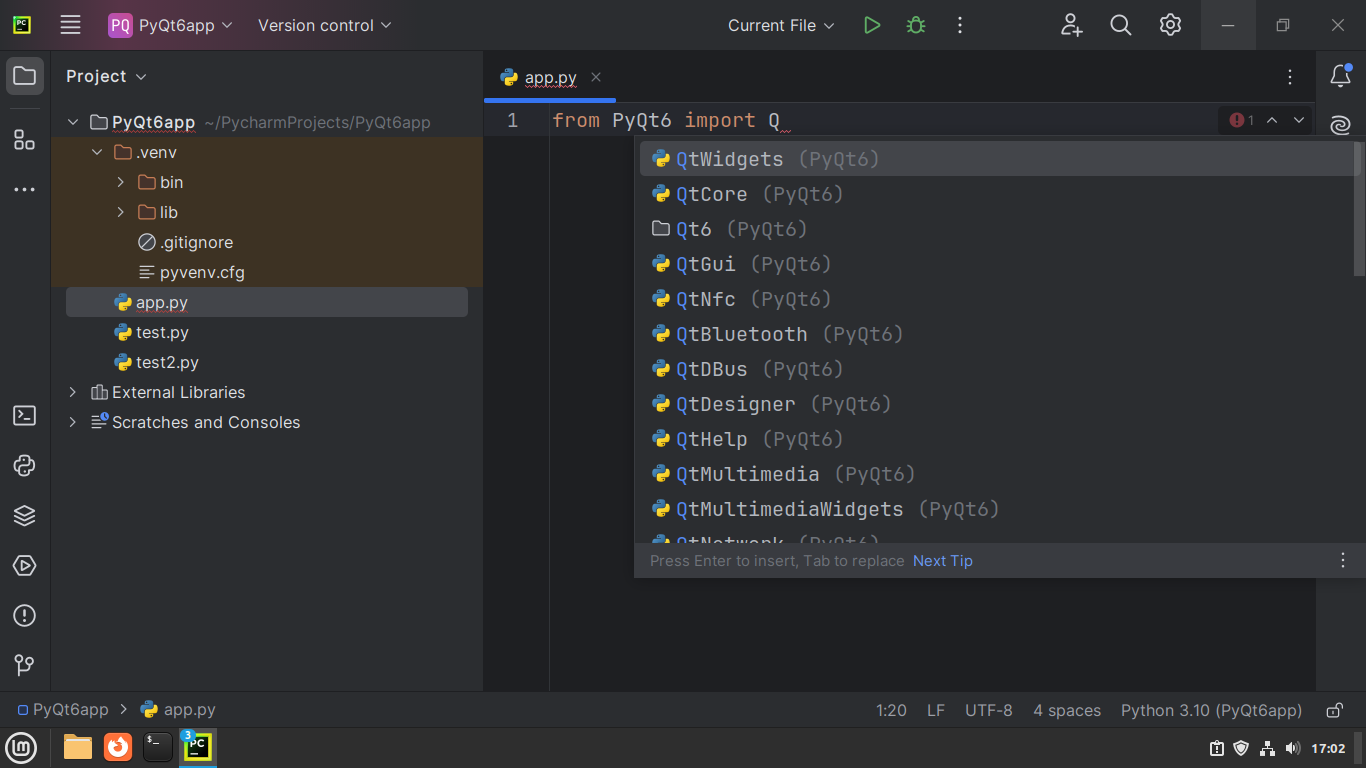 PyCharm's code suggestions pop-up
You can use the Up and Down arrow keys to navigate the list of suggestions. Then, press TAB to select the highlighted suggestion.
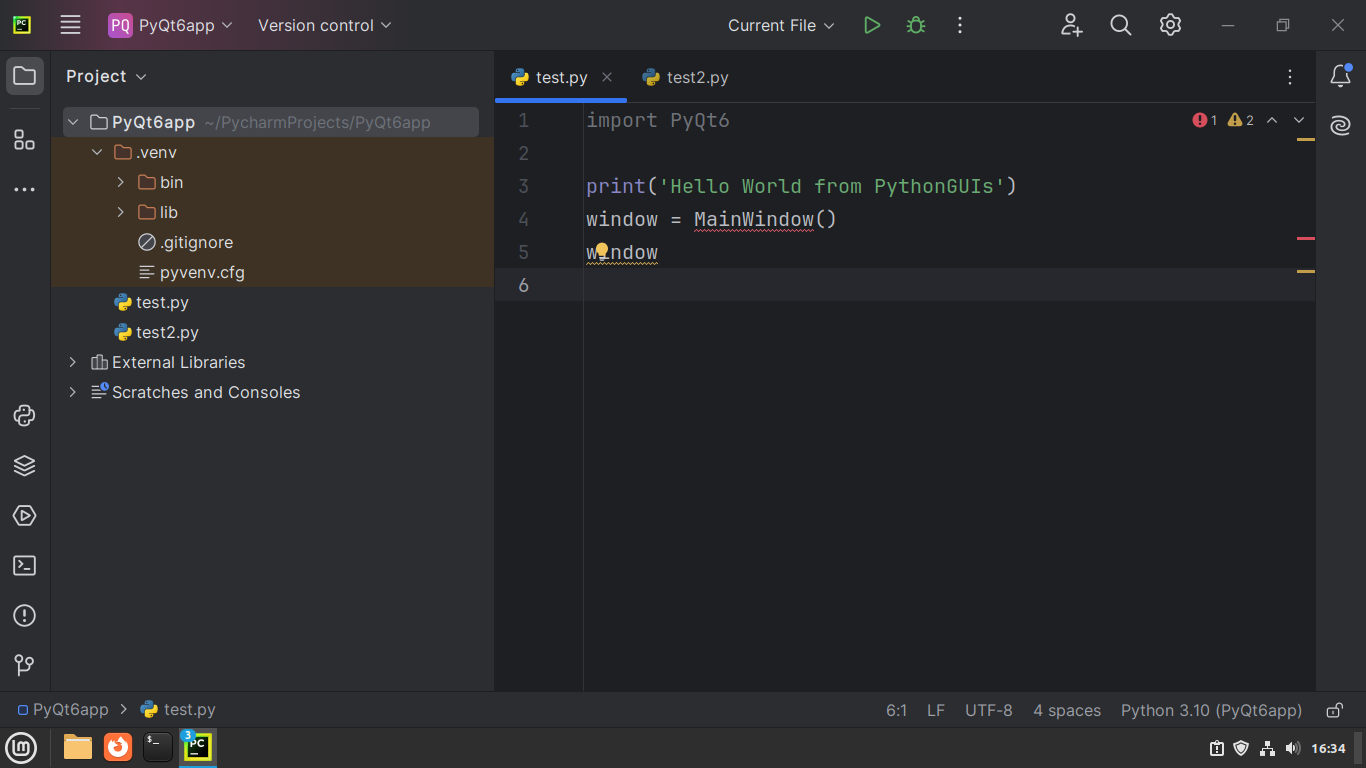
Using PyCharm's Error Detection and Code Fixes
Another useful feature of PyCharm is its ability to detect errors and provide fixes for problematic code. The following code block deliberately includes a few errors to demonstrate this feature:
QApplication
window = MainWindow()
window.show()
app.exec()
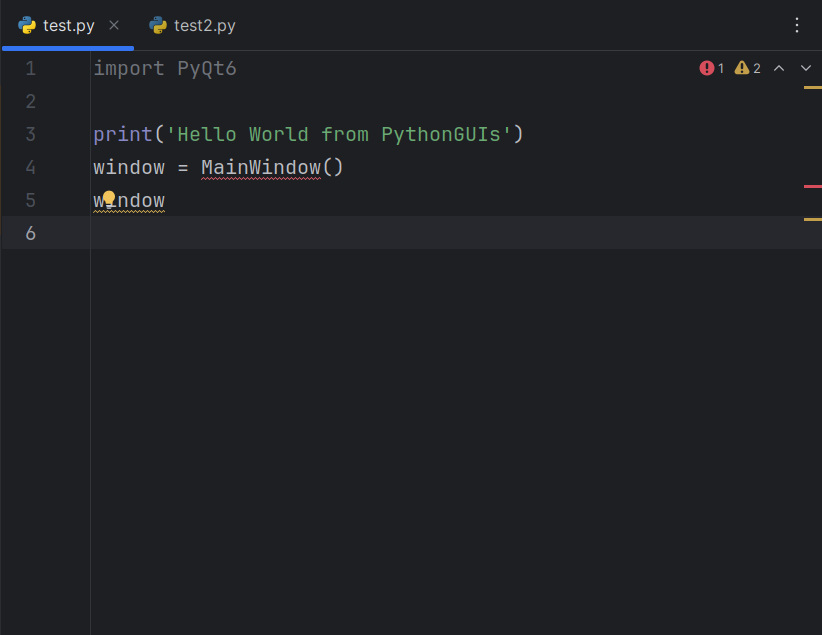
In this code, we haven't instantiated QApplication correctly. This error produces a cascade of errors that PyCharm nicely spots for us:
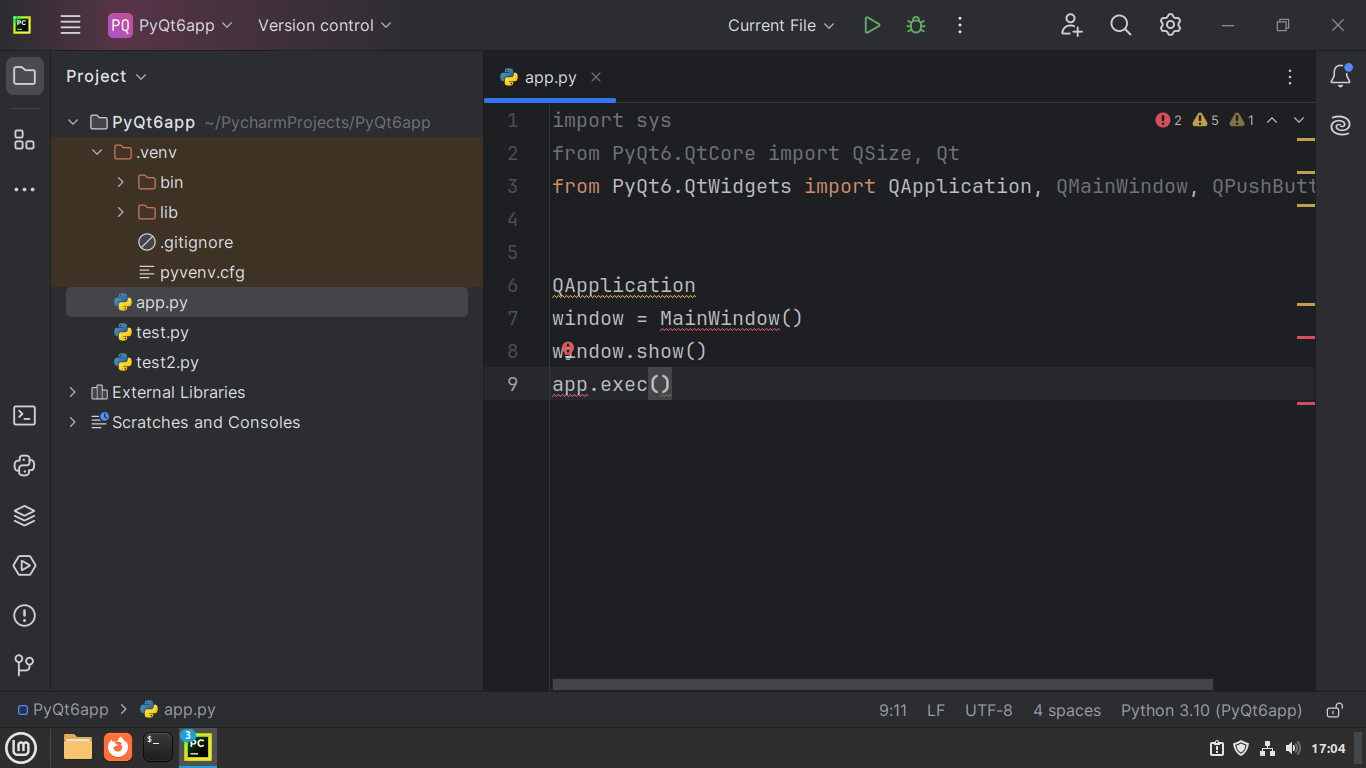 PyCharm's error detection feature
PyCharm detects a few errors in the code we just typed. It indicates the error by highlighting the relevant piece of code with a squiggly line.
The color of the squiggly line indicates the severity of the problem PyCharm detected. Any problem highlighted in red is a critical error that prevents the program from running and everything else is marked in yellow.
To discover what an error is about, we can drag the mouse pointer to the highlighted section and hover over it to see a tooltip as shown below:
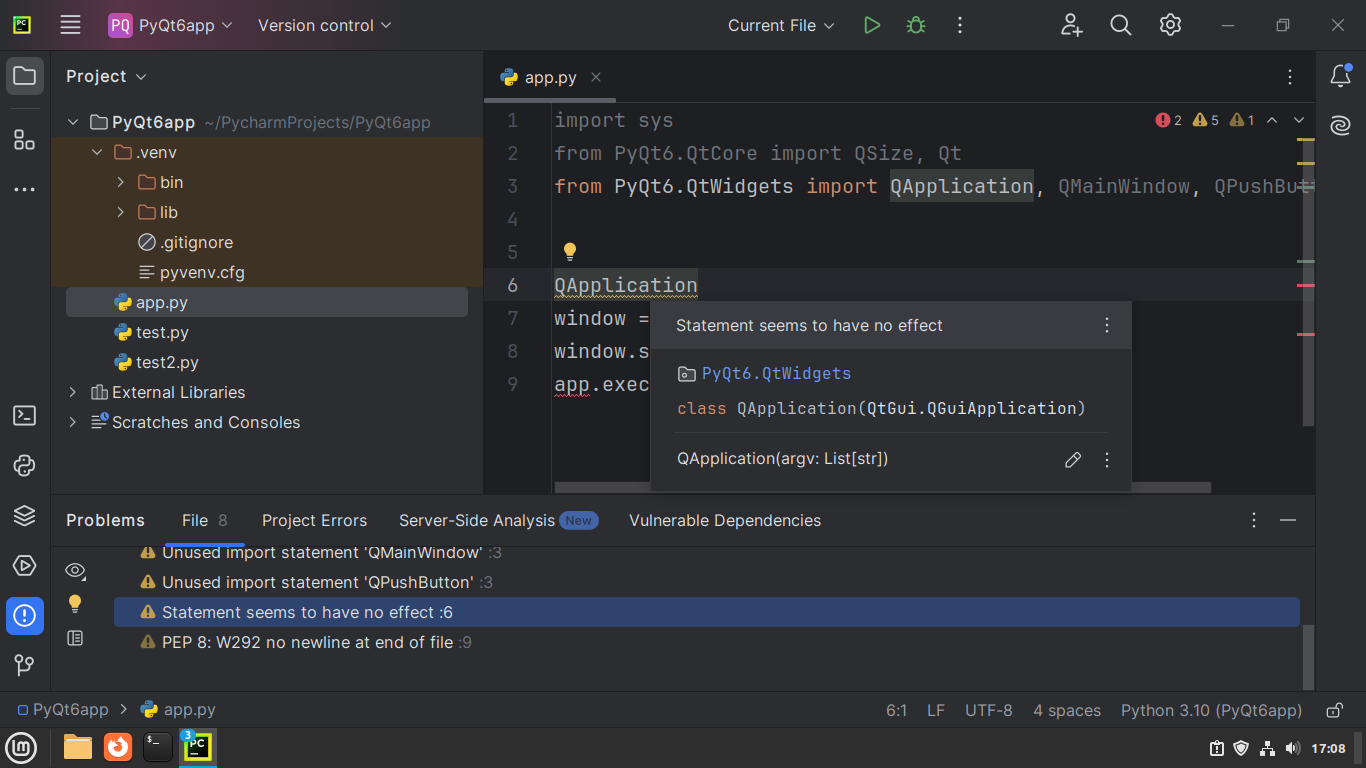 PyCharm's error tips: statement with no effect
PyCharm's tooltip says that the statement QApplication has no effect. This is because we are just referencing a class without creating a concrete object. As a result, PyCharm flags a critical error in the last line because the app name hasn't been assigned yet.
We can fix both errors by instantiating QApplication to create an object named app:
app = QApplication(sys.argv)
window = MainWindow()
window.show()
app.exec()
We've taken care of two problems detected by PyCharm, but there is still one critical error remaining. If we hover the mouse's pointer over the highlighted object, we'll see that PyCharm is complaining about window = MainWindow() because we are using a class that we haven't defined yet:
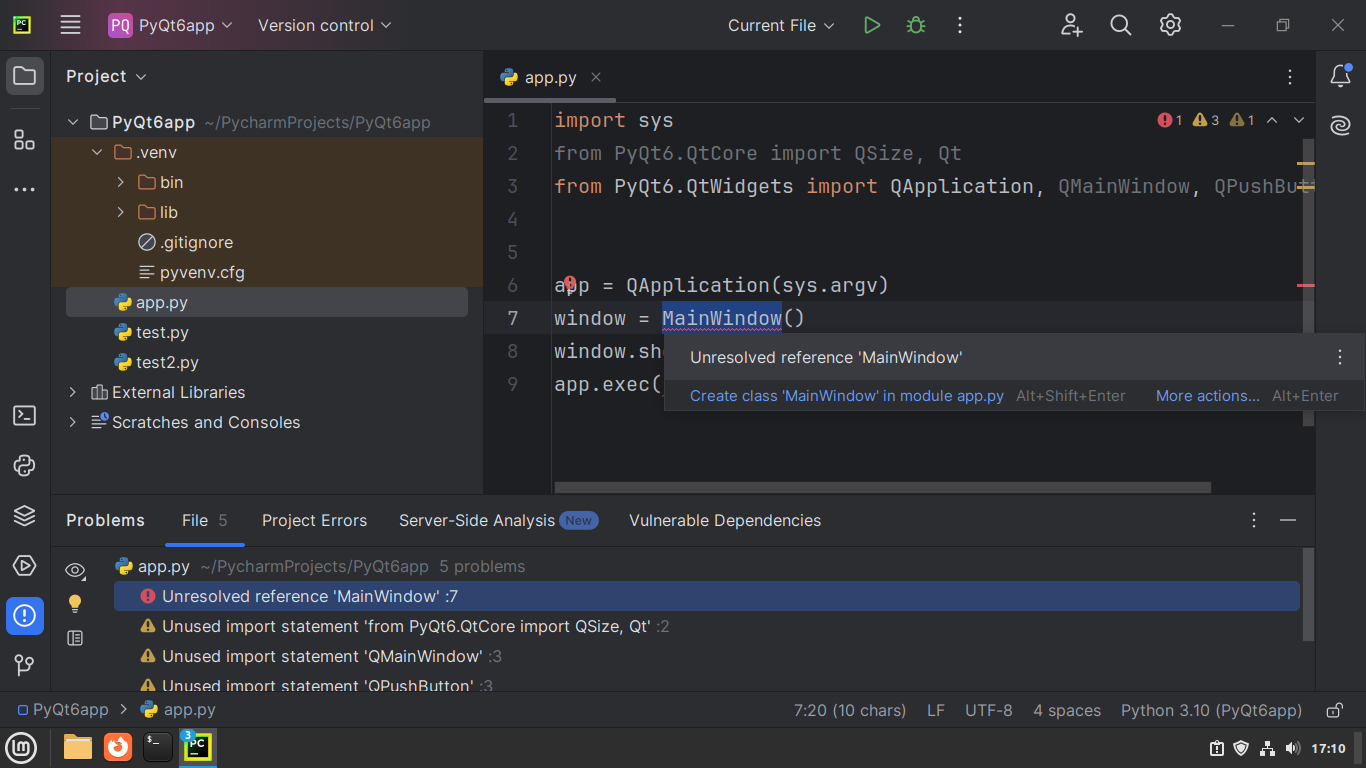 PyCharm's error tips: unresolved reference
To fix the issue, right-click the highlighted object to open the associated Context Menu. Once you see the menu, select Show Context Actions. This will open another pop-up where PyCharm offers smart suggestions to fix the problem.
For this particular problem, we'll choose the option Create class 'MainWindow' in module app.py as shown below:
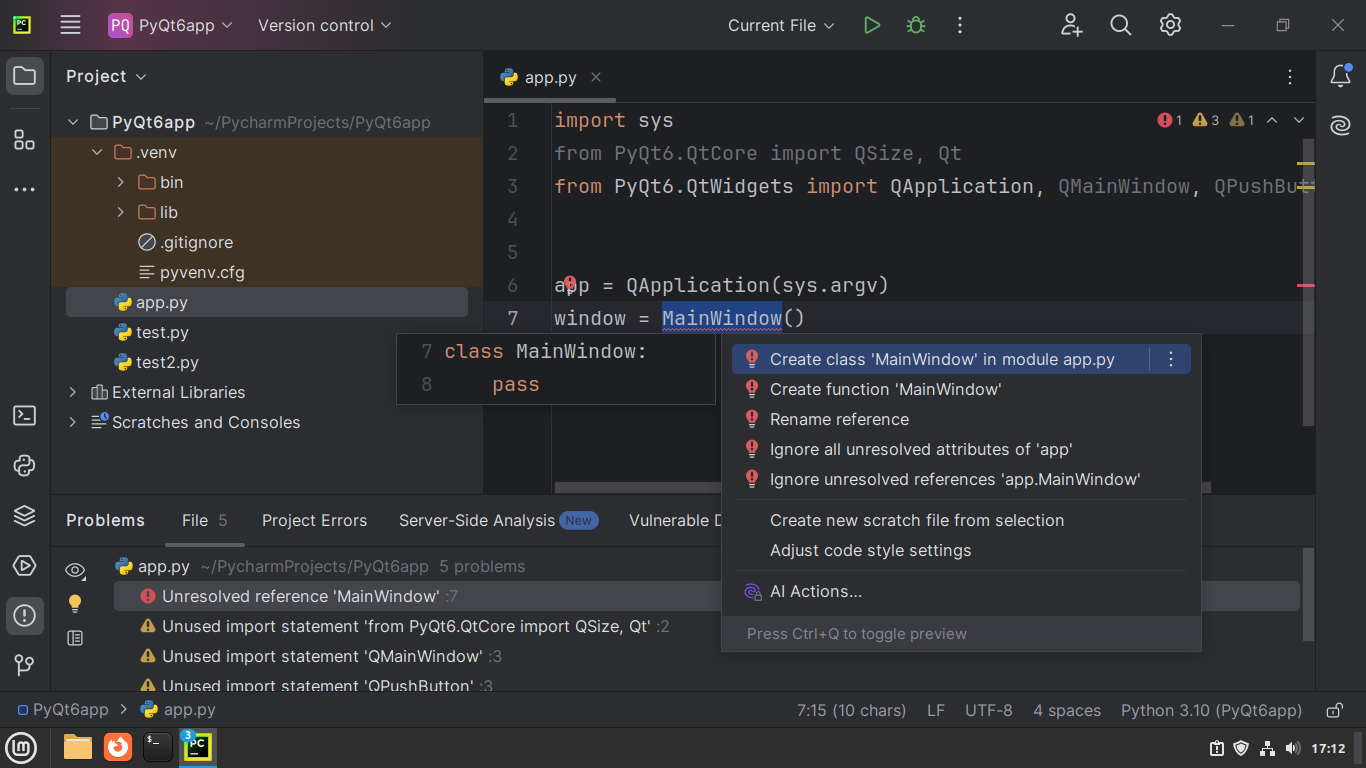 PyCharm's Context Actions pop-up
PyCharm automatically generates an empty class named MainWindow. Update the class as follows in order to specify how the app's GUI will look:
class MainWindow(QMainWindow):
    def __init__(self):
        super().__init__()
        self.setWindowTitle("My App")
        button = QPushButton("Press Me!")
        self.setFixedSize(QSize(400, 300))
        self.setCentralWidget(button)
Complete PyQt6 Application Code
With this update done, the complete code for app.py should look something like the following:
import sys
from PyQt6.QtCore import QSize, Qt
from PyQt6.QtWidgets import QApplication, QMainWindow, QPushButton

class MainWindow(QMainWindow):
    def __init__(self):
        super().__init__()
        self.setWindowTitle("My App")
        button = QPushButton("Press Me!")
        self.setFixedSize(QSize(400, 300))
        self.setCentralWidget(button)

app = QApplication(sys.argv)
window = MainWindow()
window.show()
app.exec()
Now you have a working PyQt6 desktop application. The next step is to run the app using PyCharm's features but before that, let's summarize what we've learned so far.
We learned how to create a file using the Project tool window and then edit it using the Editor. We also learned how to use some of the assistive coding features provided by PyCharm to get code suggestions, fix problems in our code, and generate boilerplate code for a faster coding experience.
Run Python GUI Code in PyCharm
PyCharm provides a convenient way to run code through its interface. To run our PyQt6 app, right-click on the Editor's work area to open the Context Menu. Then, select the Run 'app' option:
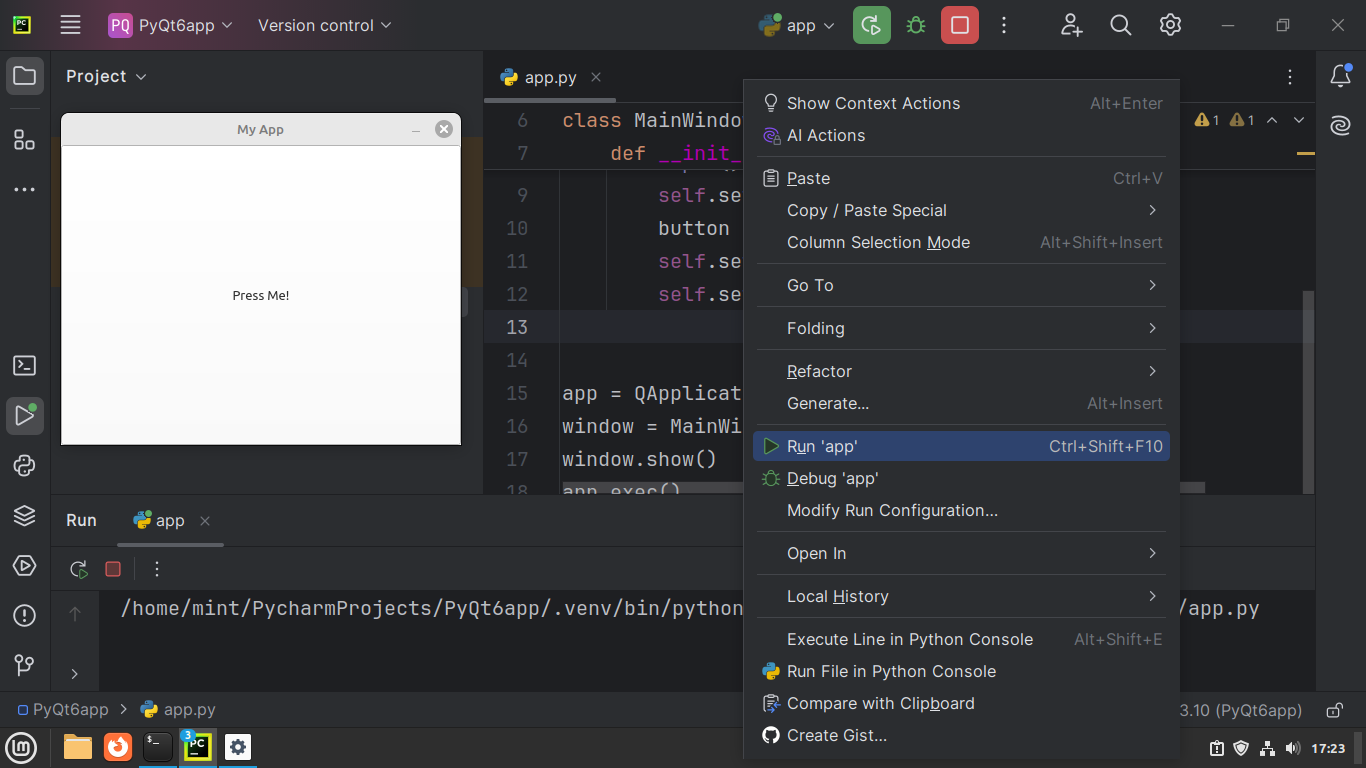 Running code with PyCharm's Run option from the Editor's context menu
The option to run code using the Run option in the context menu can be appropriate for short apps or scripts. However, when you have a much larger project with more than one file, it's often convenient to configure a default Python file for a project to run.
To do so, right-click on the app.py file in the Editor to show the Context Menu. Then, select Modify Run Configuration... as in the following screenshot:
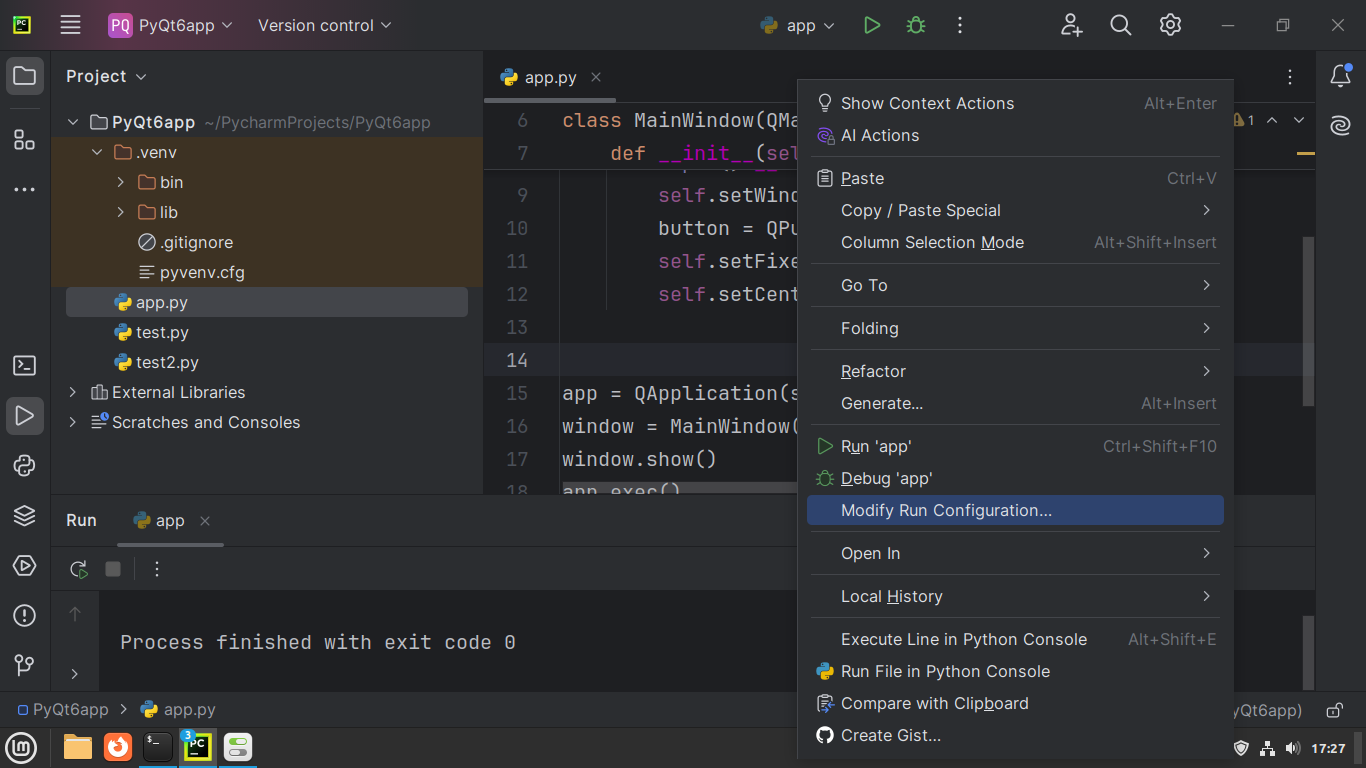 Modifying the Run Configuration in PyCharm
Once you select the Modify Run Configuration..., you get presented with the Edit Run Configuration dialog:
 PyCharm's Edit Run Configuration dialog
In the Edit Run Configuration dialog, we can modify the path to the Python script or set additional command-line arguments to pass when running the project. We can also set a name for this configuration at the top of the dialog and click the OK button.
Now, we'll see the app configuration next to the green Run button on the Window Header. This indicates which script PyCharm will run by default. If we have more than one Run Configuration, then we can switch between them by clicking on the dropdown menu next to the Run button.
Once we have set the project's default Run Configuration, we can run the associated script regardless of which file we are currently working on the Editor by clicking on the Run button in the Window Header:
 Running code with PyCharm's Run button from the Window Header
To terminate the app's execution from the PyCharm interface, click the Stop button in the Window Header.
Configure a Python Virtual Environment in PyCharm
Python's best practices recommend avoiding the system interpreter in favor of using a virtual environment. A Python virtual environment is an isolated copy of the system interpreter that we create for development purposes.
For most large projects, you should create a dedicated virtual environment. As we noted earlier, PyCharm creates a virtual environment by default whenever we create a new project. This allows us to manage the project's dependencies separately because they are installed in the dedicated Python environments rather than globally in your system.
We can see the installed packages in our current Python environment by clicking on the Python interpreter selector (in the Status Bar) and clicking on the Manage Packages... option. This action opens the Python Packages tool window, which we previously used to install PyQt6:
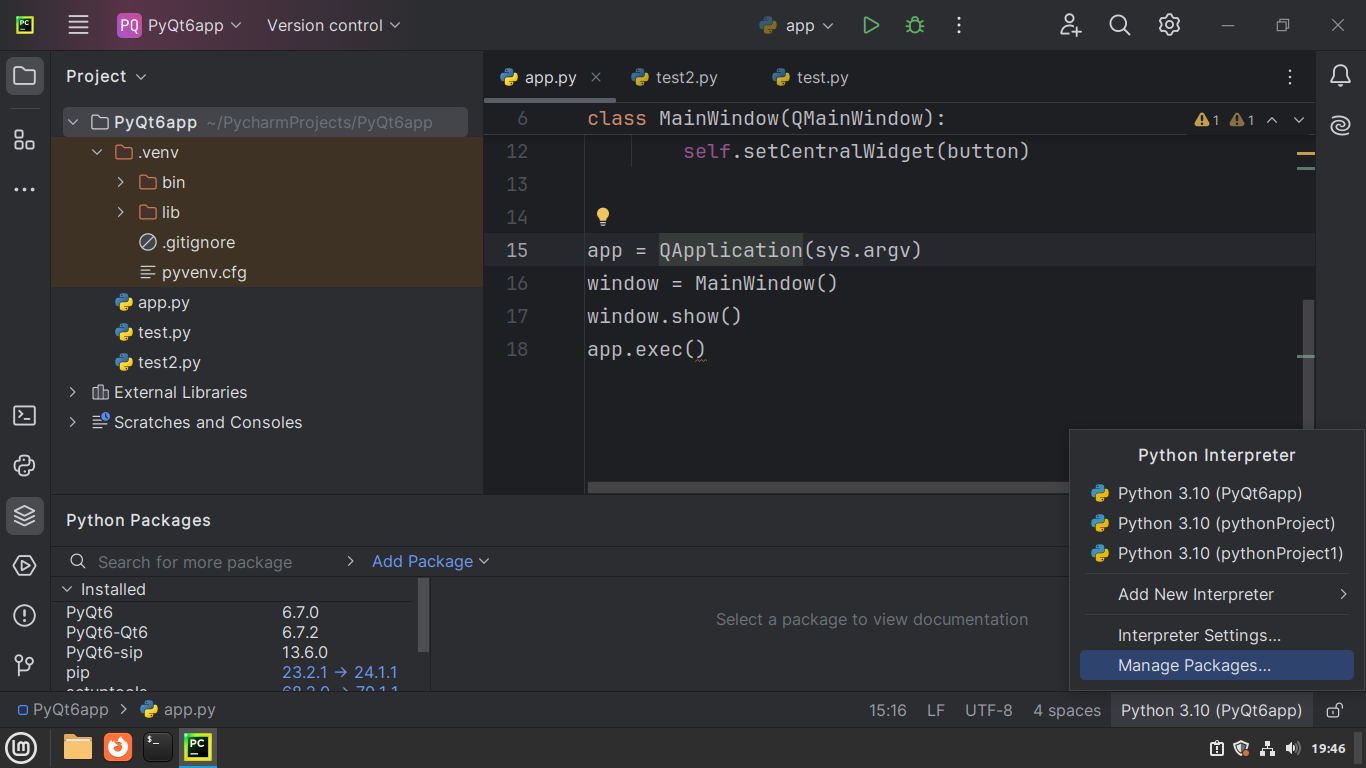 Managing Python packages in PyCharm
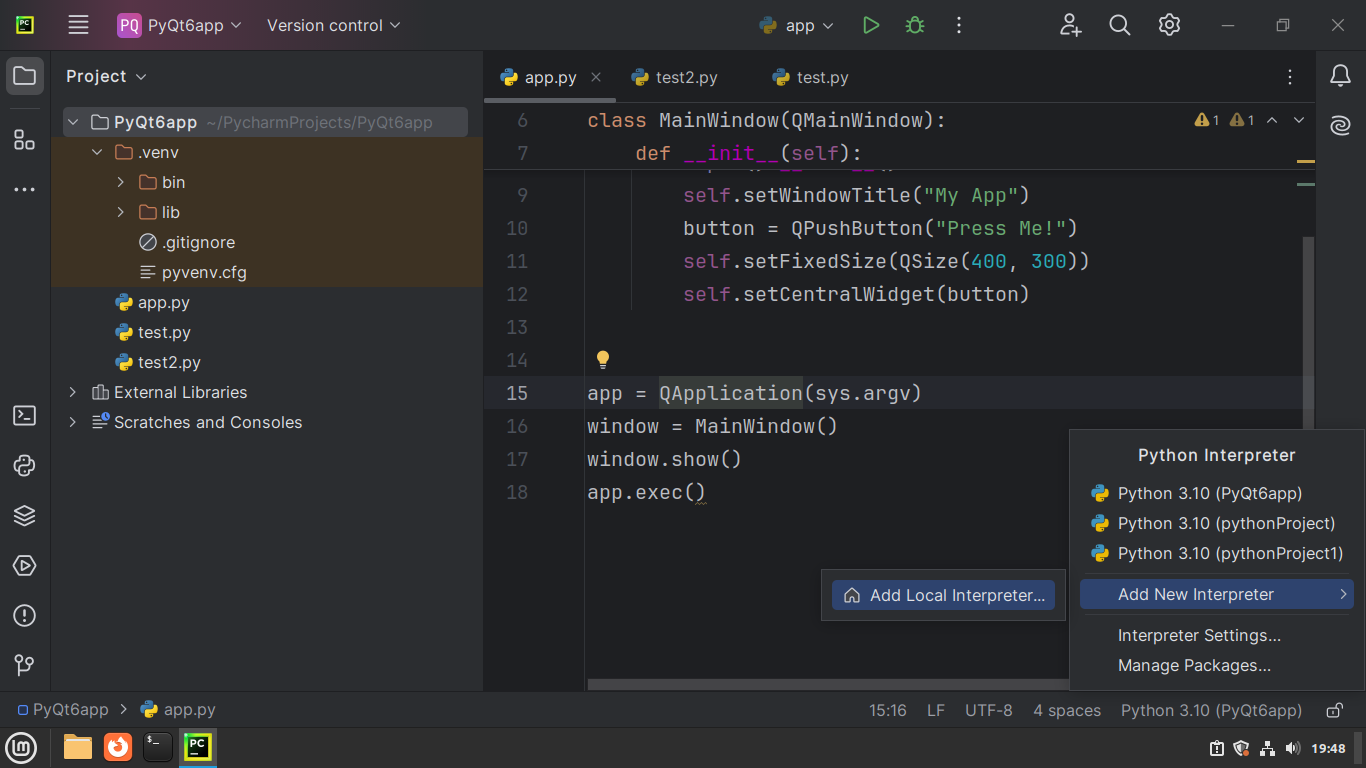
We can create a new Python virtual environment for our project by going to Add New Interpreter > Add Local Interpreter:
 Creating a new Python virtual environment in PyCharm - Step 1
After clicking on the Add Local Interpreter option, you get presented with the Add Python Interpreter dialog. There, you'll find several options to create working environments for Python coding. For the purposes of this guide, we'll only look at creating a standard Virtualenv Environment:
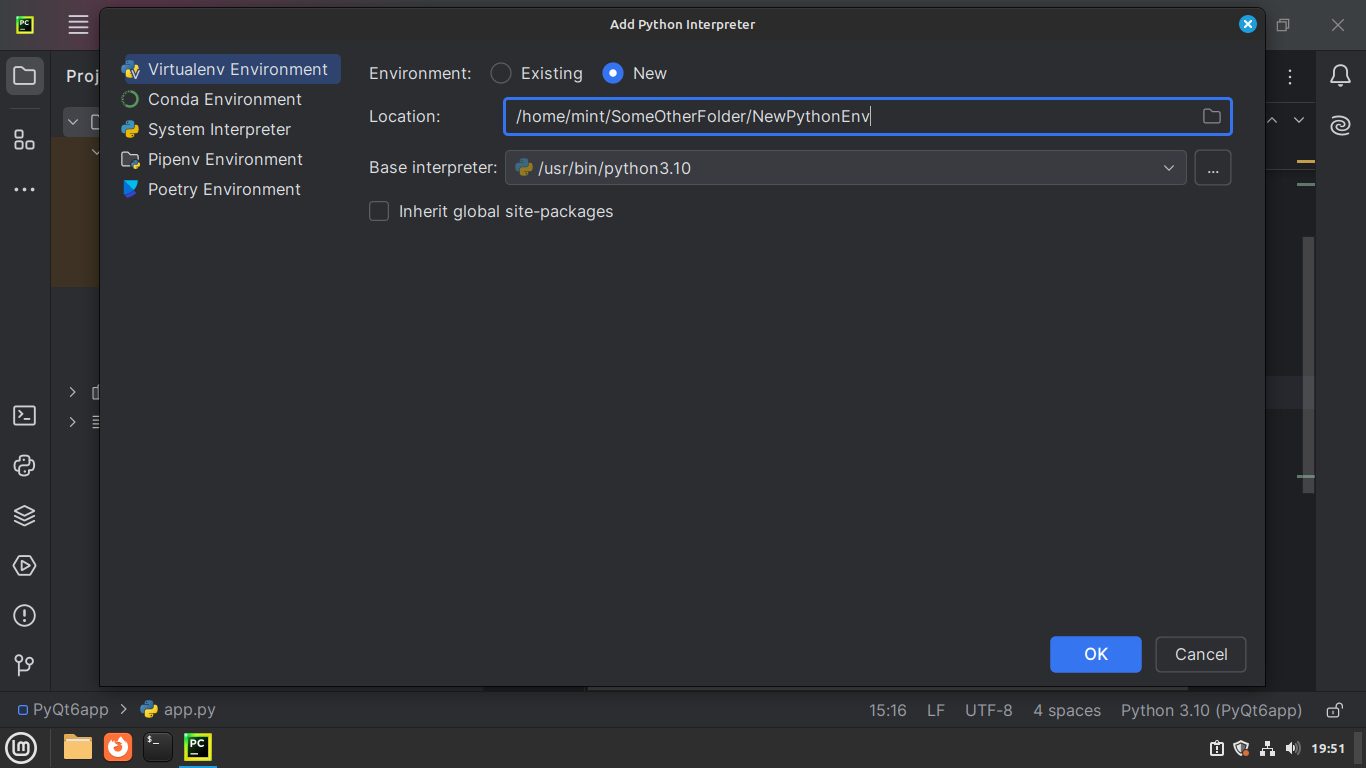 Creating a new Python virtual environment in PyCharm - Step 2
Specify where to create the Python virtual environment and select a base interpreter from the dropdown list if you have more than one version of Python. Then, click the OK button to create the new Python environment for the active project. We can see the current Python environment by looking at the Python interpreter selector in the right bottom corner of the Status Bar.
Because this is a brand new virtual environment, trying to run the app now will fail because we haven't installed PyQt6 in this Python environment.
To switch back to the previous Python environment, click on the interpreter selector and select the relevant interpreter from the list:
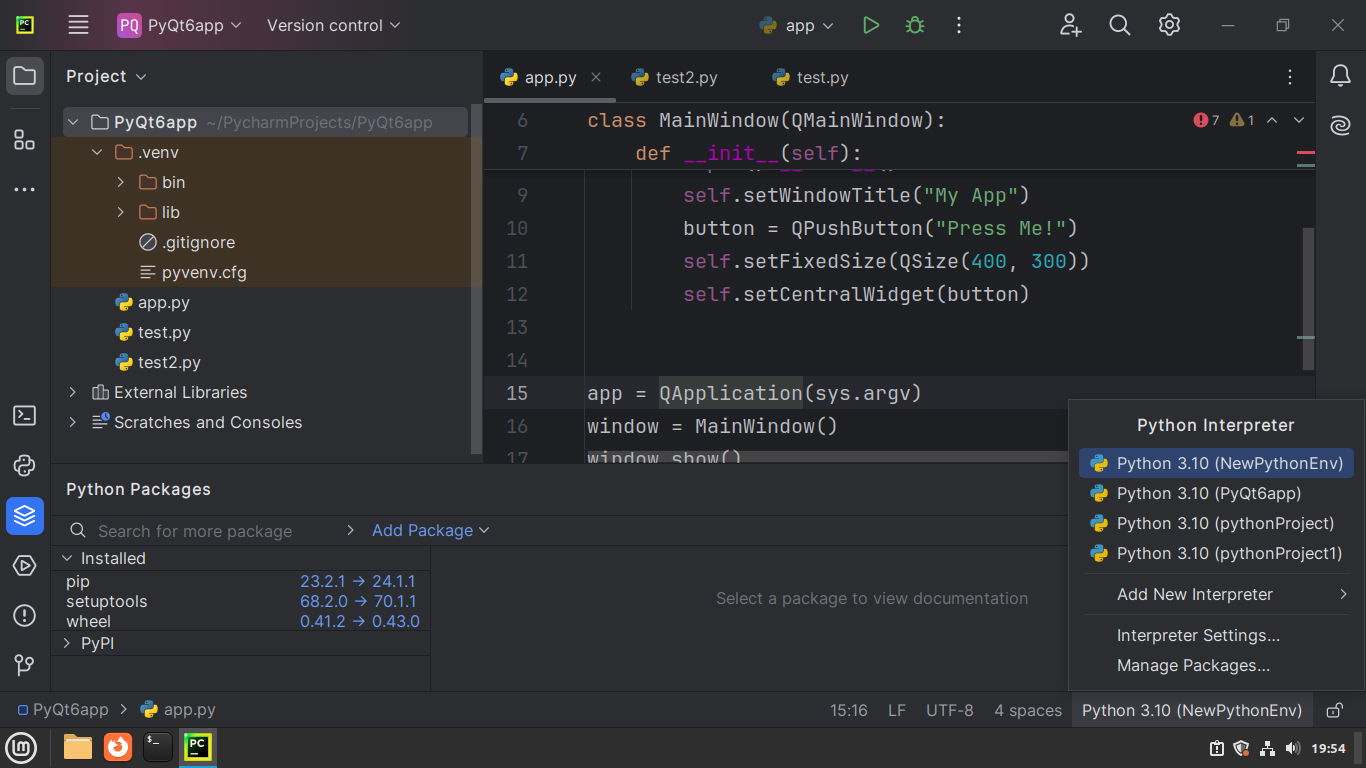 Changing the Python virtual environment in PyCharm
To get back to the original Python environment, select the Python 3.10 (PyQt6app) menu option in the dropdown list.
Use Git for Version Control in PyCharm
Version control systems (VCS) allow us to track changes to a project's codebase. They are useful because they let us know what has changed in the app and who is responsible, which is particularly important when working with teams. VCSs also make it easy to revert any changes we make, giving us more freedom to test out new features.
PyCharm has built-in support for several VCSs. In this tutorial, we'll focus on Git, which is one of the most popular. In this section, we'll go over how to create and manage a Git repository for a Python GUI project in PyCharm.
WARNING: To use Git-related features in PyCharm, Git needs to be installed. If you haven't done so already, please follow this guide to install and set up Git on your computer.
Track Changes in a Project
You can use Git via its command-line interface. However, PyCharm allows us to perform common version control tasks through a graphical interface.
To enable version control for the current project, go to the Version Control tool window at the bottom of the Sidebar and click on Create Git Repository link:
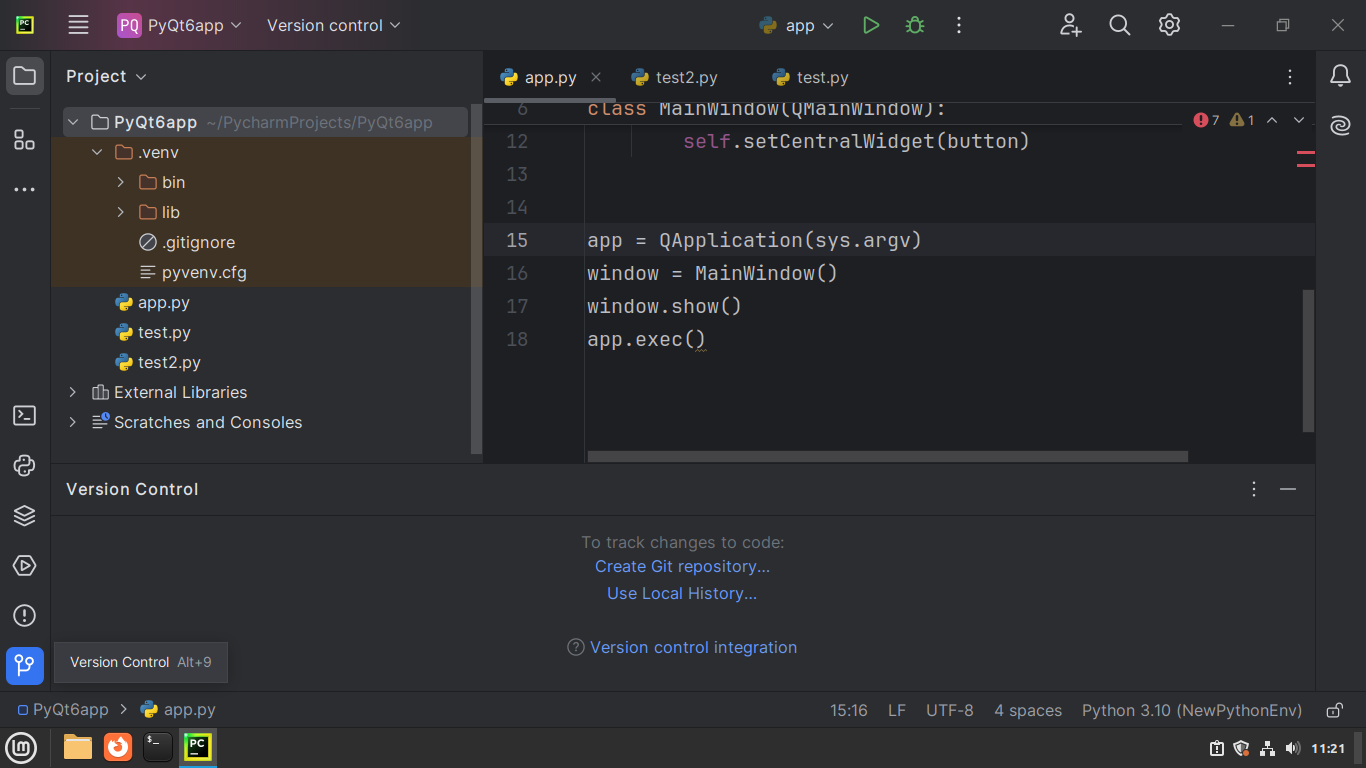 PyCharm's Version Control tool window
Once you click the Create Git Repository link, you get the Create Git Repository dialog:
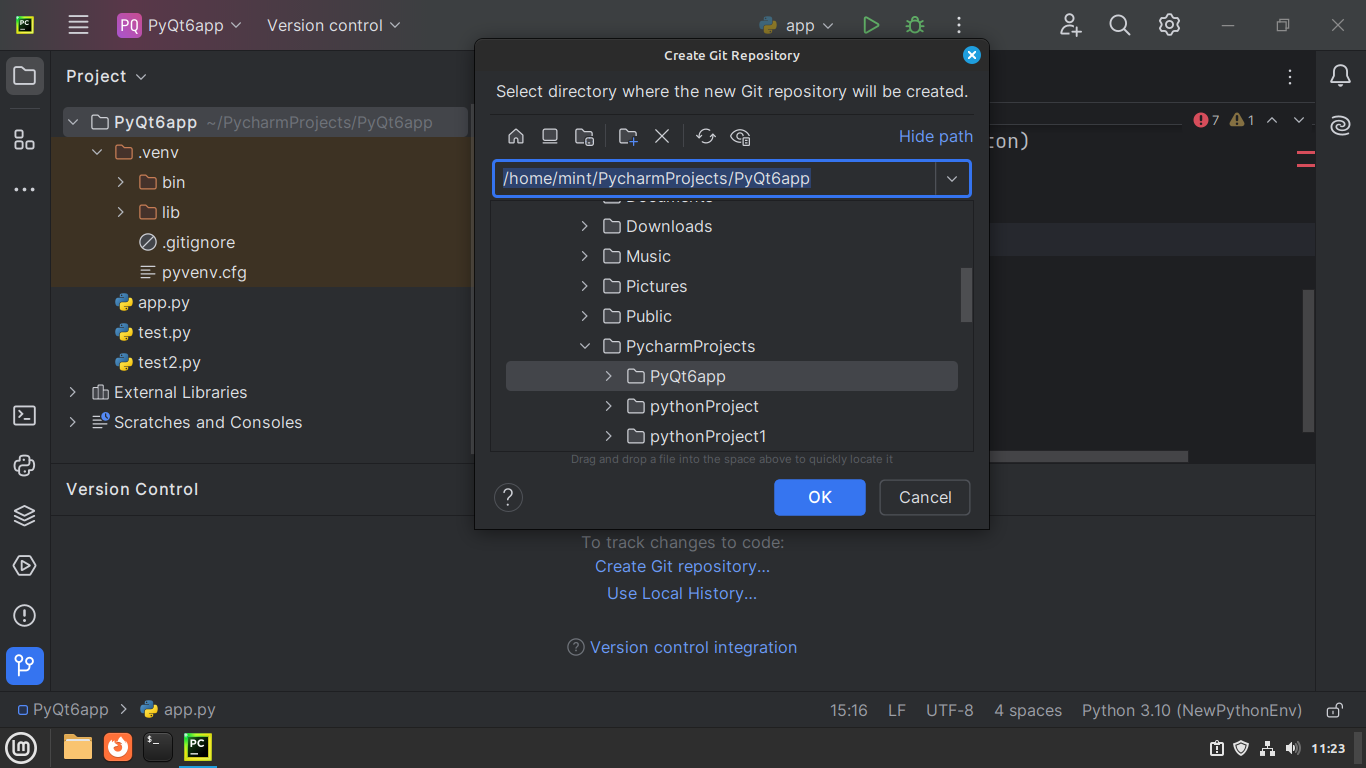 PyCharm's Create Git Repository dialog
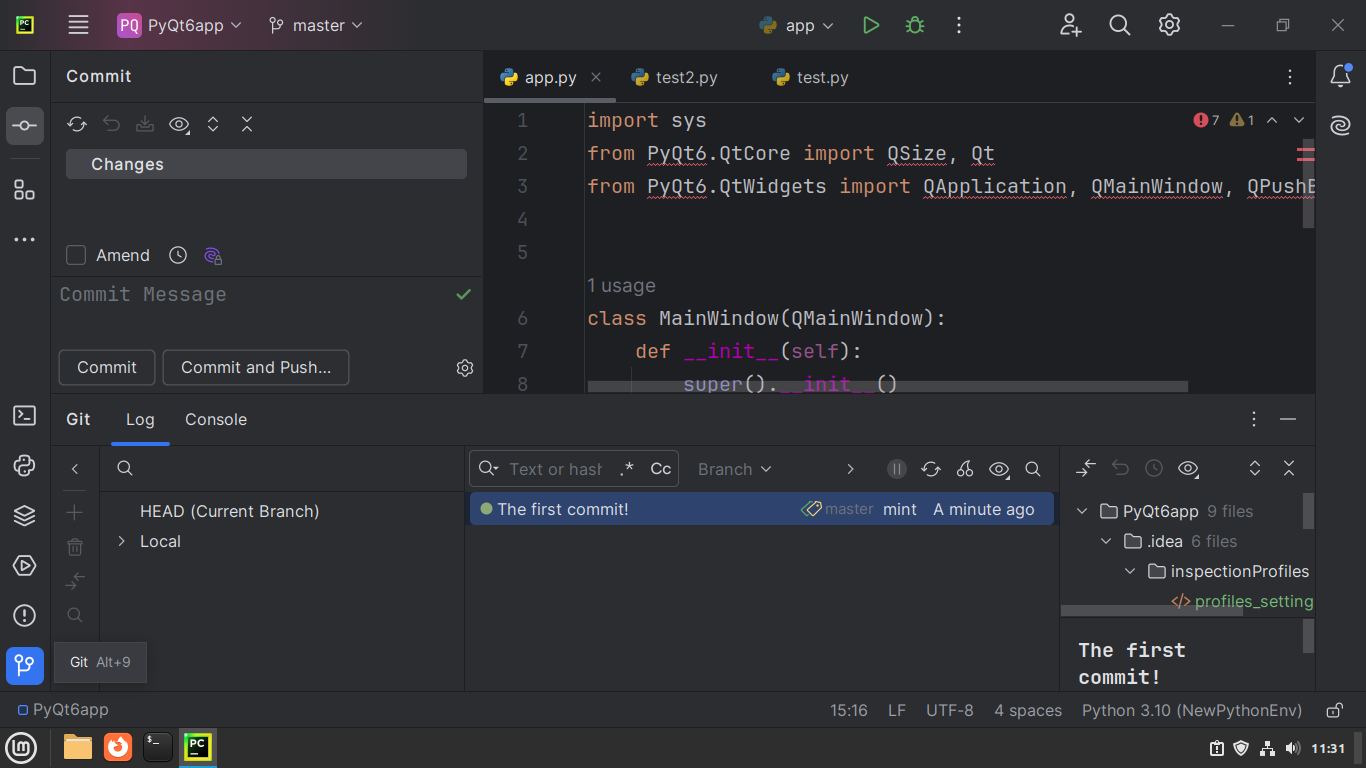
Once you create the Git repository, the tool window will update its view to provide additional information. It should be mostly blank right now because we haven't started tracking any files.
To start tracking project files, we need to commit to the Git repository. To do that, a tool window named Commit will appear in the Sidebar (near the top).
A commit is a snapshot of the current state of all the files in a project. Each time we make a significant change to our codebase, we make a commit to mark what changed and by whom.
Open the tool window and look at the section named Changes:
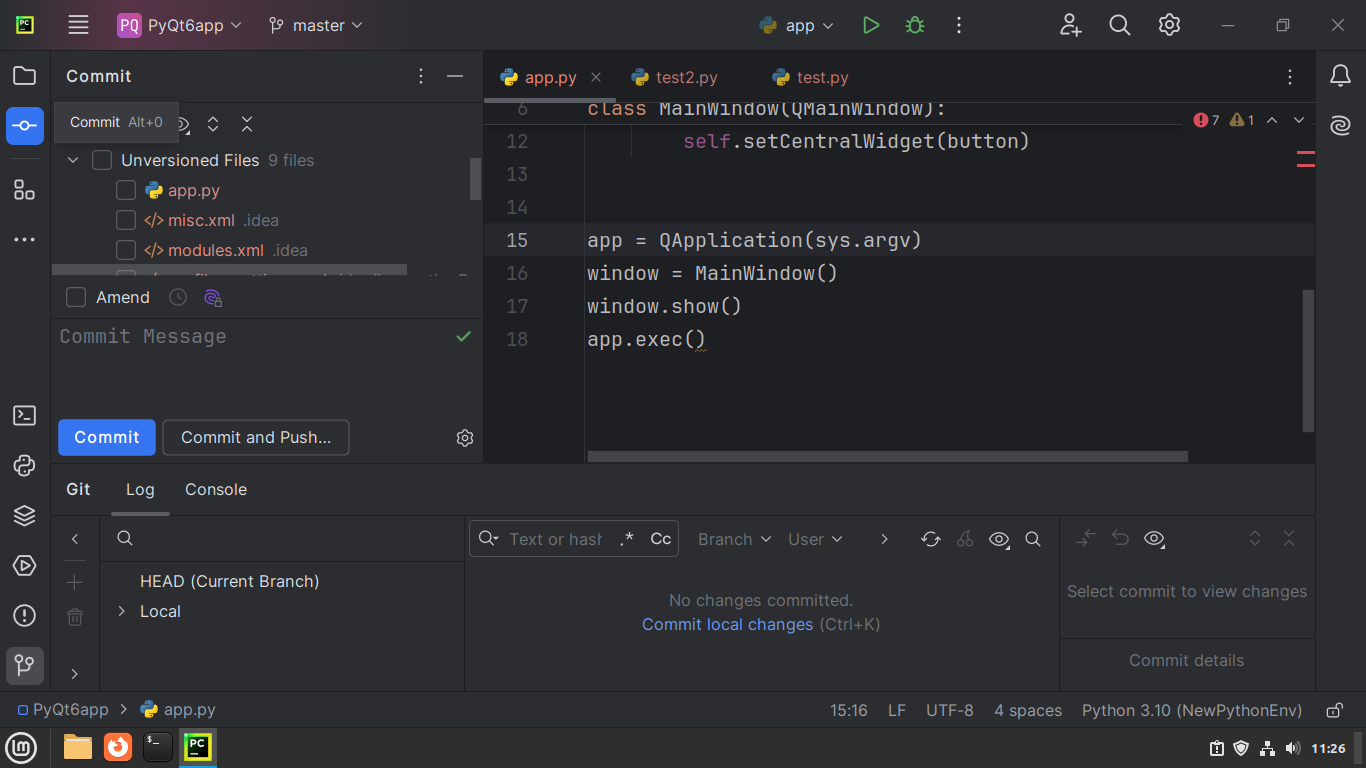 PyCharm's Commit tool window
The Changes section under Commit shows any project files that have changed or aren't being tracked. Because we aren't tracking any files for now, all of our project files appear under Unversioned Files.
We can select which files we would like to include in a commit by marking the checkbox next to each filename. For this project, select all of the Unversioned Files in the first commit.
There's a text box right below the Changes section where you can type a commit message to describe what changed in these files. Because this will be our first commit for the current project, we can write a message like "Initial commit":
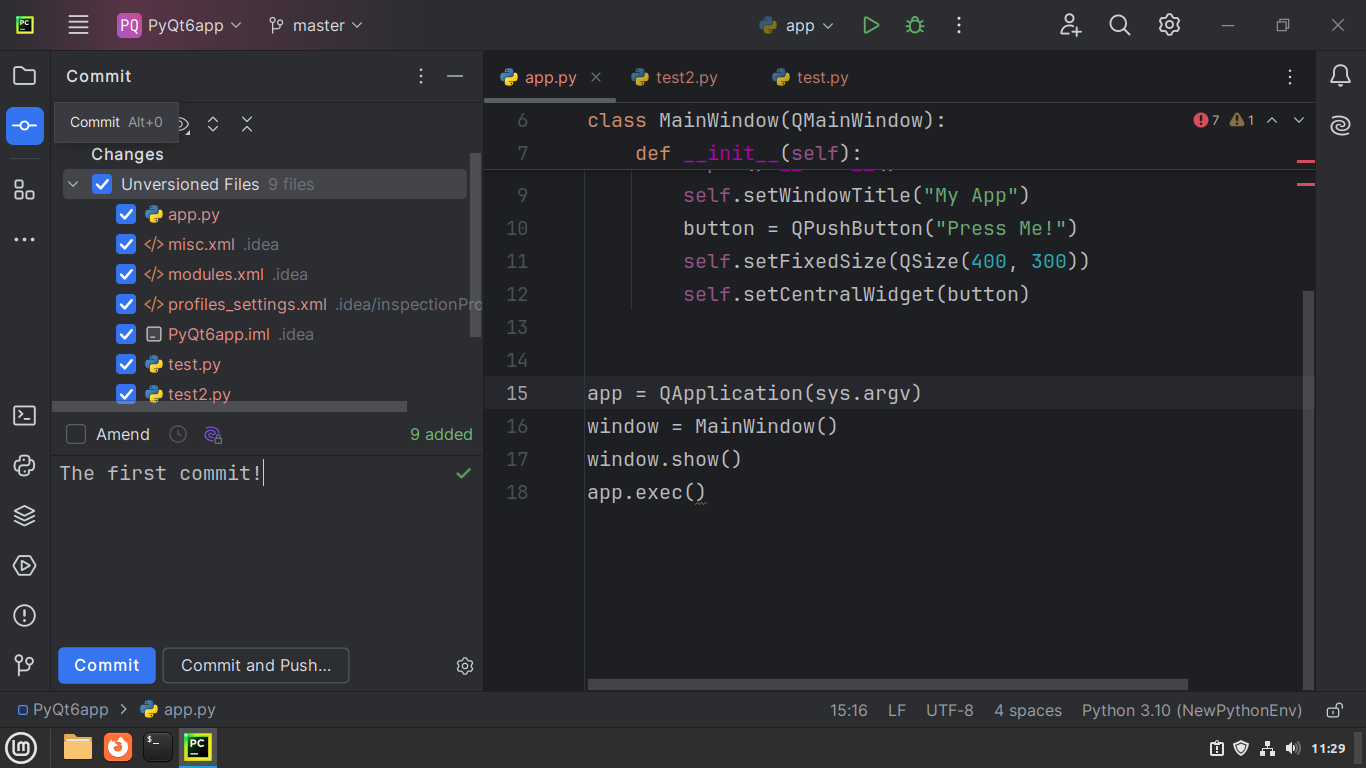 Select the files to commit and add a commit message in PyCharm
Once we've selected the files to include in the commit and typed the commit message, we can make the commit by pressing the Commit button underneath. The commit we made should now appear in the Version Control tool window:
 PyCharm's Version Control tool window showing a commit
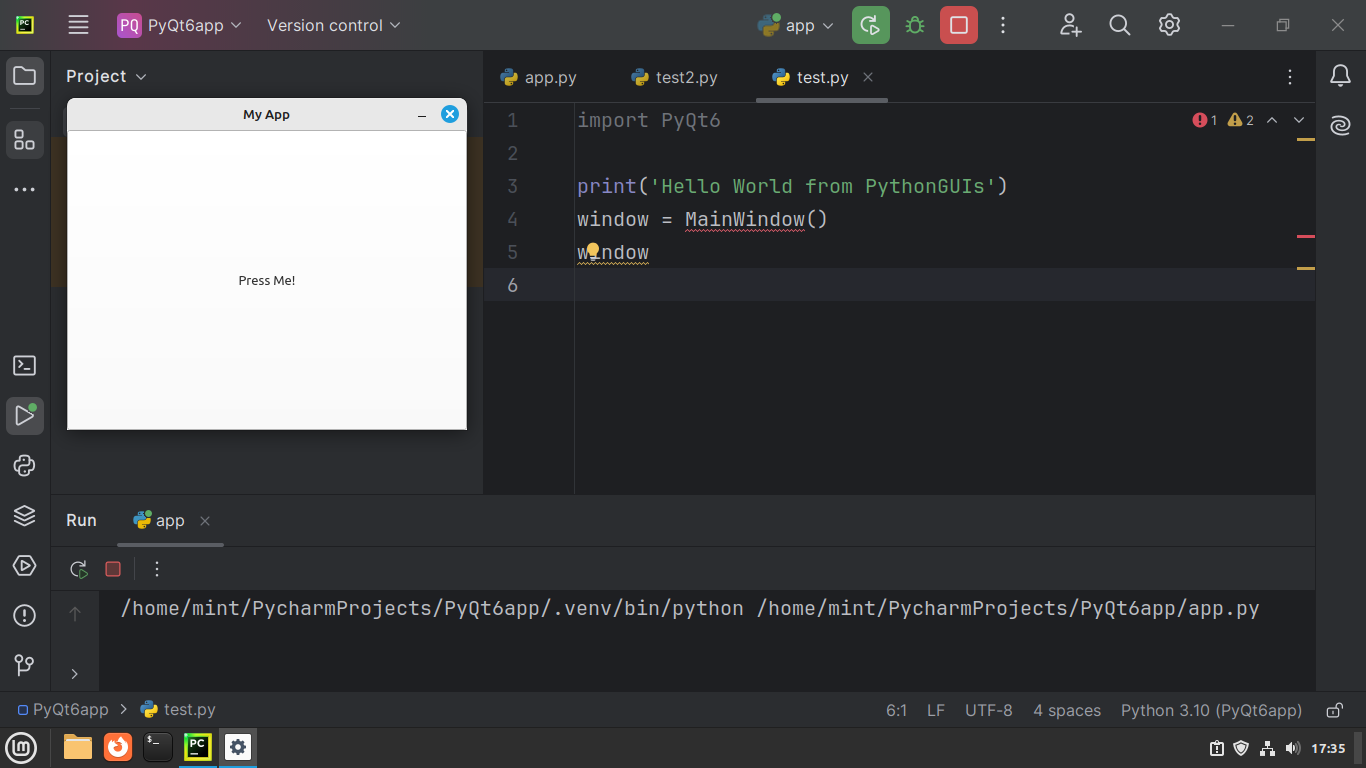
We'll make one more commit to this project by changing the text of the button in app.py from "Press Me!" to "Press This Button!":
class MainWindow(QMainWindow):
    def __init__(self):
        ...
        button = QPushButton("Press This Button!")
        ...
When a project is version-controlled, PyCharm will indicate when a line has been added, modified, or deleted from a file by showing a colored indicator next to the line number in the gutter. The indicator disappears once we commit the changed file to the repository again:
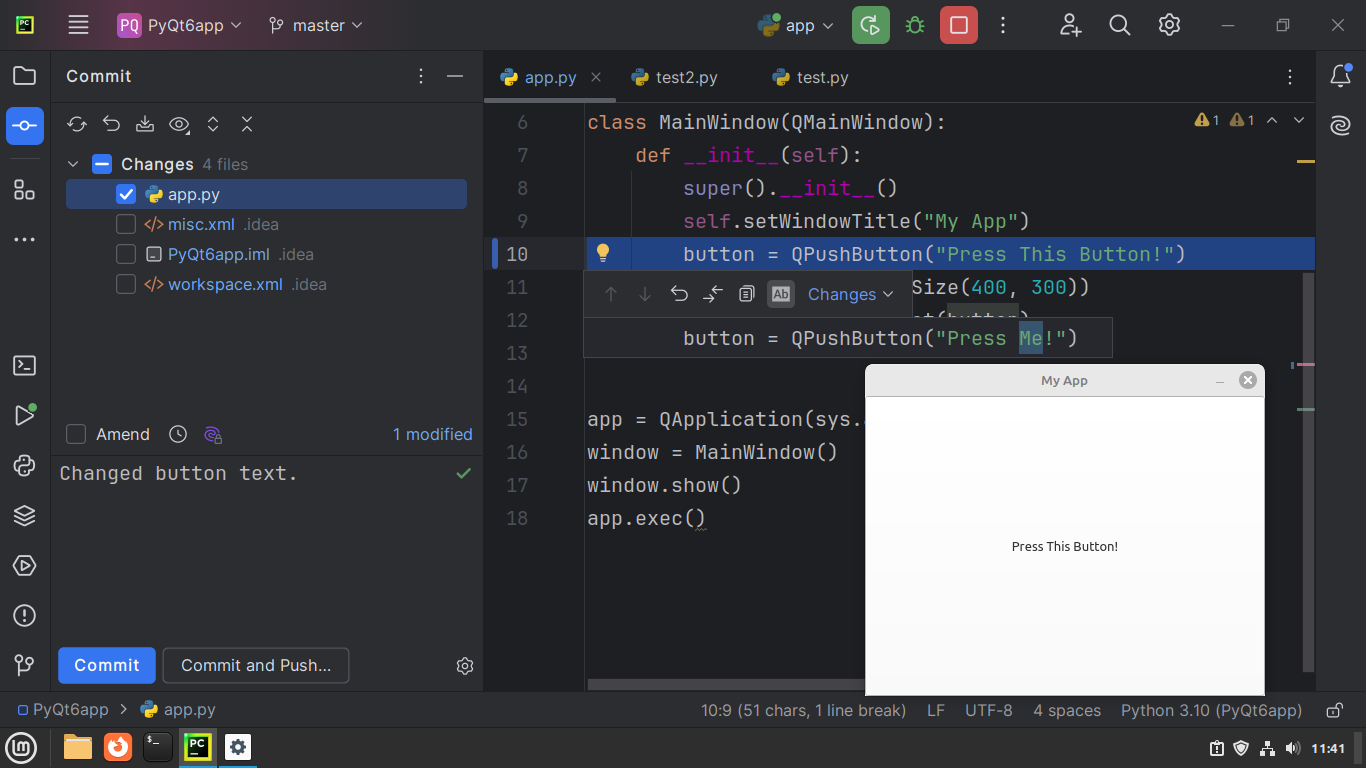 PyCharm showing a colored indicator for modified lines
Go to the Commit tool window, select app.py under Changes, type a commit message like "Changed button text," and then press the Commit button again. You'll see the new commit appear above the previous one in the Version Control tool window:
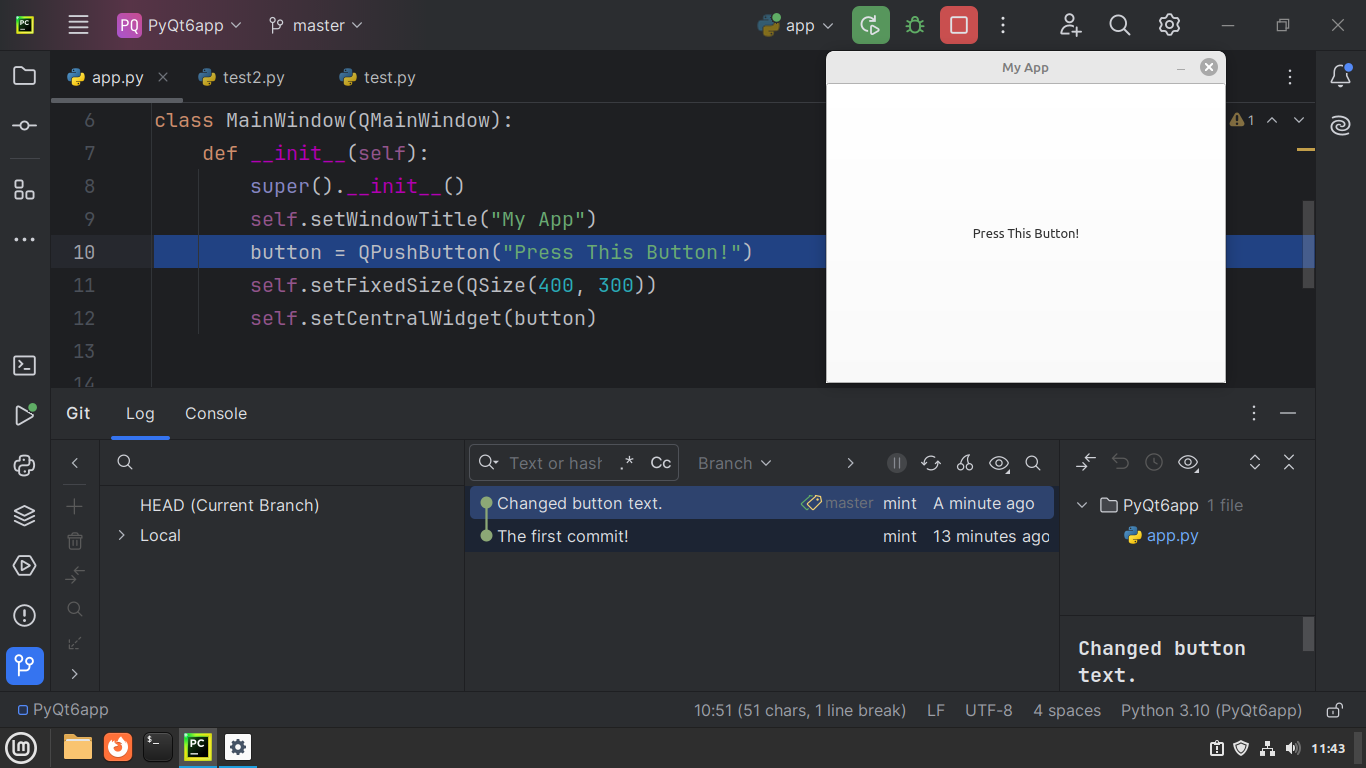 PyCharm's Version Control tool window showing the commit history
This is called the commit history, where we can see all the changes or commits that we've made in a project.
Push a PyCharm Project to GitHub
We've created a local Git repository and want to publish the project to a remote repository on GitHub. Before doing that, we need to authenticate so that PyCharm can access, create, and delete remote repositories on our GitHub account.
We could authenticate manually using SSH. However, PyCharm simplifies the process by integrating GitHub and GitLab right into the IDE. To authenticate, go to Settings and look for GitHub under Version Control. Then, click on the plus (+) sign and select the Log In via GitHub option:
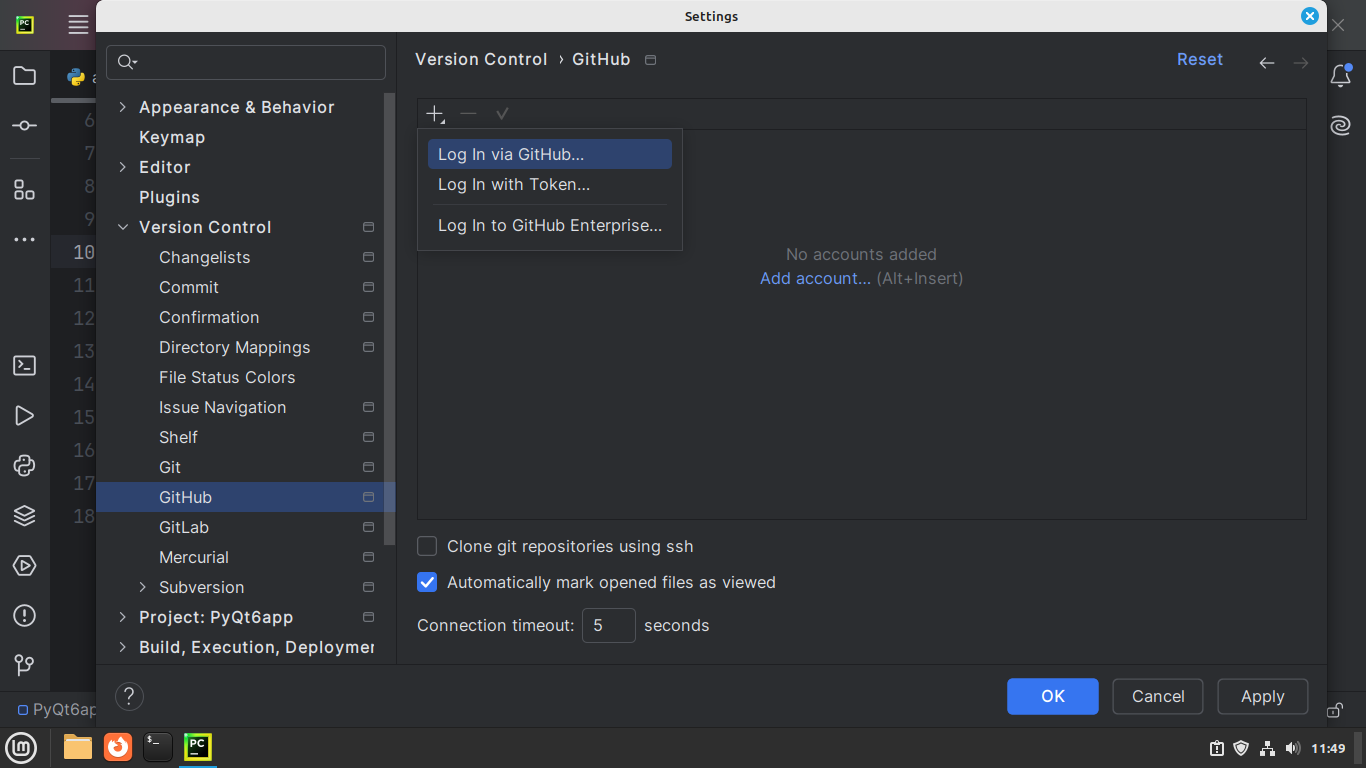 Log in to GitHub through PyCharm's UI
A browser window should open and ask you to confirm whether you want to authorize PyCharm to access your GitHub account. Once you confirm by selecting Authorize in GitHub, you will be redirected to GitHub:
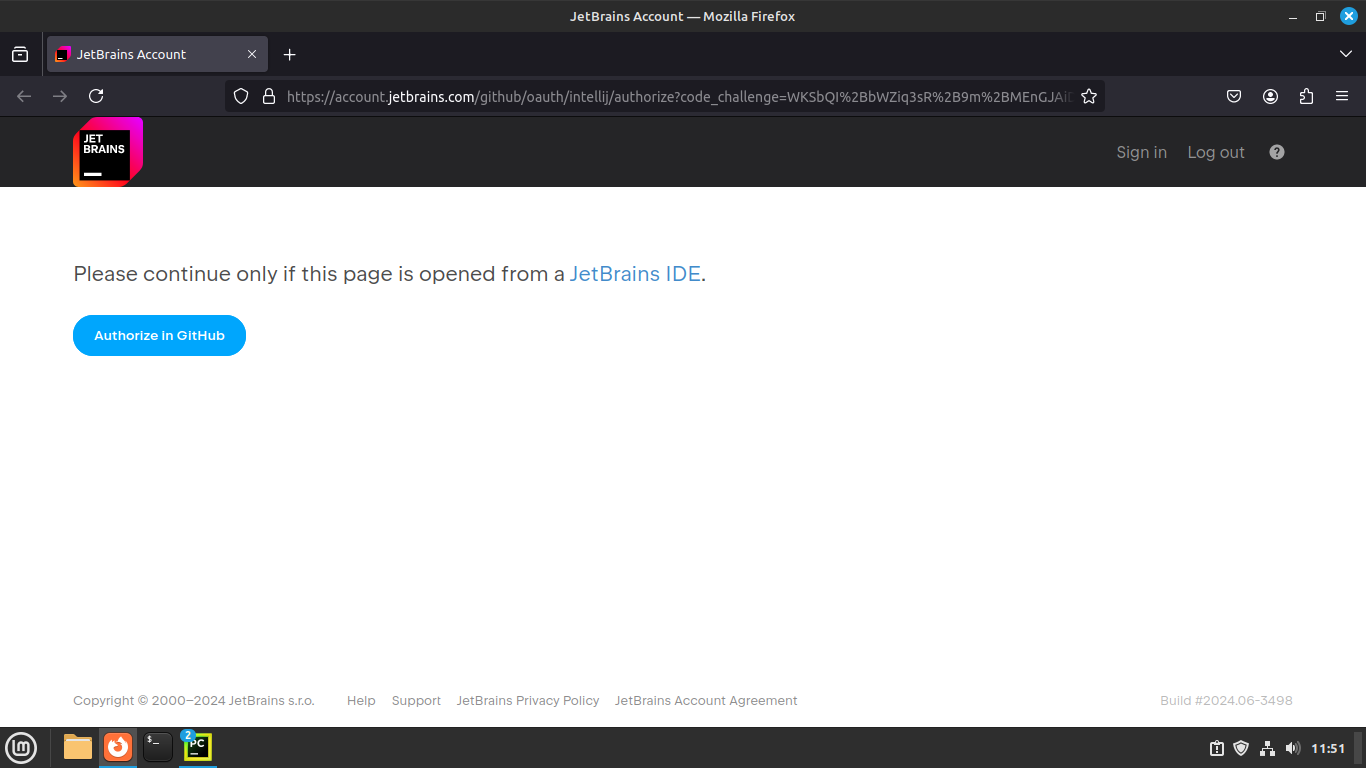 Authorize PyCharm in GitHub
If you aren't already signed in, you will be shown the login page where you can sign up too if you don't already have a GitHub account:
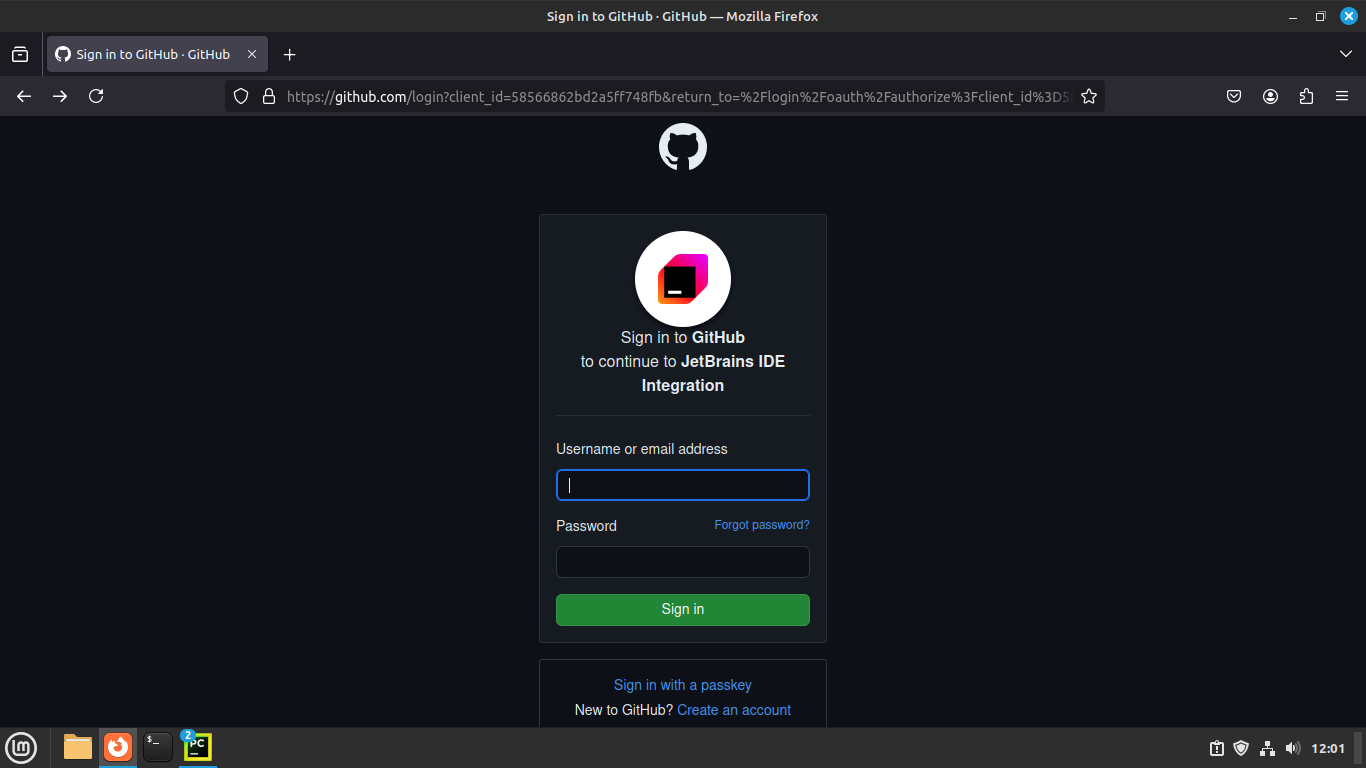 GitHub's log in page for authorizing PyCharm
Once you provide your GitHub credentials and click the Sign in button, you'll get your GitHub account listed in the Version Control screen:
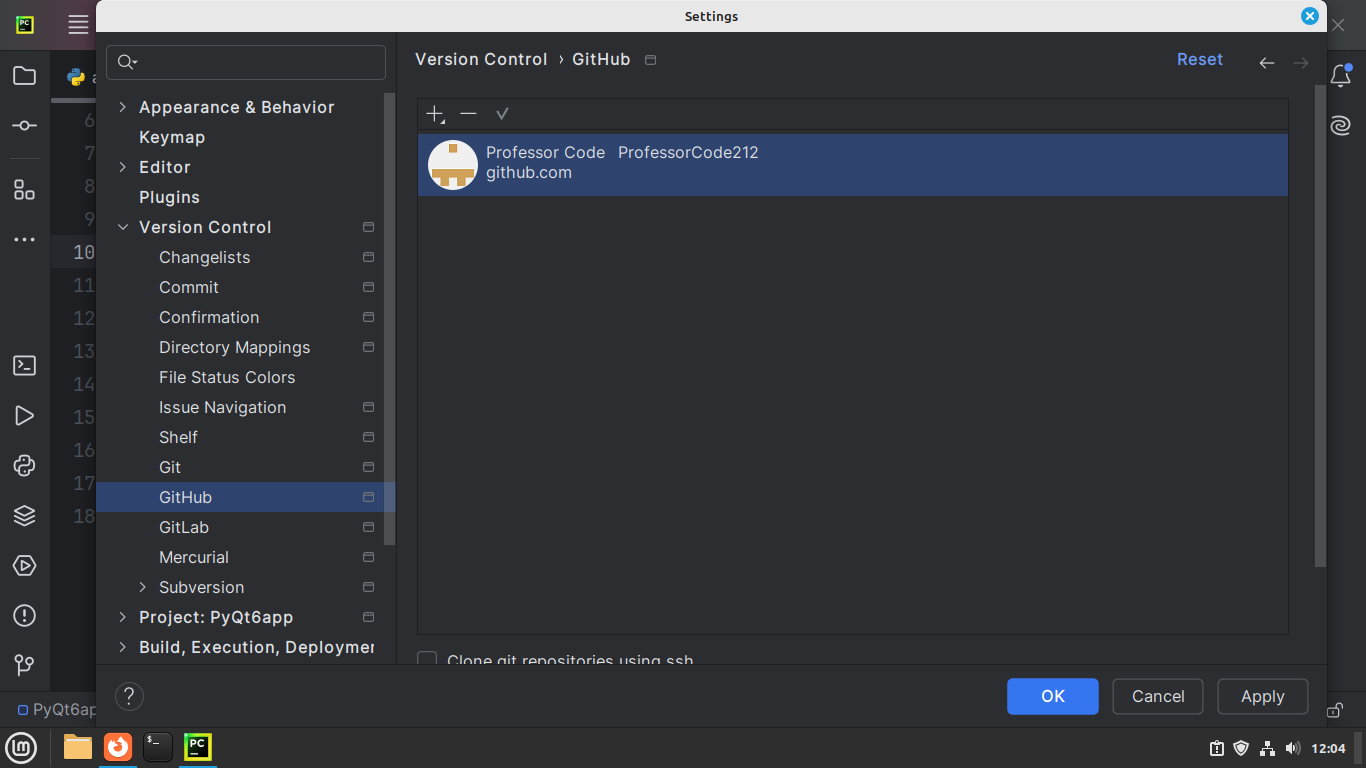 GitHub account authorized in PyCharm
PyCharm only needs to be authorized once for each user on a computer.
Once PyCharm is authorized, we also need to create a new, empty remote repository. Go back to the GitHub website and click on the plus sign (+) at the top of your Dashboard to create a new repository:
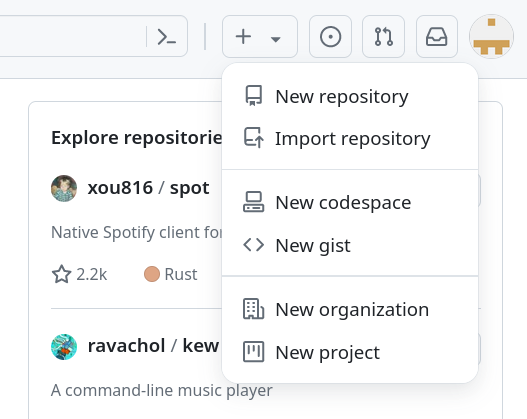 Creating a new GitHub repository from the Dashboard
Let's give this repository a unique name related to the project we are working on:
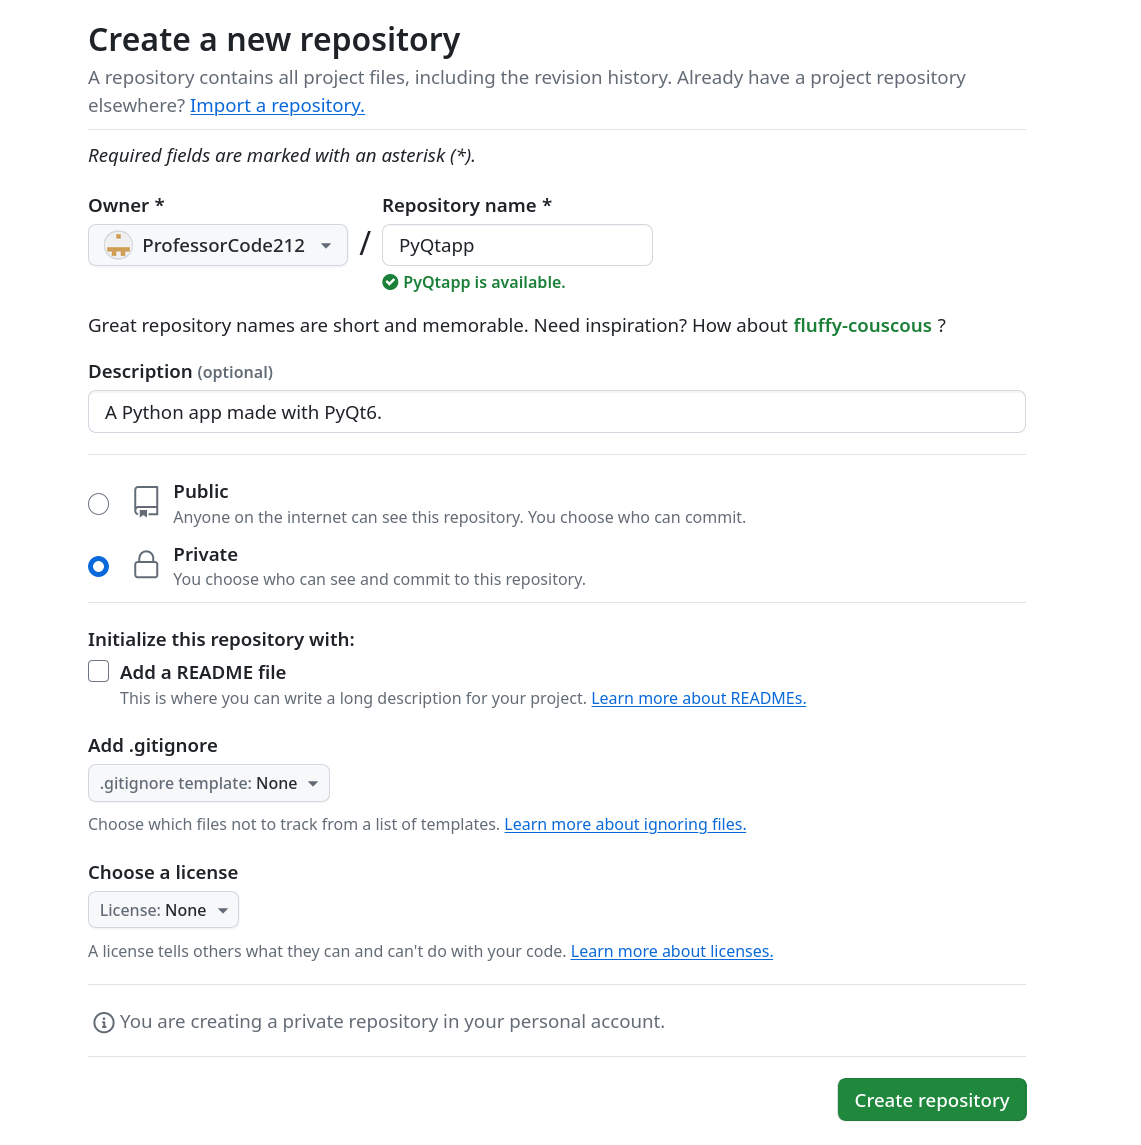 Create a new repository page on GitHub
Depending on who you plan to share this project with, you can also set the repository's visibility to be public or private. Then, click the Create Repository button and copy the remote repository URL:
 New repository on GitHub
Finally, click on the VCS widget in PyCharm's Window Header to Push all the commits we've made in the local repository to the remote repository we just created on GitHub:
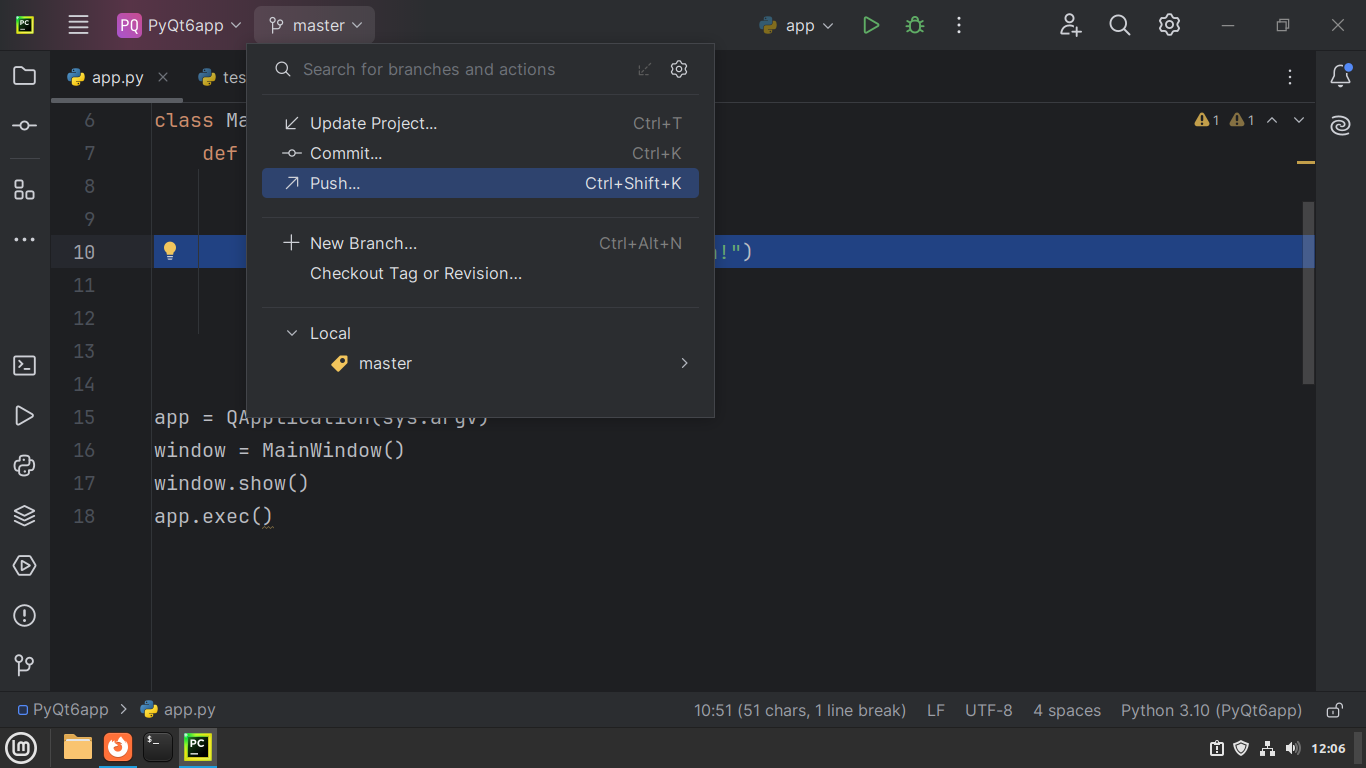 Pushing to GitHub through PyCharm's UI
Then, we need to specify where the remote repository is located. So, click on Define Remote and paste the repository's URL into the corresponding input box:
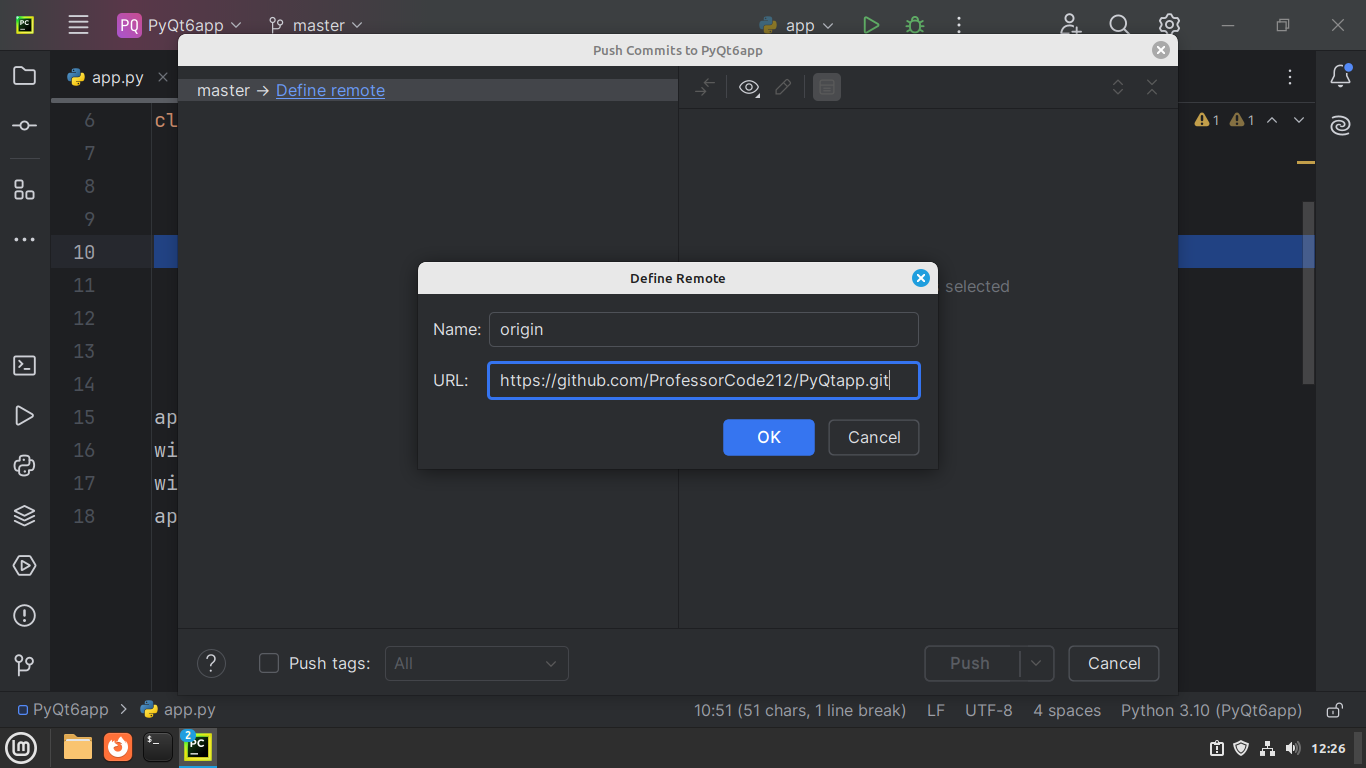 Setting the GitHub repository's URL through PyCharm's UI
Click OK and then select the Push button:
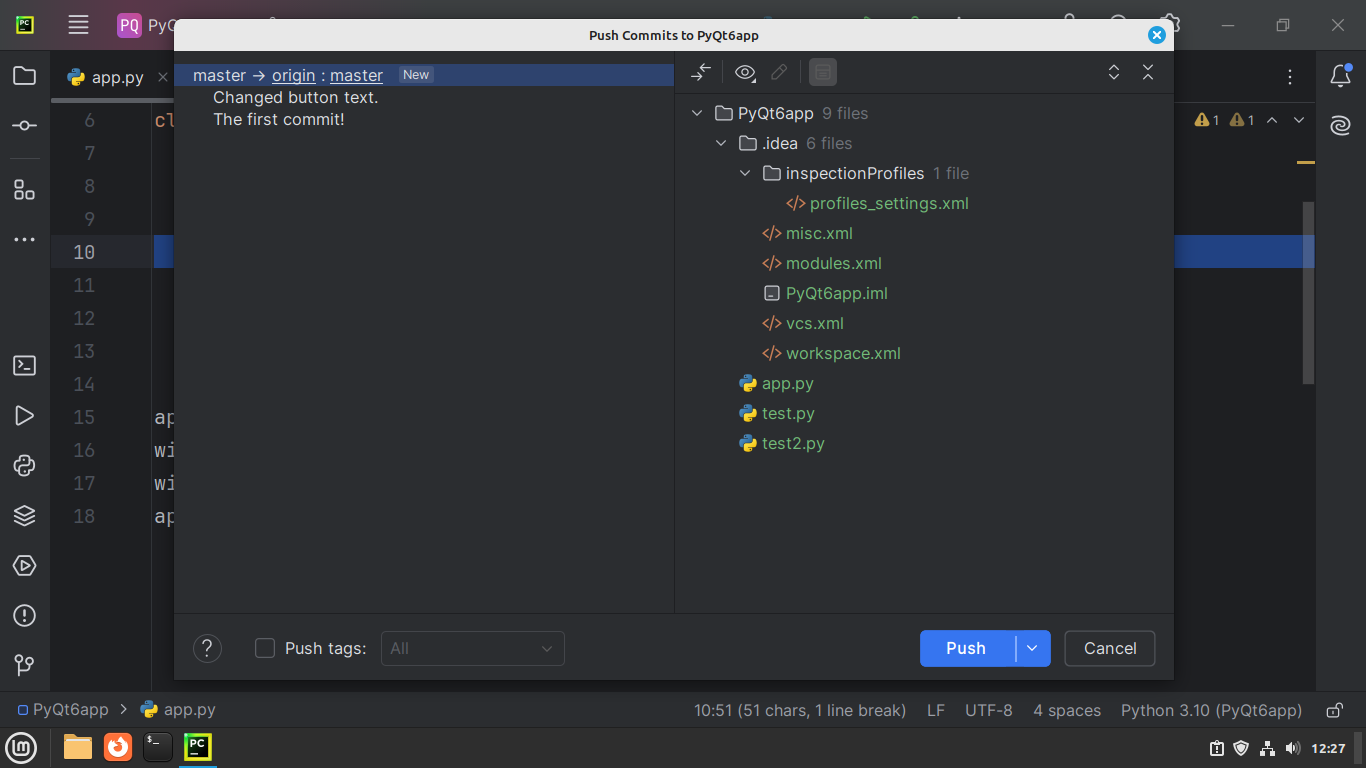 Pushing commits to GitHub through PyCharm's UI
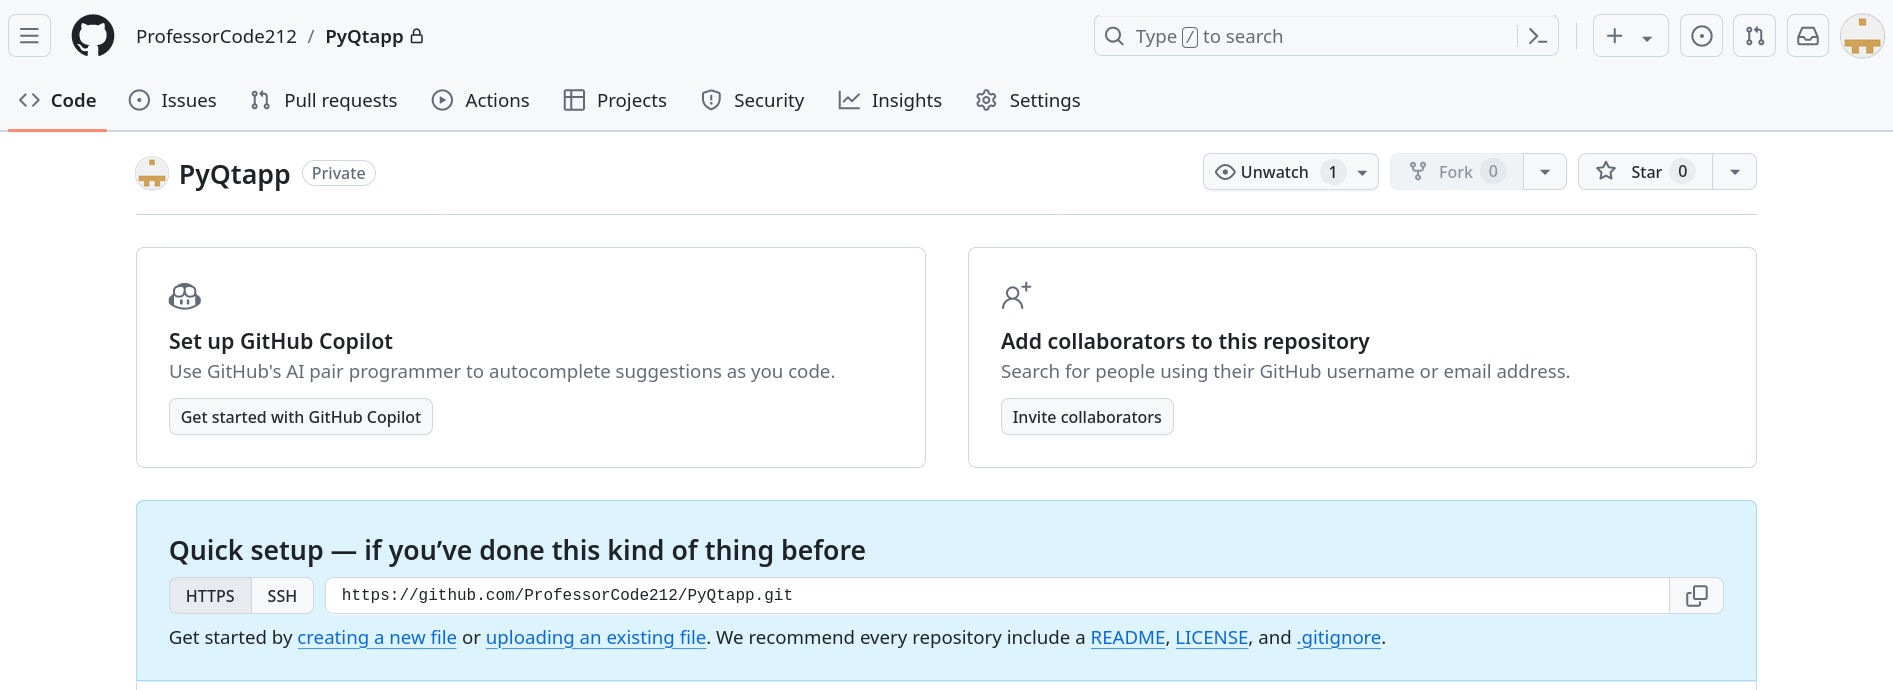
Now, any commits we made to our project will be visible in the remote repository on GitHub. If we go back to GitHub, we can see that it's no longer an empty repository:
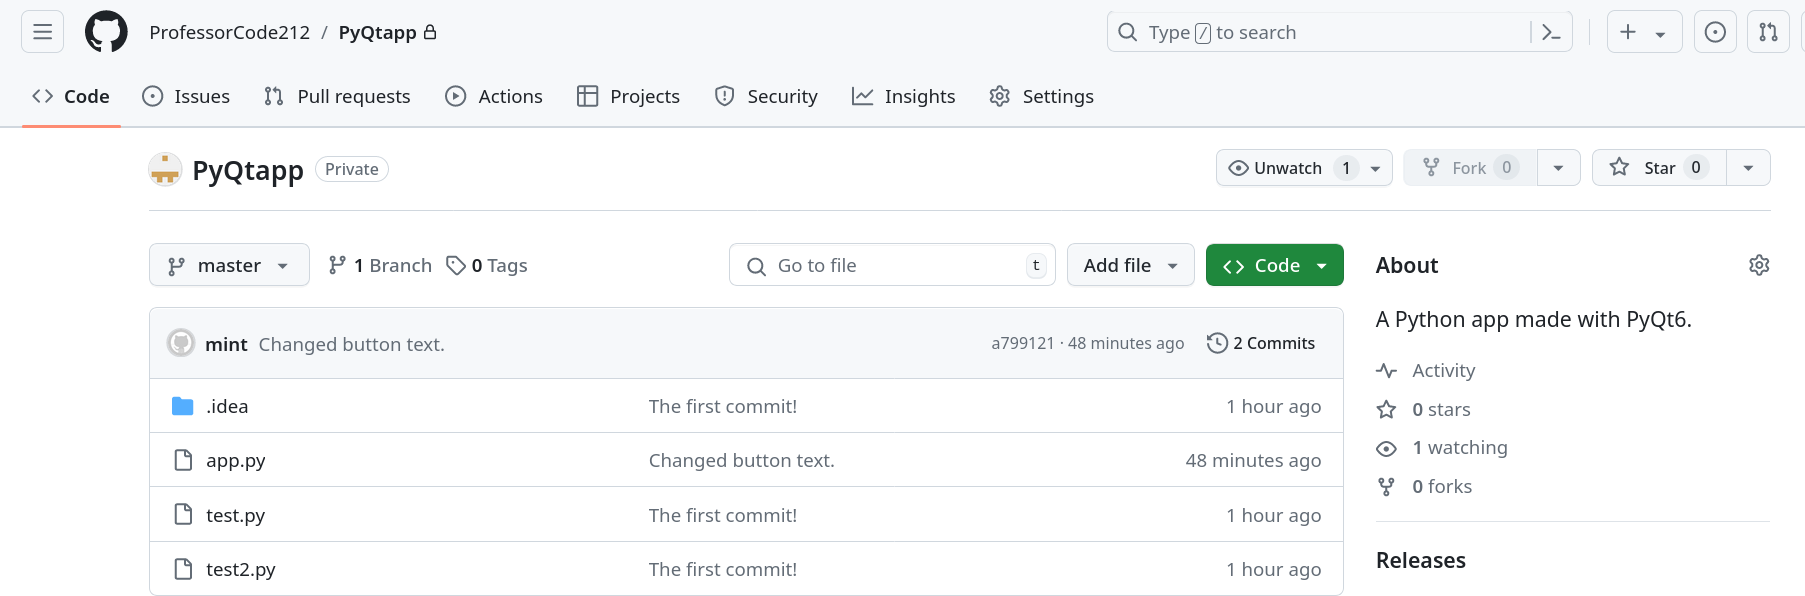 Populated repository on GitHub
The Version Control tool window should also display the name we set for the remote next to the latest commit:
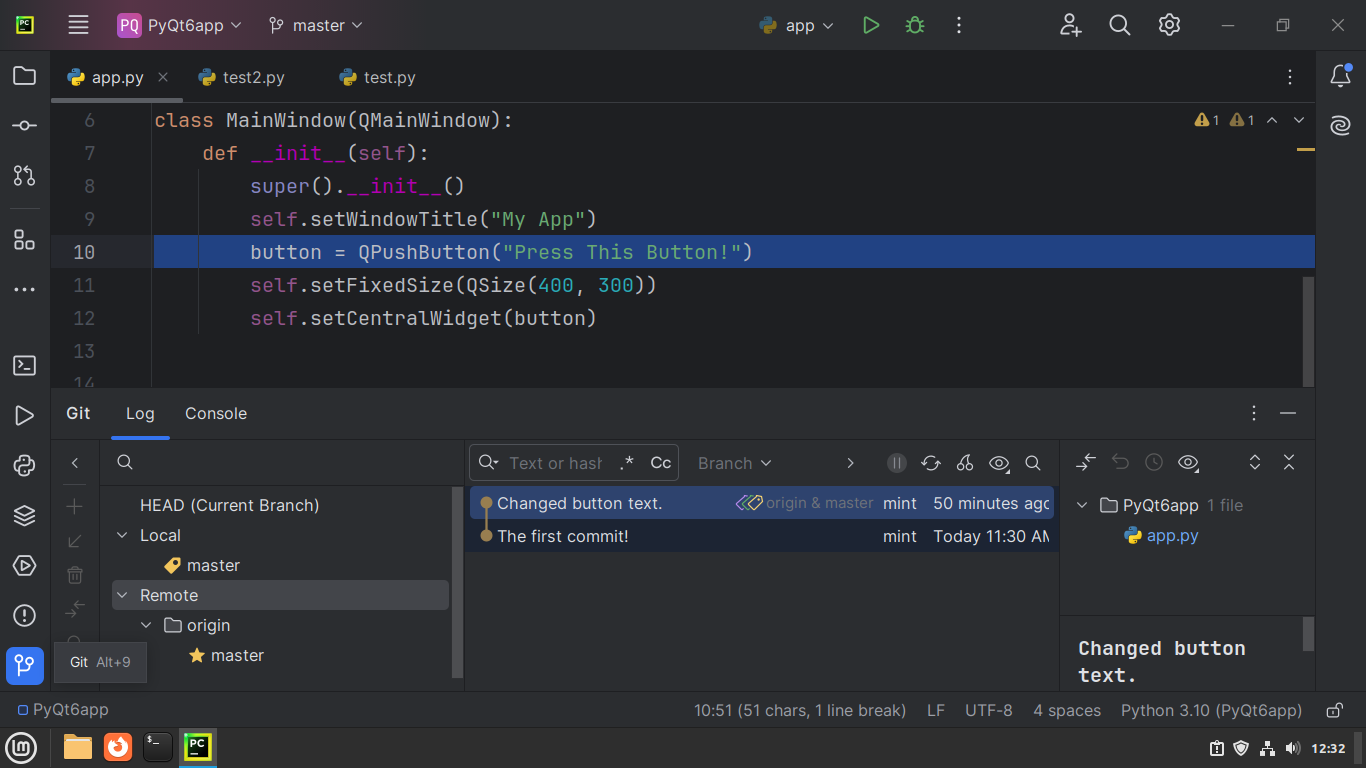 PyCharm's Version Control tool window showing the remote repository
To make the next commit, make your changes and go to the Commit tool window, where you can click the Commit and Push... button to do both actions in one go:
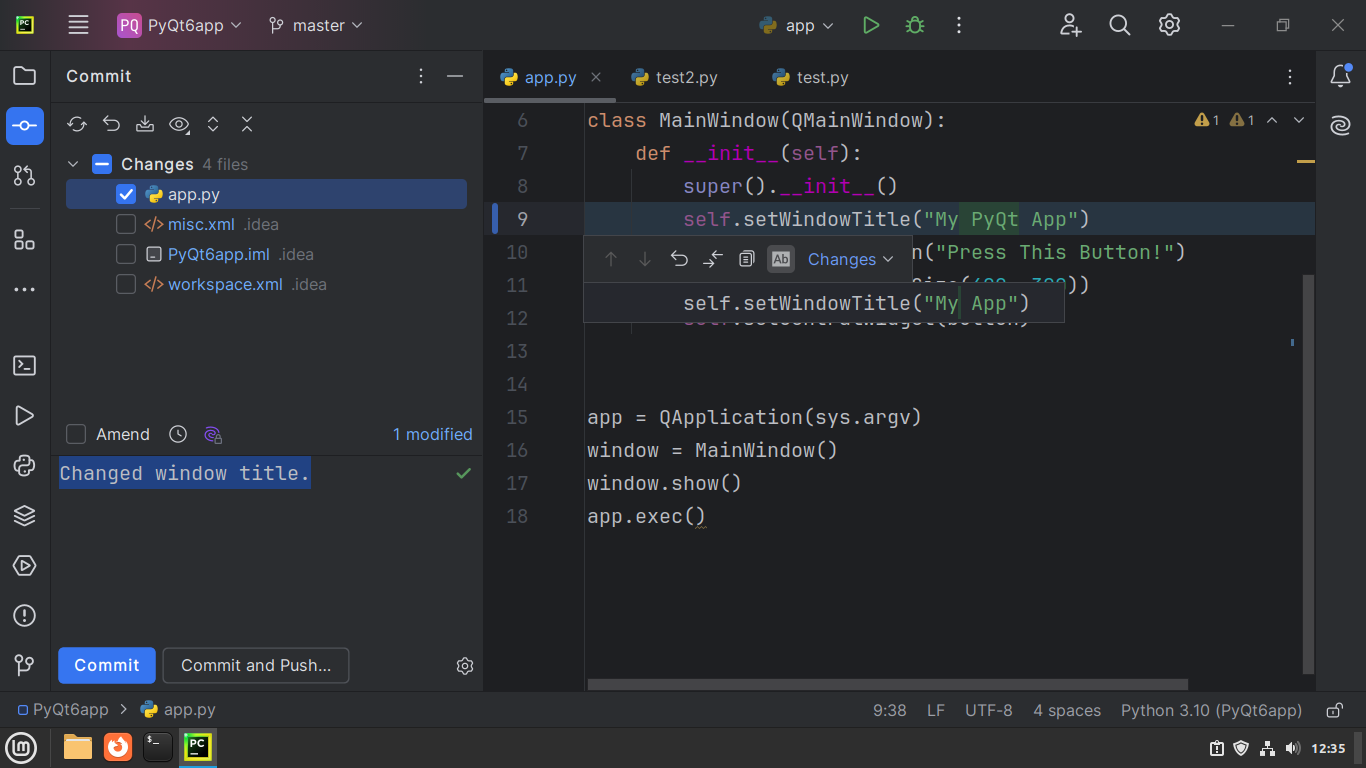 Committing new changes through PyCharm's UI
We can also go to the VCS widget and select Push to do this at any time.
Explore Other Useful PyCharm Features for GUI Development
PyCharm has several features that help us write Python GUI code more efficiently and make development smoother. In this section, we'll explore some of these features and learn how to use them.
Search Everywhere
Projects can become quite large spanning multiple files and folders. By using the Search Everywhere feature, we can look through the whole project for files, classes, lines of code and even specific actions like Commit or Push. This feature also allows us to quickly find PyCharm's Settings and tool windows without using our mouse.
To use Search Everywhere, double-tap the SHIFT key. You'll get presented with the search window:
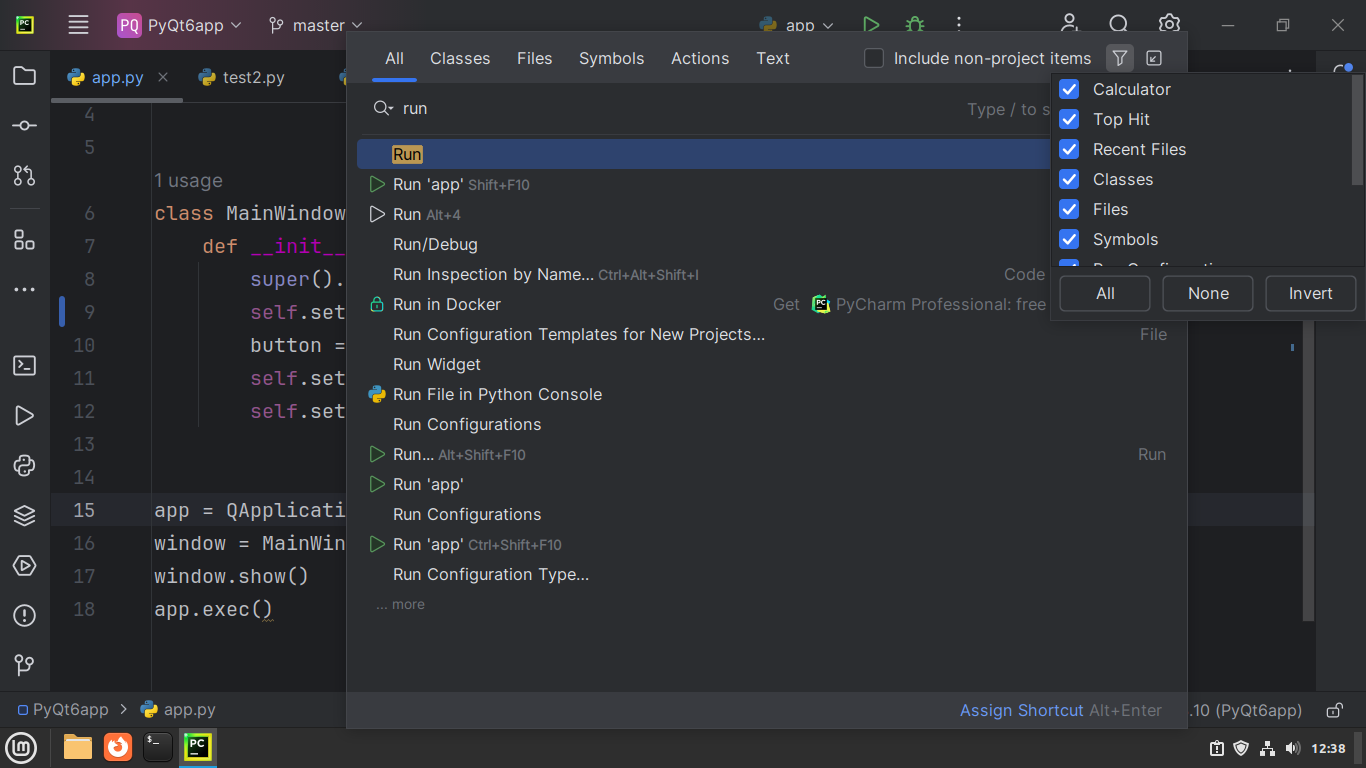 PyCharm's Search Everywhere window
To specify what you are looking for, press TAB to switch between Classes, Files, Symbols, Actions, and so on. It also supports evaluating mathematical expressions and filtering out certain file types via the Filter button at the top-right corner.
Code With Me
There are times when we need to give temporary access to other developers so that they can review our code and provide assistance. In these cases, we can use PyCharm's Code With Me feature to create a shared session between a host and one or more guests.
The guests can see what the host is doing in PyCharm and can be allowed to edit files in the project in real time. We can also share the camera and microphone so we can discuss with others who joined that session.
To start a session, click on the Code With Me icon at the top-right of the window header next to the Run button:
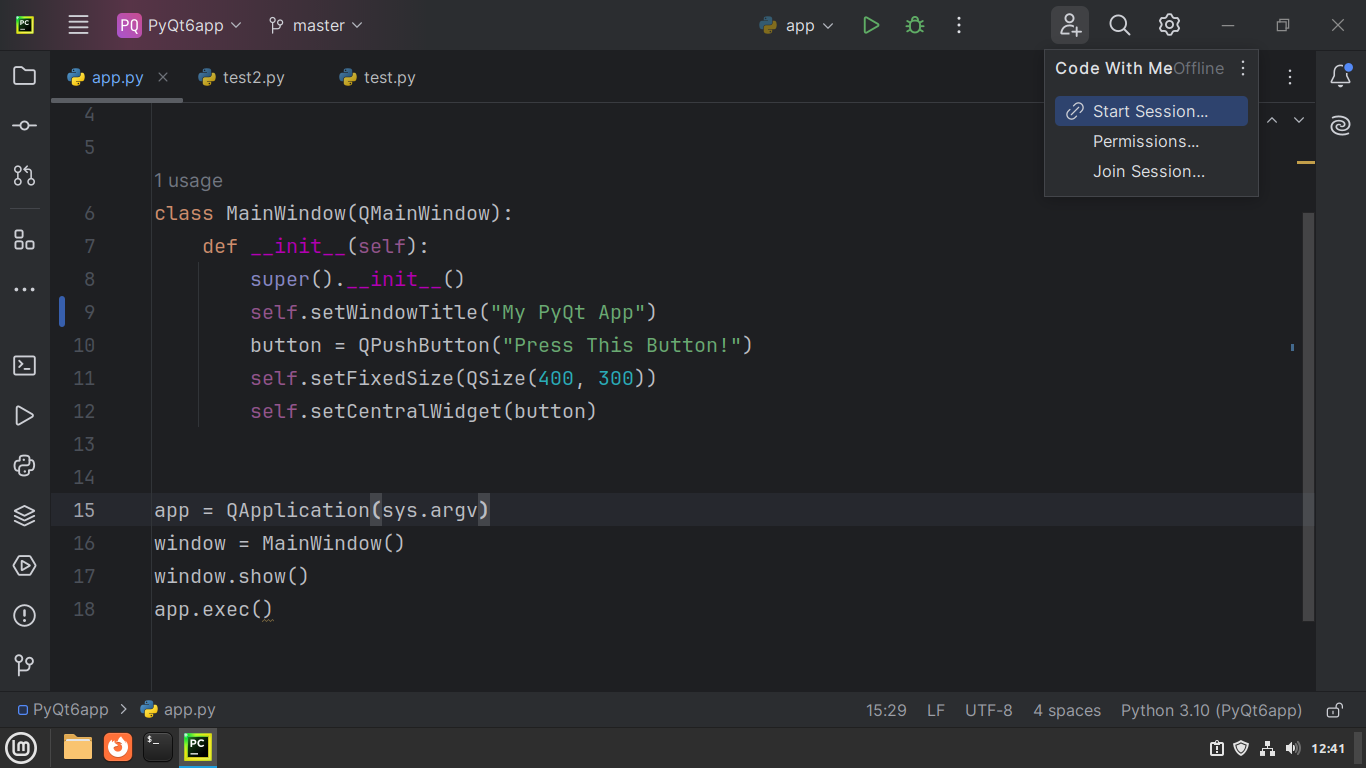 PyCharm's Code With Me feature
After selecting the Start Session... option from the menu, PyCharm will allow you to configure what guests can and can't do in this session:
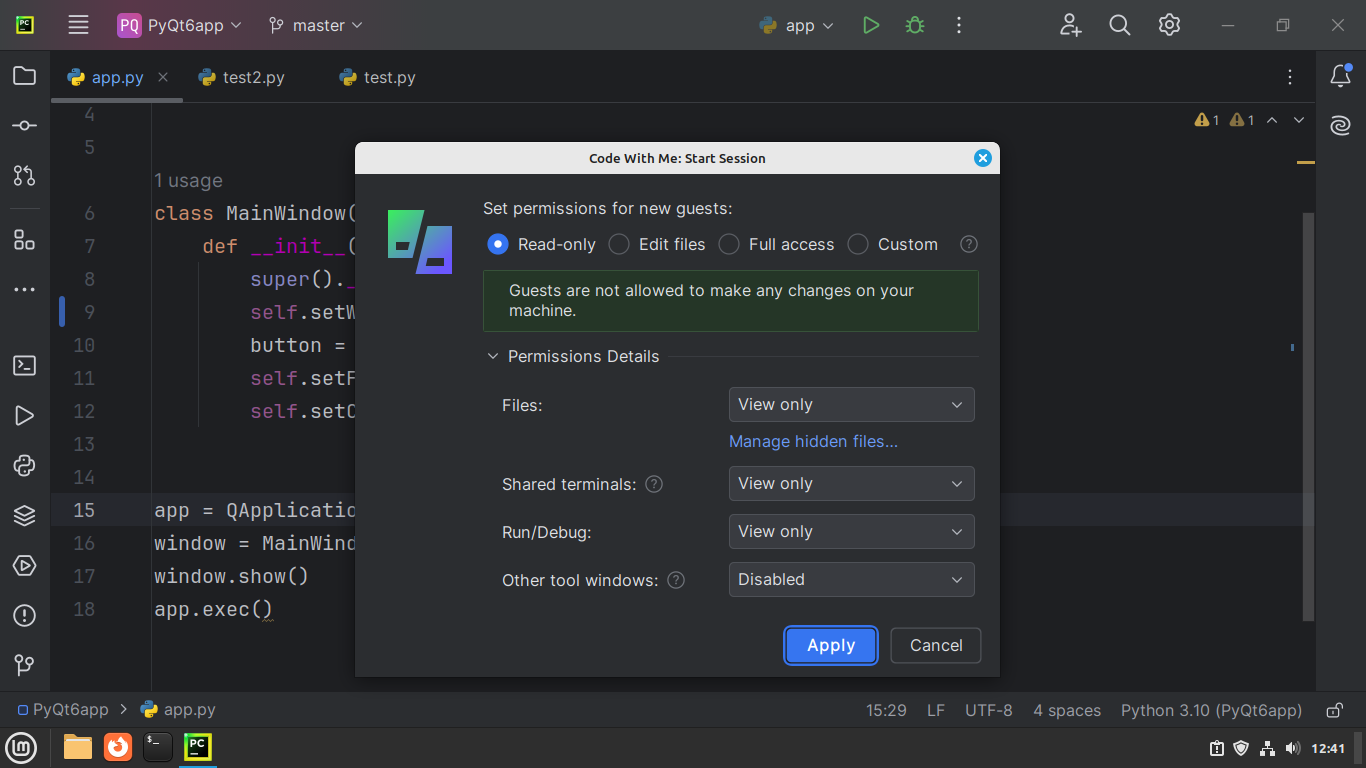 PyCharm's Code With Me: Start Session dialog
NOTE: You can use Code With Me for free in PyCharm Community edition but there are limits on the number of guests allowed and the session time. You can learn more about the specific limits for the Community plan of Code With Me on their website.
Once we set permissions for our guests, PyCharm will create a link we need to send to the guests we are inviting. To copy the link, click on the Code With Me icon again and select Copy Session Link from the menu.
When a guest clicks the link, we will receive a popup in PyCharm asking us to either accept or decline the guest. If we accept, they will be able to use a lightweight installation of PyCharm just using their web browser through which we can collaborate.
It is always recommended to use Git for collaborating with others on a project. Code With Me can't tell who made a change or why that change was made. More importantly, it requires an active connection to the host's computer to make changes to the project and guests have limited access to PyCharm's features.
Sync Python Requirements
Earlier in this guide, we installed the PyQt6 package to build the interface of our sample app. Most software we develop depends on third-party Python packages for essential features. In collaborative contexts, we often need to keep track of our project's dependencies so that everyone working with us knows what to install.
In Python, developers typically create a requirements.txt file that lists all the needed packages and their recommended versions. You can create this file manually. However, PyCharm provides tools to generate a requirements.txt file using its UI.
As a best practice, you should update a project's requirements.txt file whenever the dependencies change.
To generate the file, use Search Everywhere to find the Sync Python Requirements action:
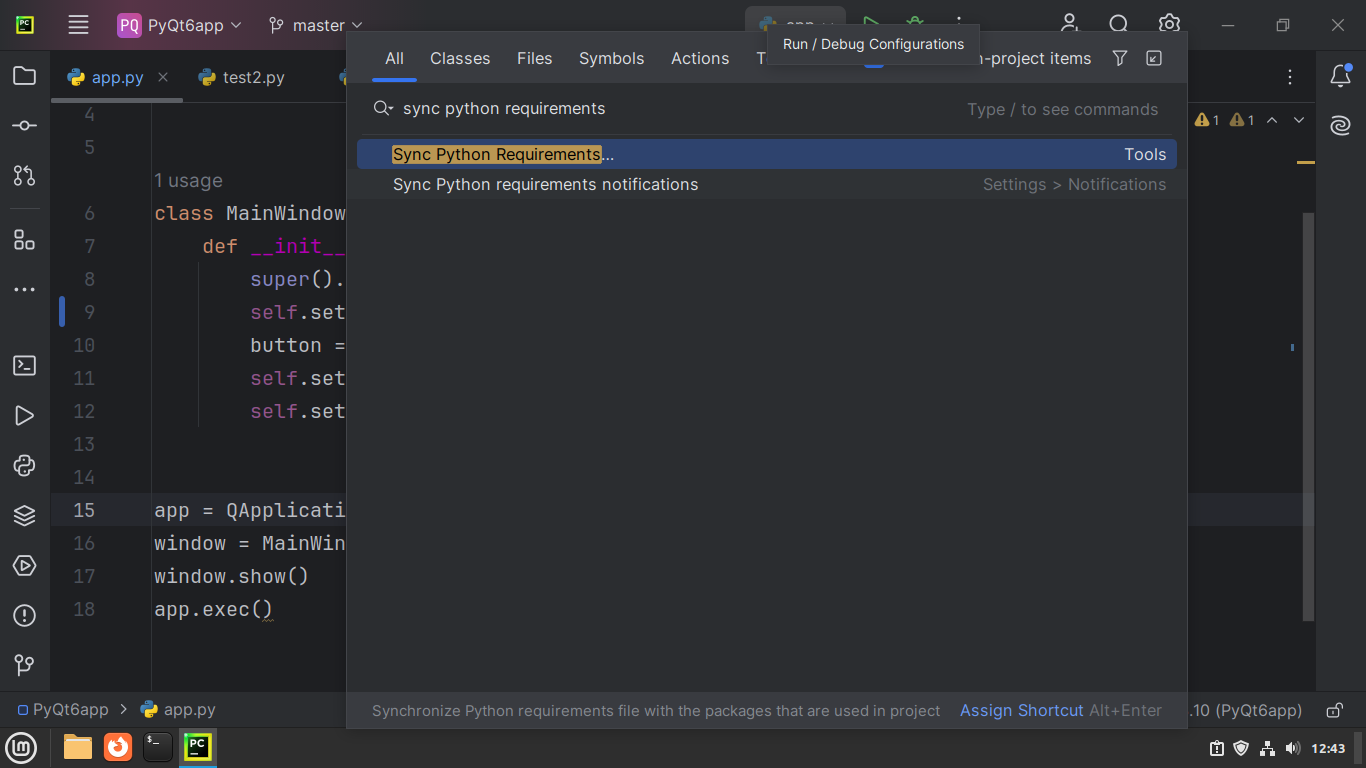 Searching for the Sync Python Requirements action in PyCharm's Search Everywhere
Selecting the Sync Python Requirements action will open a dialog where we can specify how to handle package versions and manage the requirements file:
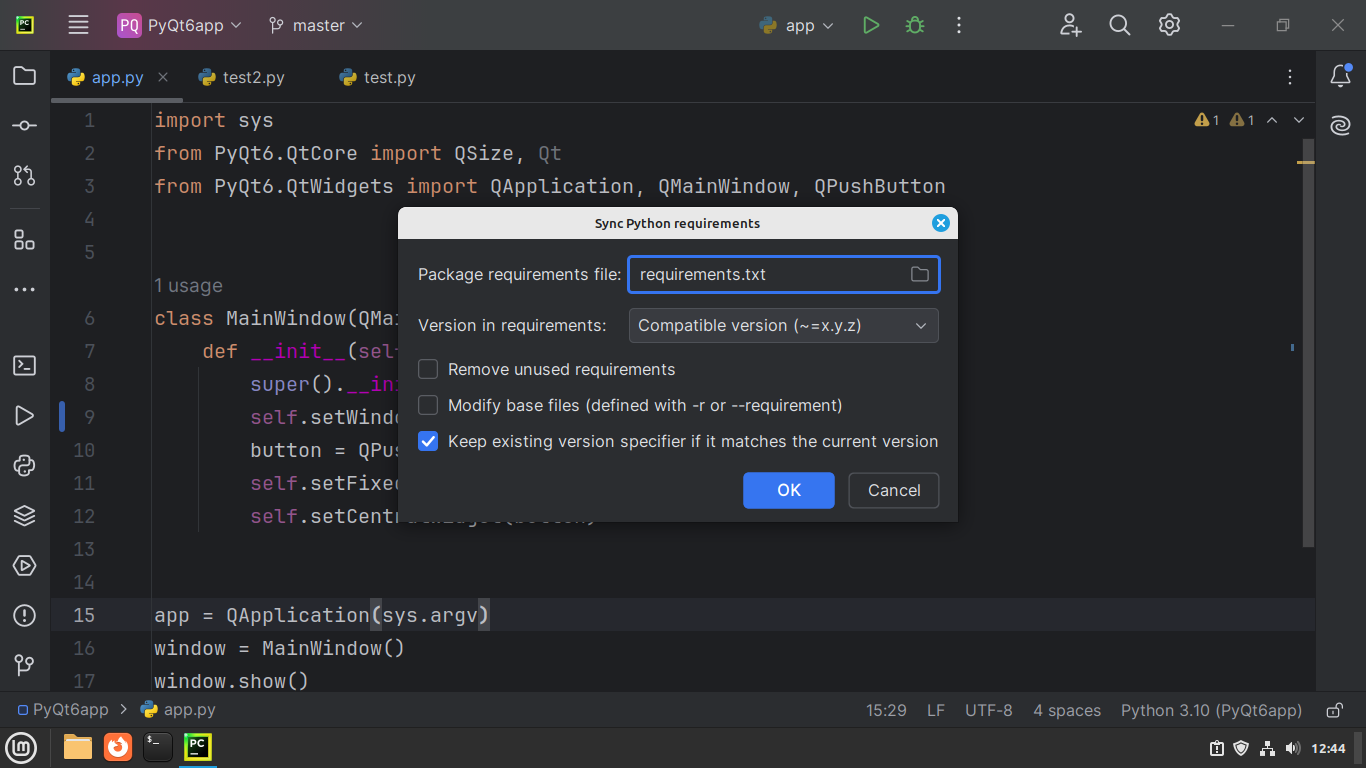 PyCharm's Sync Python Requirements dialog
Once we click the OK button, PyCharm will create the file and populate it with the names and versions of the required Python packages.
If we look at the Project tool window, we'll see the new requirements.txt file in the project directory. If we open the file, we will see PyQt6 listed with its package version:
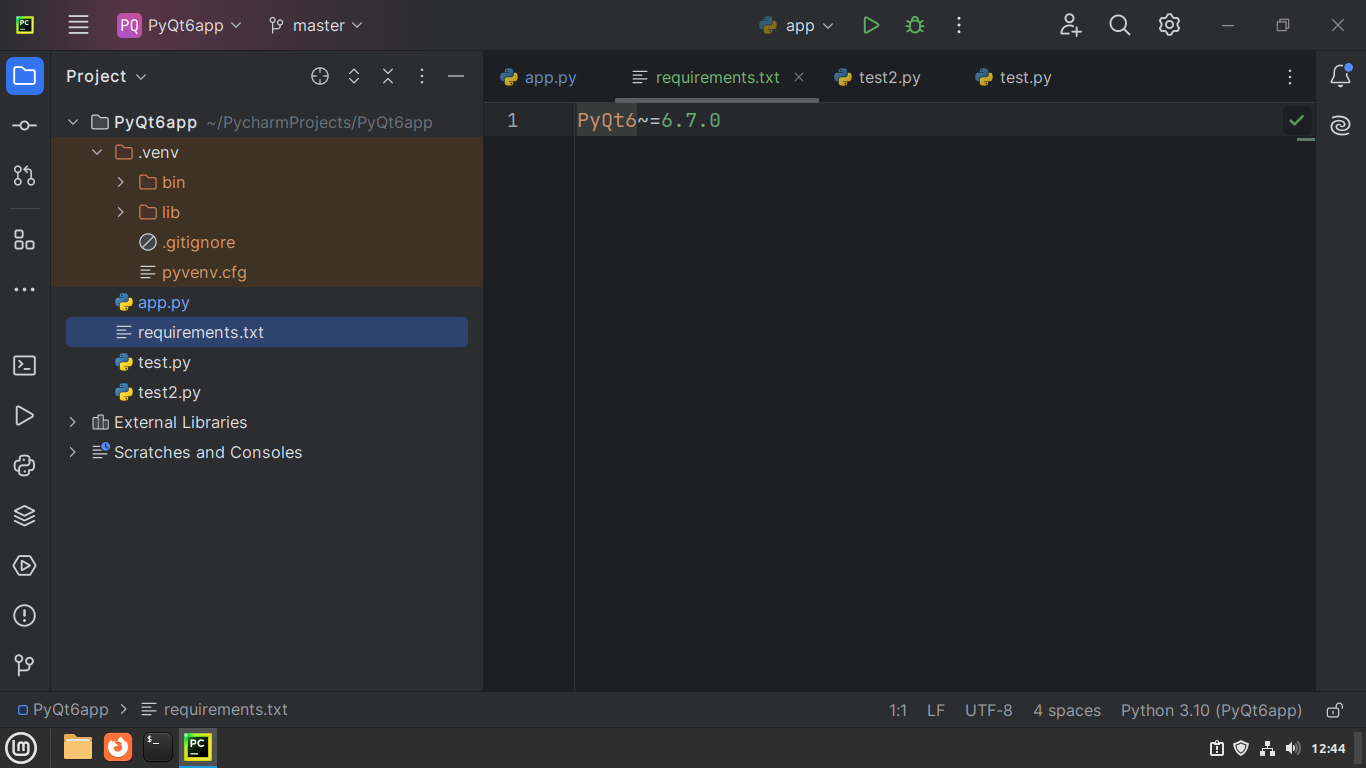 The
The requirements.txt file listed on PyCharm's Project tool window
Remember to run the Sync Python Requirements action again whenever you install or update Python packages in your project.
TODOs
Keeping track of changes already made in a project is important, but so is tracking what we still need to do. We can keep track of what needs to be done using TODOs. A TODO is a comment in our code that we start with # TODO:
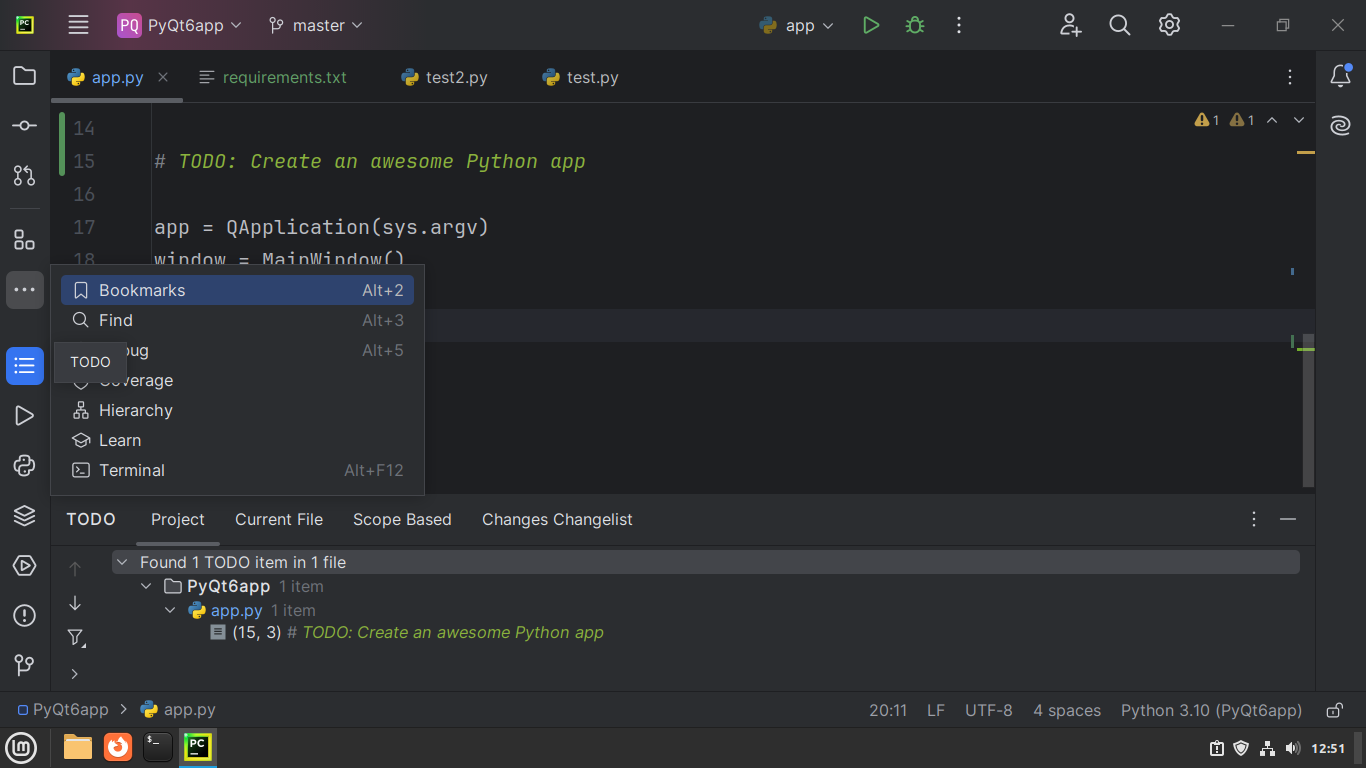 A TODO comment on PyCharm's editor and TODO tool window
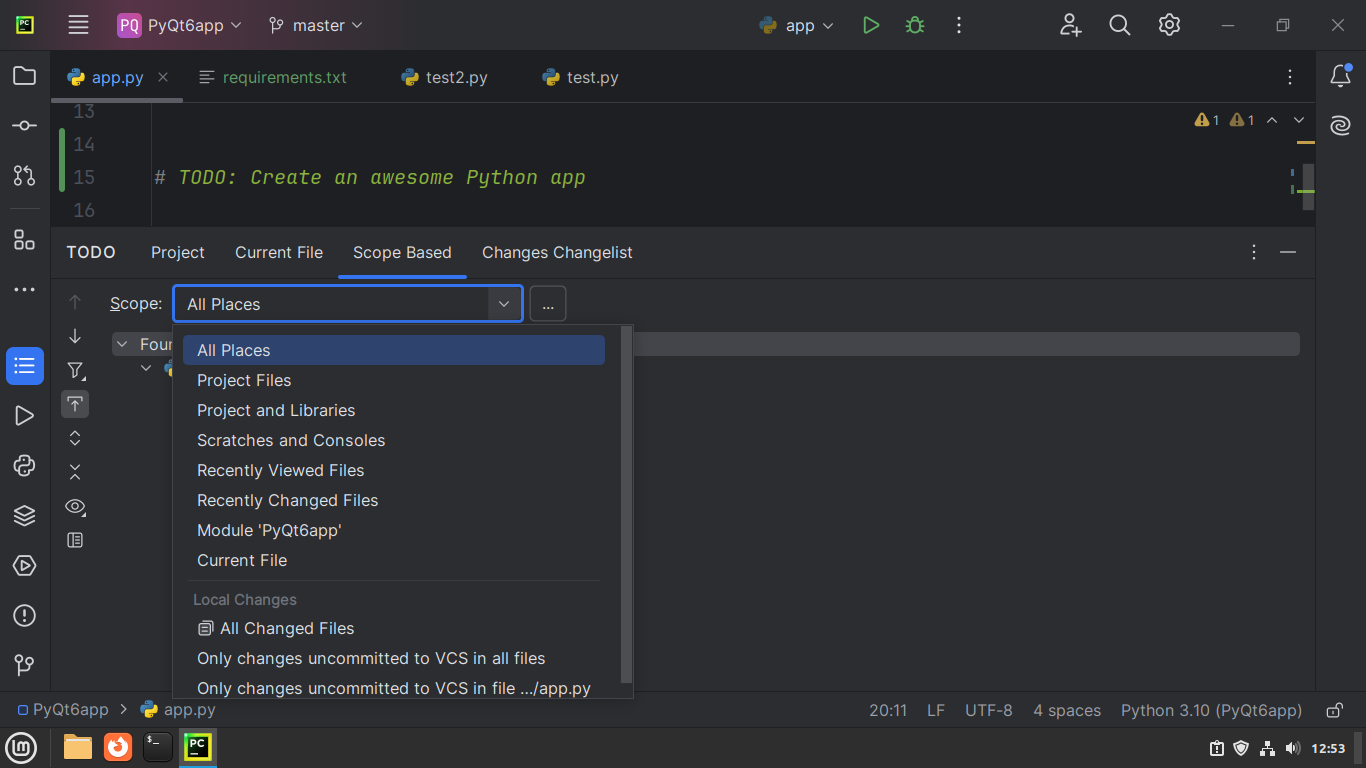
PyCharm will track these comments across the whole project, and we can view them all at any time in the TODO tool window. This tool window has several options to filter the TODOs:
 PyCharm's TODO filtering options
We can see every single TODO across the project by selecting the Project tab or just the ones in the current file with Current File. We can be even more specific by looking only at files that were recently viewed, changed, or are currently open by selecting the Scope Based option.
When we use Git for version control, PyCharm will also show the number of remaining TODOs in each commit:
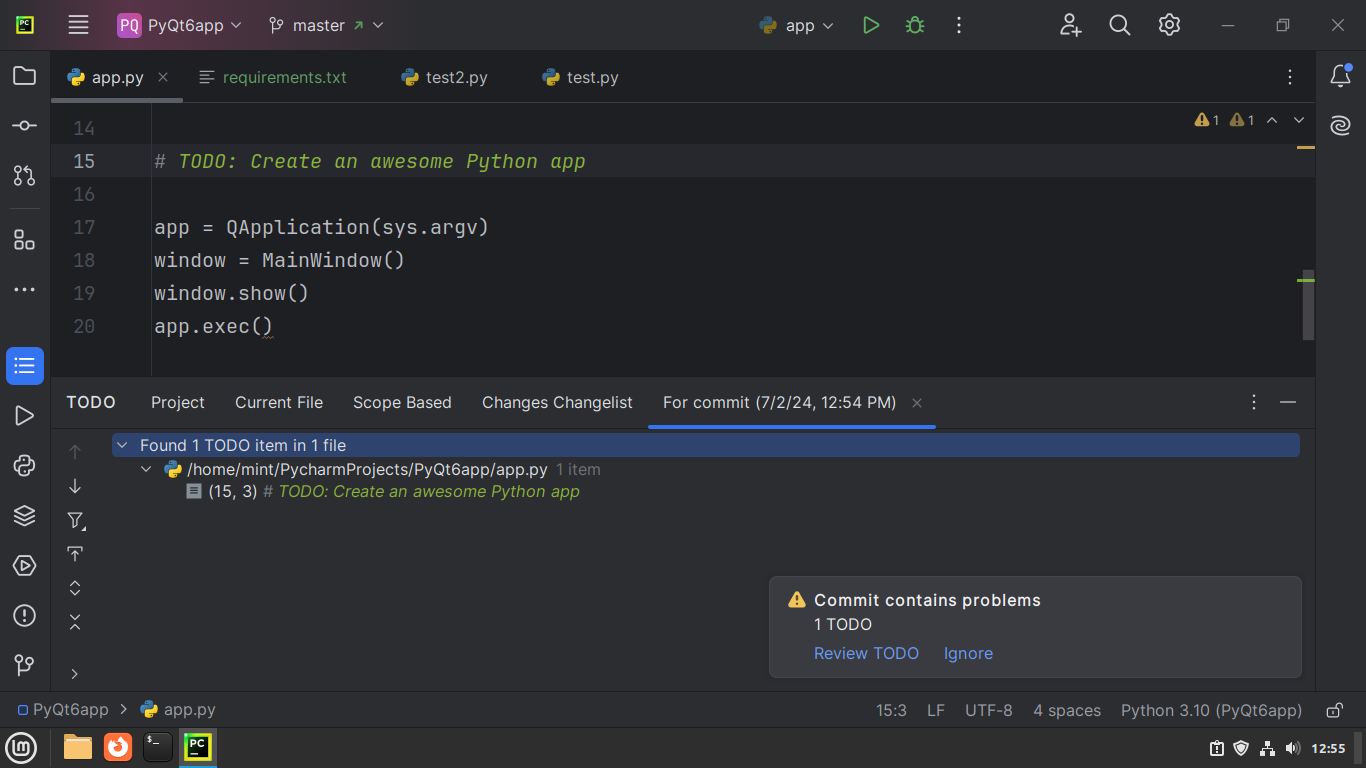 PyCharm showing the number of remaining TODOs
Scratches
Scratches are another interesting PyCharm feature that allows us to write temporary notes or draft code without touching any of the project files. To add a scratch, go to the Project tool window and right-click on Scratches and Consoles entry:
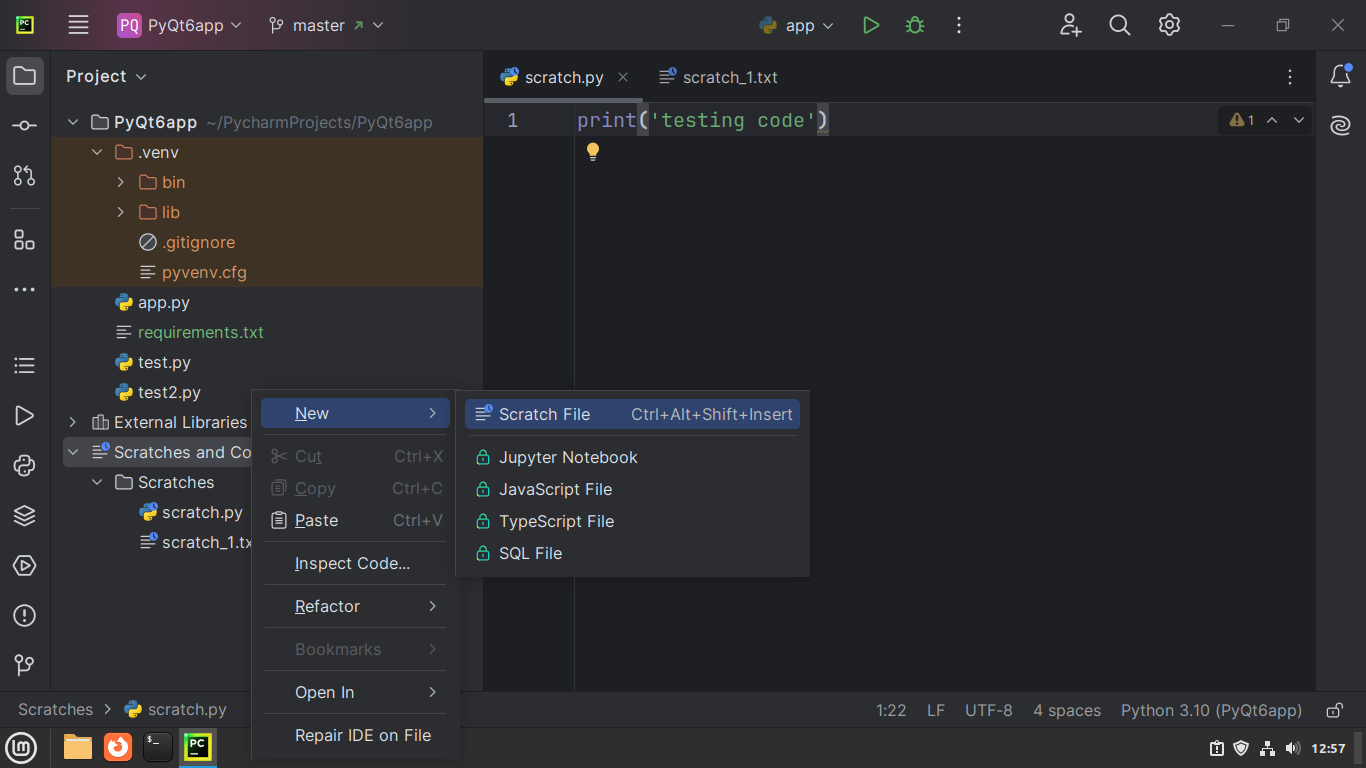 Creating a Scratch file from PyCharm's Project tool window
The New -> Scratch File option will open a dialog where you can select the type of scratch file you want to create.
Plugin Marketplace
While PyCharm is already packed with features to aid development, it is also highly extensible thanks to its Plugin marketplace. We can customize our PyCharm installation by getting themes and other plugins that provide additional functionality.
To use the Plugin marketplace, click on the Settings icon on the Window Header and select Plugins:
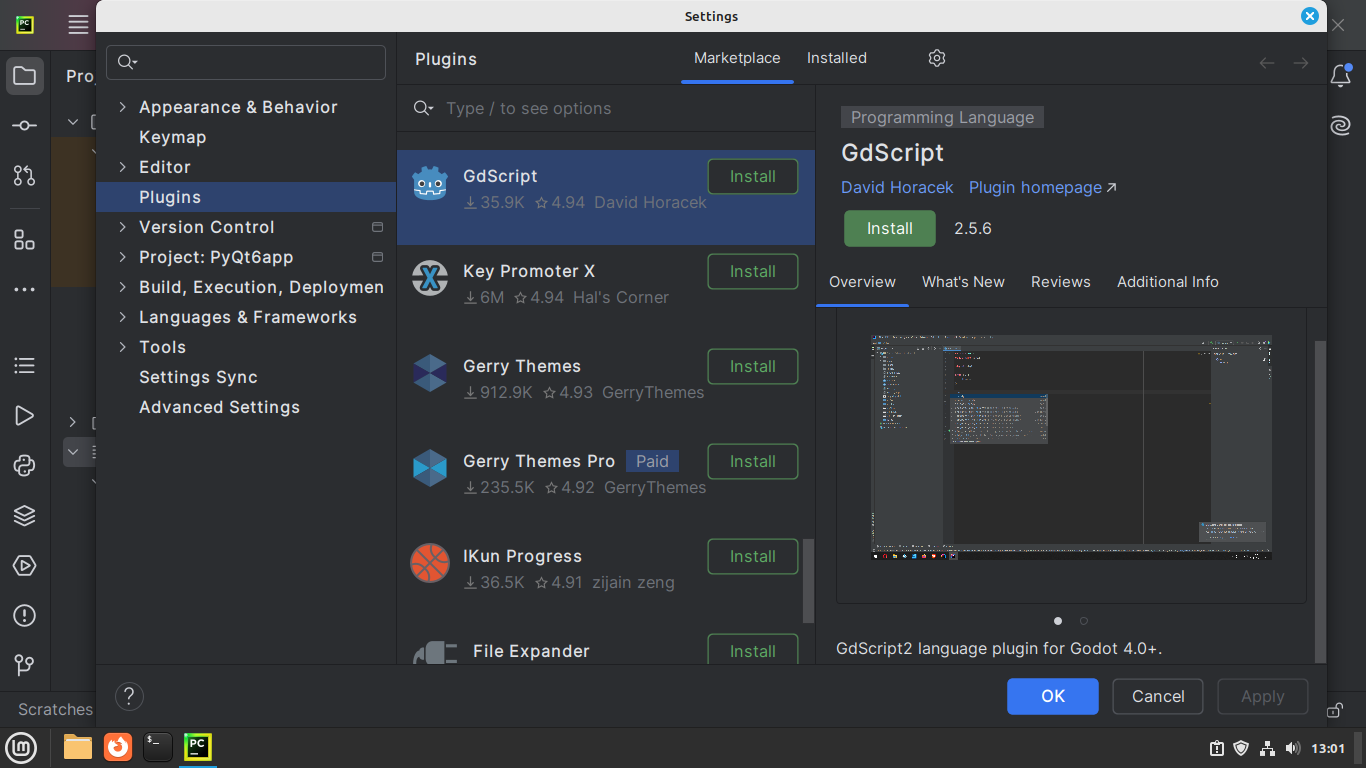 PyCharm's Plugin marketplace
In the Plugin marketplace, we can see installed plugins as well as those that are available in the marketplace. To install a plugin, click the Install button and wait for PyCharm to download and install it.
Summary
In this tutorial, you have learned how to install and set up the PyCharm IDE for Python GUI development with PyQt6. You've also learned how to write and run Python code in PyCharm as well as how to install external Python packages like PyQt6 using the IDE's graphical interface. You are now able to create and configure a Python virtual environment and use Git for version control in your projects.
Finally, you explored several additional useful features for working with GUI applications in PyCharm, including Search Everywhere, Code With Me, requirements syncing, TODOs, scratches, and the plugin marketplace. With this knowledge, you are now ready to confidently use PyCharm to develop your own Python GUI apps and desktop applications.