Streamlit is an open-source Python library that makes it easy to create and share custom web apps for machine learning and data science. In this tutorial we'll take a first look at Streamlit, installing it, getting it set up and building a simple app.
Installing Streamlit
Because Streamlit is a third-party library, we need to install it on our system before using it. Streamlit can be easily installed using pip. Open your terminal (Mac/Linux) or Command Prompt (Windows) and type the following command:
pip install streamlit
This command will download and install Streamlit and its dependencies. Once the installation is complete, we can create a simple Streamlit app.
Open your editor and create a file named app.py. This file will be our main Python file to write and edit the Streamlit app. In order to make sure that Streamlit is running on our system, let us import it and run the app.
import streamlit as st
To run the app, open the terminal in the same directory and enter the following commands
streamlit run app.py
This command will open a new tab in your default browser. It will be empty right now, but this is where we'll be building the interface of our app.
Add title, headings, and paragraphs
Streamlit allows you to create clean and structured web apps with ease, making it perfect for data visualization and interactive dashboards. One of the key features that make Streamlit user-friendly is its ability to format text with titles, headings, and paragraphs. This tutorial will guide you through how to add these elements to your Streamlit app.
PyQt/PySide 1:1 Coaching with Martin Fitzpatrick — Get one on one help with your Python GUI projects. Working together with you I'll identify issues and suggest fixes, from bugs and usability to architecture and maintainability.
Adding Titles
Titles in Streamlit are added using the st.title() function. This function displays the text in a large, bold font, ideal for the heading of your app.
import streamlit as st

st.title("This is the title of our app")
Save the changes and refresh the browser tab to see the changes. This will create a large, centered title at the top of your app.
 The streamlit application open in your browser
Adding Headings
Streamlit provides several levels of headings to structure your content, similar to HTML's <h1> to <h6> tags. You can use st.header() and st.subheader() for the primary and secondary sections, respectively.
import streamlit as st

st.title("This is the title of our app")
st.header("This is a Header")
st.subheader("This is a Subheader")
In this code, we use st.header() to create the prominent heading, ideal for section titles. Then we call st.subheader() to create a slightly smaller heading, suitable for subsections under a header.
Save the changes and refresh the browser. It will create the following changes to our app.
 Subheaders added through Streamlit
Adding Paragraphs
To add regular text or paragraphs, use the st.write() function. This function can handle text, Markdown, and even complex objects like data frames.
import streamlit as st

st.title("This is the title of our app")
st.header("This is a Header")
st.subheader("This is a Subheader")
st.write("You can write text here and it will appear as a paragraph.")
Save the change and refresh the browser tab.
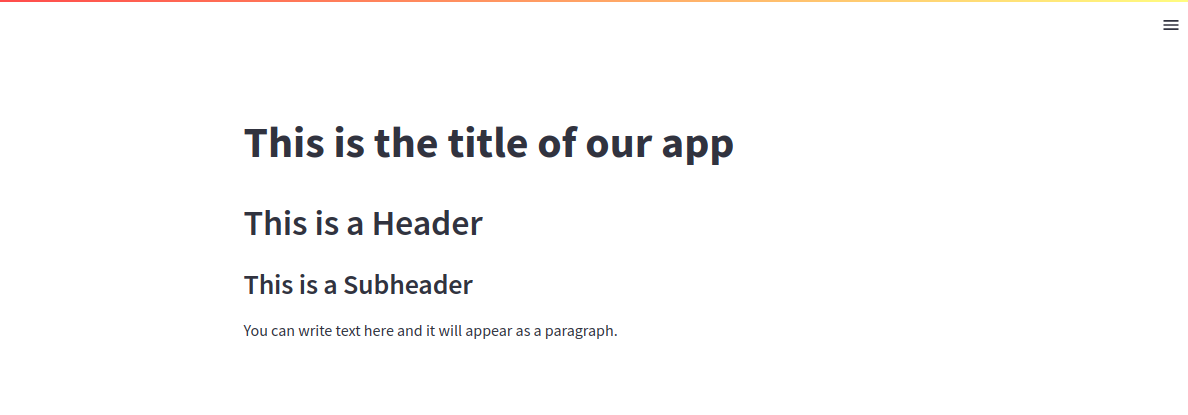 Paragraph text added through Streamlit
Adding different kinds of buttons to the Streamlit app
Buttons are fundamental interactive elements in any web application. Streamlit provides simple yet versatile options for adding buttons to your app, enabling users to trigger actions, navigate between sections, or submit data. This tutorial will guide you through adding different kinds of buttons to your Streamlit app and how to handle user interactions.
Basic Button
The simplest button in Streamlit is created using the st.button() function. It generates a clickable button that can trigger specific actions.
import streamlit as st

st.title("This is the title of our app")

st.button("Click Me")
 A button in your Streamlit UI
Notice that a small button is shown in our app. Right now, it is a static button which mean nothing will happen when we click the button. To make it interactive, we have to use conditional statements. When the button is clicked in Streamlit app, it returns a True value. So, we can use this in our conditional statement.
import streamlit as st

st.title("This is the title of our app")

button = st.button("Click Me")
if button: # button is True if clicked
    st.write("You clicked the button")
We create the button by calling st.button() passing in the label as a string "Click Me". If the button is clicked in the browser, the value of button will be True and the if branch will be executed: outputting the message to the UI.
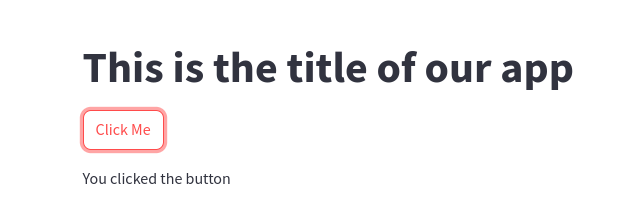 A button with clickable behavior
Download Button
You can create a download button using st.download_button(), which allows users to download files directly from your app.
import streamlit as st

st.title("This is the title of our app")

text_file_content = "This is a sample text file. This content will be downloaded as a text file."

st.download_button(
    label="Download Text File",
    data=text_file_content,
    file_name="sample.txt",
    mime="text/plain"
)
In this code we use st.download_button() to creates a button that, when clicked, lets users download a file. The parameters of the download button are:
label: The text on the button.data: The content to be downloaded.file_name: The name of the file.mime: The MIME type of the file (e.g.,text/plain).
This gives the following update UI:
 A download button
Radio Buttons for Options
Radio buttons allow users to select one option from a set of choices. Streamlit provides this functionality using st.radio().
import streamlit as st

st.title("This is the title of our app")

choice = st.radio("Choose an option:", ["Option 1", "Option 2", "Option 3"])

if choice == "Option 1":
    st.write("You selected Option 1")
elif choice == "Option 2":
    st.write("You selected Option 2")
else:
    st.write("You selected Option 3")
In this case we used st.radio() to create a set of radio buttons. The selected option is stored in the variable choice, which you can use to control the app's behavior.
This will give the following result:
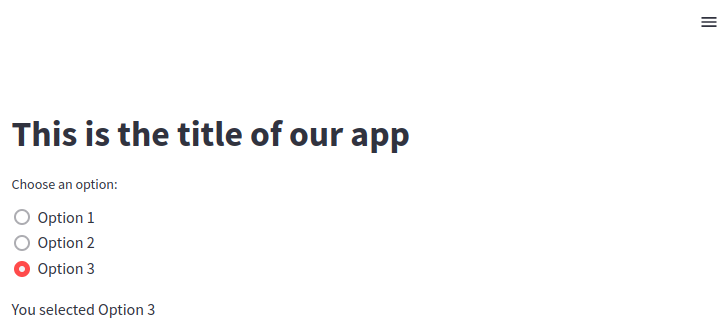 Radio buttons in your Streamlit UI
Adding slider
A slider in Streamlit is a UI element that allows users to select a value by moving a handle along a track. This is particularly useful for adjusting parameters in data visualizations, setting thresholds, or selecting ranges for filtering data.
Streamlit provides st.slider() which you can use to add sliders to your app. This function supports both single-value and range sliders.
A single value slider allows users to select a single value within a specified range. Here’s how to add a simple slider to your Streamlit app:
import streamlit as st

st.title("This is the title of our app")

age = st.slider("Select your age:", 0, 100, 25)

st.write(f"Your age is: {age}")
Here we've used st.slider() to add a slider to your app. The first argument is the label for the slider. The next two arguments define the minimum and maximum values, while the the last argument is the default value the slider starts at.
 A simple slider in your Streamlit UI
Packaging Python Applications with PyInstaller by Martin Fitzpatrick — This step-by-step guide walks you through packaging your own Python applications from simple examples to complete installers and signed executables.
Streamlit also allows you to create a range slider, where users can select an upper and lower bound of a range. This is useful for filtering where you want to select some data within the given range. You can add a range slider to your application as follows:
import streamlit as st

st.title("This is the title of our app")

start, end = st.slider("Select a range of values:", 0, 100, (20, 80))

st.write(f"Selected range: {start} to {end}")
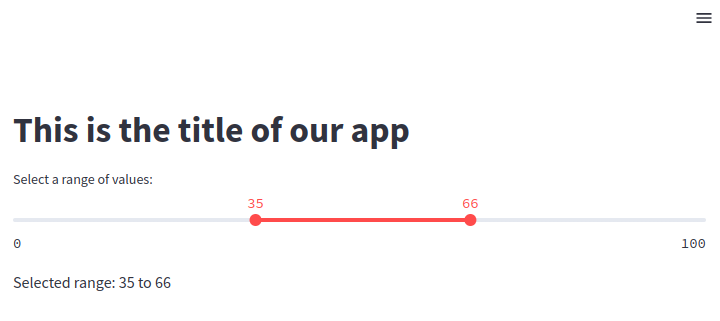 A range slider in your Streamlit UI
Here, st.slider() is used to create a range slider by passing a tuple (20, 80) as the default value. The tuple represents the initial start and end values of the slider range.
When you run this app, the slider will allow users to select a range between 0 and 100, starting with a default range from 20 to 80. The selected range is then displayed on the app. The initial and returned tuple represent the selected range in the slider.
Don't confuse this with a Python range! Unlike a Python range, they are inclusive: that is, if you select 80 as the upper bound, then 80 will be returned (not 79).
Adding the dropdown menu in the app
Dropdown menus are a powerful and versatile UI component that allows users to select an option from a predefined list. Streamlit makes it easy to add dropdown menus to your web app, providing an intuitive way for users to interact with your data or application.
Streamlit provides a straightforward way to add dropdown menus through the st.selectbox() function. This function not only adds a dropdown to your app but also allows you to capture the selected value for further processing.
Let’s start with a simple example where users can choose their favorite fruit from a list:
import streamlit as st

st.title("This is the title of our app")

fruit = st.selectbox("Select your favorite fruit:", ["Apple", "Banana", "Orange", "Grapes", "Mango"])

st.write(f"You selected: {fruit}")
 A dropdown box in your Streamlit UI
In the above code we used st.selectbox() to creates a dropdown menu. The first argument is the label for the dropdown and the second argument is the list of options users can choose from.
Adding a Sidebar in Streamlit
A sidebar is an additional panel that appears on the left side of the app. It can be used to house interactive widgets like sliders, buttons, and dropdowns, or to display information that should be easily accessible throughout the app.
This allows the main part of the app to focus on displaying results, visualizations, or other content, while the sidebar handles user inputs and navigation.
Streamlit makes it easy to add a sidebar using the st.sidebar attribute, which you can use to place any widget or content into the sidebar.
To add a sidebar to your Streamlit app, you can use the st.sidebar attribute followed by the widget you want to add. Here’s a basic example of adding a sidebar with a simple slider.
import streamlit as st

st.title("This is the title of our app")

age = st.sidebar.slider("Select your age:", 0, 100, 25)

st.write(f"Your age is: {age}")
This will produce the following output:
 Adding a sidebar to your Streamlit UI
st.sidebar.slider() is a function that adds a slider widget to the sidebar instead of the main page. The rest of the code works just like a regular slider.
You can add multiple widgets to the sidebar, allowing users to control various aspects of your app from one convenient location. Here’s an example with a dropdown menu, a slider, and a button.
import streamlit as st

st.title("This is the title of our app")

color = st.sidebar.selectbox("Select a color:", ["Red", "Green", "Blue"])

# Add a slider to the sidebar
level = st.sidebar.slider("Select the intensity level:", 0, 100, 50)

# Add a button to the sidebar
if st.sidebar.button("Apply Settings"):
    st.write(f"Settings applied: Color={color}, Level={level}")
The updated UI is shown below:
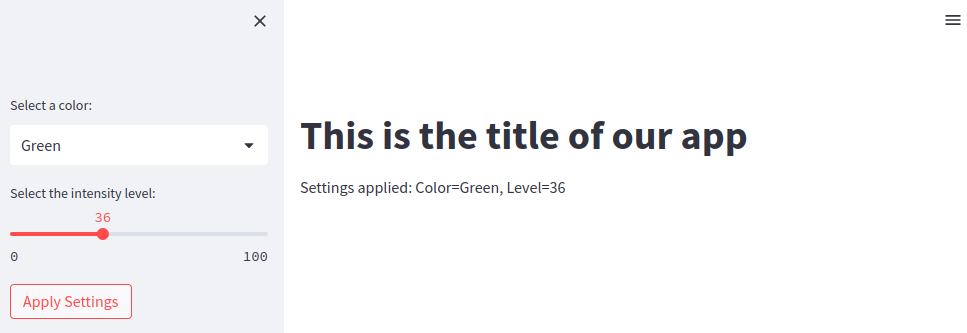 Multiple widgets in the sidebar of your Streamlit UI
In this code we used st.sidebar.selectbox() to add a dropdown menu to the sidebar, st.sidebar.slider() to add a slider to the sidebar and finally st.sidebar.button() to add a button to the sidebar. The the action associated with the button click is displayed on the main page.
Creating a simple web app using Streamlit
Now, we will combine all the basic concepts that we have learned about Streamlit and put them together to create a simple streamlit web app.
In this example we'll being using the Iris dataset. This data is widely available, for example from this repository. Download the csv file into the same folder as your Streamlit app and then we can load it using pandas.
Using this dataset we're going to build a data exploration dashboard with the following features.
- Dataset Display showing the full Iris dataset.
- Sidebar Controls** to allow users to select a feature and filter the data based on that feature using sliders.
- Filtered Data Display to show the filtered dataset based on the user's input.
- Basic Statistics like mean, median, standard deviation, calculated live based on the selected feature in the filtered dataset.
The UI is simple, but shows some of the neat features of Streamlit.
import streamlit as st
import pandas as pd

# Load the Iris dataset
df = pd.read_csv('iris.csv')

# Set the title of the app
st.title("Iris Dataset Explorer")

# Display the entire dataframe
st.write("### Full Iris Dataset")
st.dataframe(df)

# Sidebar configuration
st.sidebar.header("Filter Options")

# Feature selection
feature = st.sidebar.selectbox("Select a feature to filter by:", df.columns[:-1])

# Range selection based on the selected feature
min_value = float(df[feature].min())
max_value = float(df[feature].max())

range_slider = st.sidebar.slider(f"Select range of {feature}:", min_value, max_value, (min_value, max_value))

# Filter the dataframe based on the selected range
filtered_df = df[(df[feature] >= range_slider[0]) & (df[feature] <= range_slider[1])]

# Display the filtered dataset
st.write(f"### Filtered Iris Dataset by {feature} between {range_slider[0]} and {range_slider[1]}")
st.dataframe(filtered_df)

# Display basic statistics for the filtered data
st.write(f"### Statistics for {feature}")
st.write(filtered_df[feature].describe())
The iris.csv path is relative, so will only work if you run the script from the same folder. If you want to run it from elsewhere (a parent folder) you will need to modify the path.
Below is the final UI, showing the sidebar on the left and the full & filtered Iris dataset in the middle panel. Change the feature and adjust the parameter to filter the data.
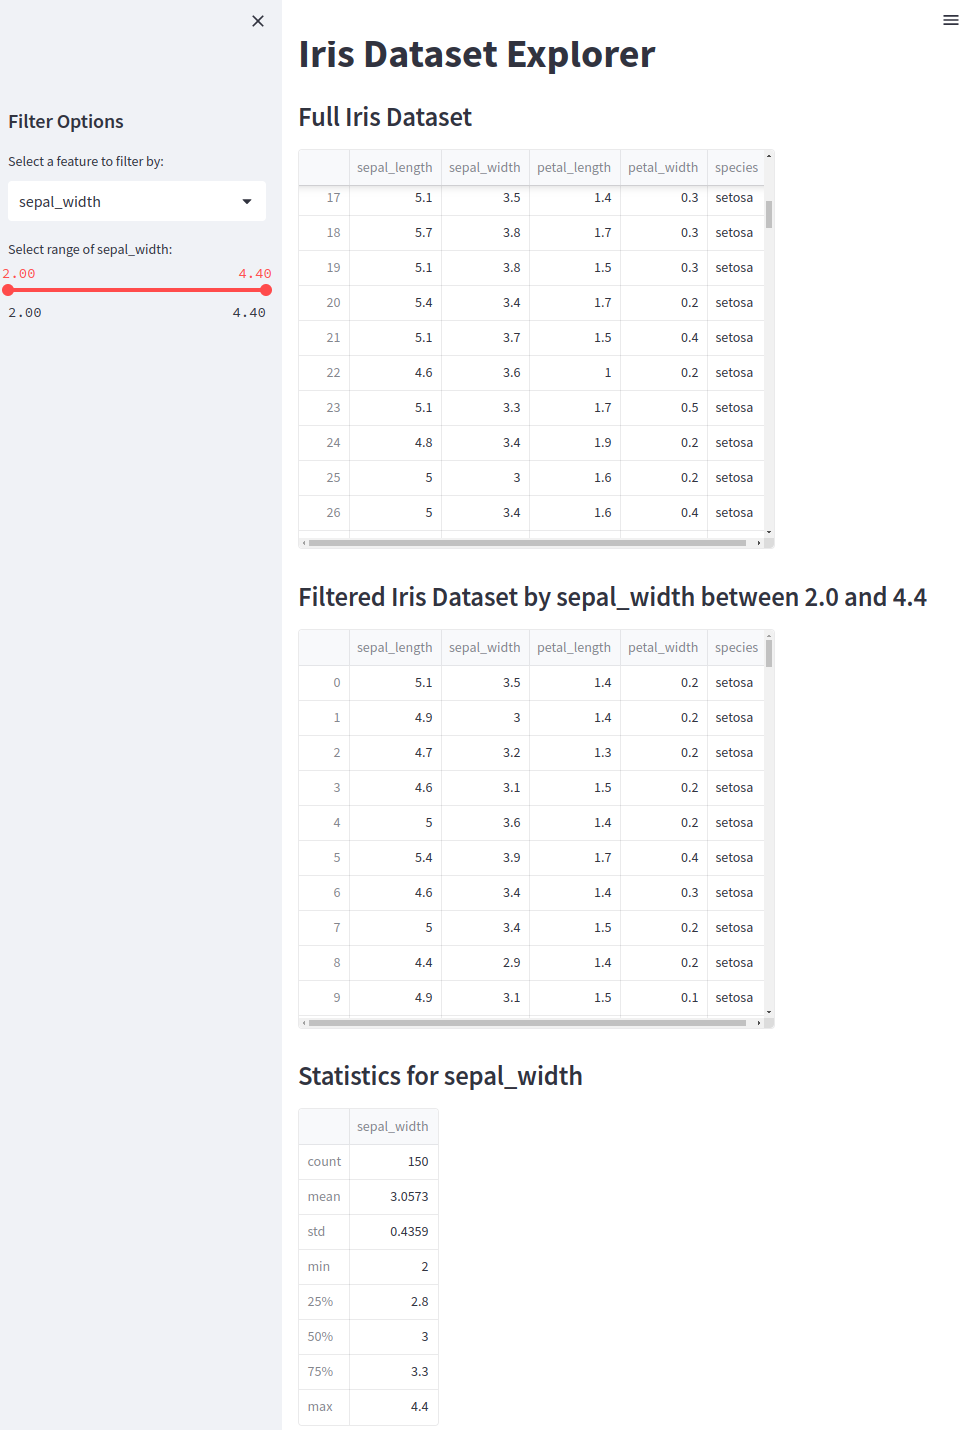 Data filtering demo using Pandas & Streamlit
This simple Streamlit app provides an easy way to explore the Iris dataset. It demonstrates how you can use sidebars, dropdown menus, and sliders to create an interactive and user-friendly data exploration tool.
You can take this simple app and adapt it for other data sets or expand it with additional features, such as advanced filtering or data manipulation options.
