Widgets are elements of the graphical user interface (GUI) that provide an application functionality. From buttons and labels to more complex elements like checkboxes, sliders and canvases, widgets receive input and display output. They are the building blocks we use to build user interfaces.
In this tutorial we'll get ourselves up to speed with Kivy's system of widgets, going through the most commonly used widget classes and their basic usage. Before you start, you'll want to be familiar with the basics of how to create apps in Kivy.
- Getting to Know Kivy's UX Widgets
- Displaying a Logo With an Image Widget
- Displaying the Texts With the Label Widget
- Collecting Text Input Data with the TextInput Widget
- Adding a Save Progress? Option
- Creating a Button Widget With the Button Class
- Adding a Progress Bar With ProgressBar
- Exploring Other UI Widgets
- Conclusion
Getting to Know Kivy's UX Widgets
Widgets are an integral part of modern graphical user interfaces. We can define a widget as a graphical user interface component that displays information or provides specific functionality. They provide different ways for your users to interact with your app's interface, whether for input or output. Buttons, text labels, text fields, drop-down lists, scrollbars, and progress bars are common examples of widgets.
In Kivy, everything visible in an application window is a widget, including the window itself.
Kivy includes a rich library of widgets which you can use in your own applications. Each widget is implemented as a Python class that implements the look and functionality of the widget they create. For example, you can use the Button class to create a Kivy button. We refer to these as widget classes.
Kivy defines widget classes in dedicated modules that we can find in the kivy.uix package. Each dedicated module is named after the widget that it defines. For example, the kivy.uix.button module and the kivy.uix.label define the Button and Label widgets, respectively.
Kivy groups its widgets into five categories five categories:
Packaging Python Applications with PyInstaller by Martin Fitzpatrick — This step-by-step guide walks you through packaging your own Python applications from simple examples to complete installers and signed executables.
- UX widgets
- Layouts
- Complex UX widgets
- Behavior widgets
- Screen manager
In this section, we will go through some of the UX widgets, their features, and how to use them in your application code.
At the end of this tutorial, we will have created a Kivy application that uses most of the UX widgets. The app will look something like this:
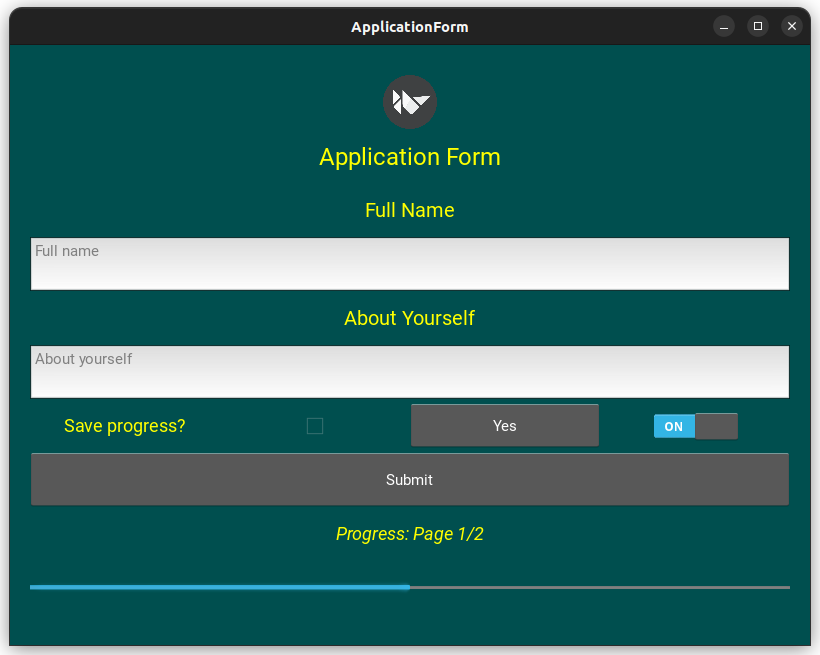 Kivy demo application with multiple UX widgets
We'll start with a simple application outline and start adding widgets from there. Add the following code to a new file named main.py:
from kivy.app import App
from kivy.core.window import Window
from kivy.uix.boxlayout import BoxLayout

Window.clearcolor = (0, 0.31, 0.31, 1.0)

class ApplicationFormApp(App):
    def build(self):
        layout = BoxLayout()
        return layout

ApplicationFormApp().run()
Run this from the command line, as follows.
$ python main.py
You will see a window, in a blue green color (as defined by Window.clearcolor) which contains no other widgets.
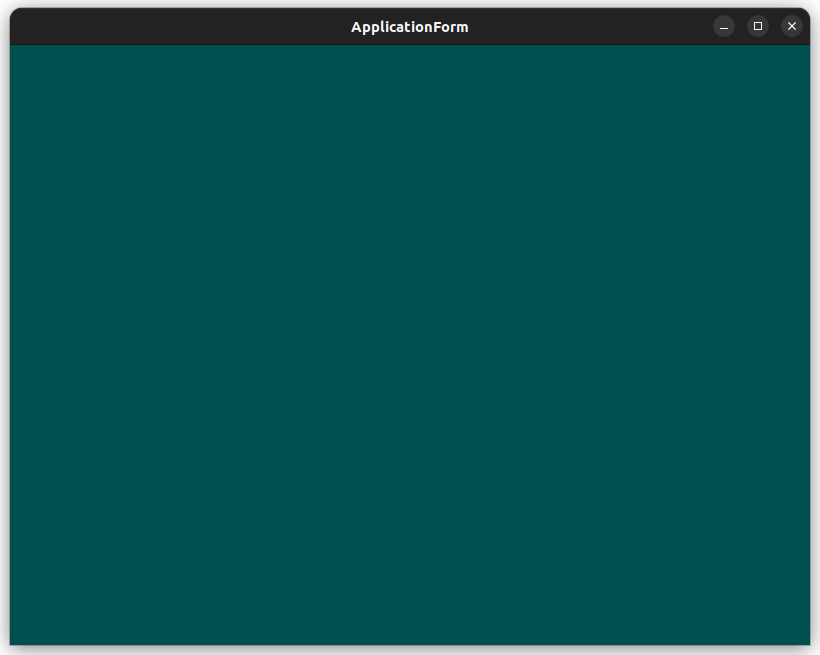 Kivy demo app's window
Now, let's start adding widgets to our Kivy demo app. To kick things off, we'll start with an image to display the Kivy logo.
Displaying a Logo With an Image Widget
You can use the Image widget to display images in your UI. It requires a source argument, which should be a Python string representing the file path to your image.
The Image class can be used for various things in your Kivy applications. For example, you could:
- Display images in an image gallery app
- Add a background image or scene for an app or game
- Display an app's logo on a welcome screen
In our sample app, we'll use the Image class to display Kivy's logo at the top of the form:
from pathlib import Path

import kivy
from kivy.app import App
from kivy.core.window import Window
from kivy.uix.boxlayout import BoxLayout
from kivy.uix.image import Image

Window.clearcolor = (0, 0.31, 0.31, 1.0)

class ApplicationFormApp(App):
    def build(self):
        layout = BoxLayout(orientation="vertical", padding=[20, 30])

        logo_path = (
            Path(kivy.__file__).parent / "data" / "logo" / "kivy-icon-512.png"
        )

        layout.add_widget(Image(source=str(logo_path)))

        return layout

ApplicationFormApp().run()
In this code, we create a Kivy application by inheriting the App class. In the build() method, we create a `BoxLayout to organize the widget in your Kivy window. Then, we create a pathlib.Path object to represent the path to the Kiby logo. Next, we add an Image instance with the logo as its source argument. Finally, we return the layout, which will be the app's root.
Here's how our application will look:
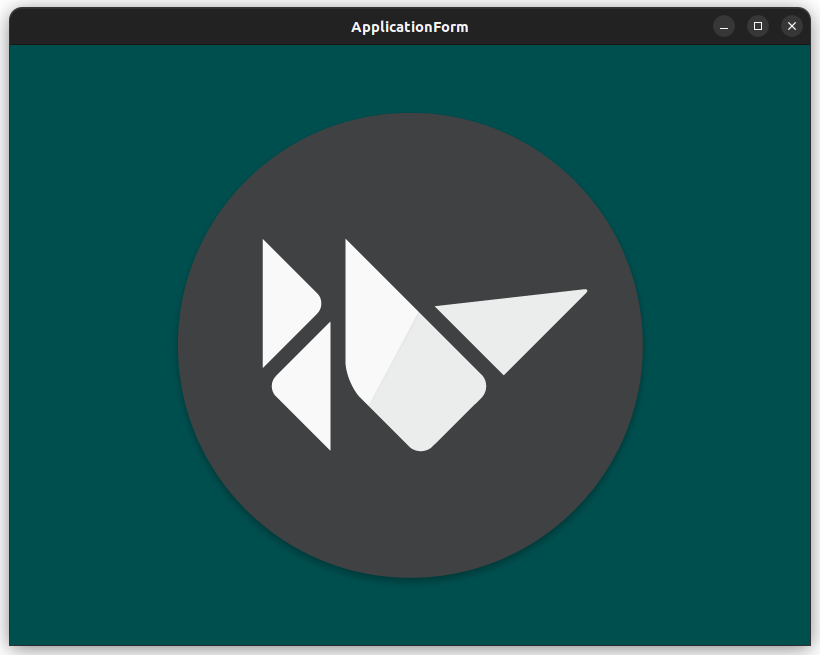 Kivy demo app with the Kivy logo
At this point, the image takes up the entire window because there are no other widgets in the layout. As we add other widgets, the BoxLayout automatically resizes each, stacking the widgets vertically. The orientation is determined by the orientation parameter we passed when creating the BoxLayout.
Displaying the Texts With the Label Widget
The Label class creates a widget to display text in a Kivy GUI. We're going to add a Label to our UI to display the title "Application Form" at the top of our window. We'll also add additional Label widgets for the labels on the form.
from pathlib import Path

import kivy
from kivy.app import App
from kivy.core.window import Window
from kivy.uix.boxlayout import BoxLayout
from kivy.uix.image import Image
from kivy.uix.label import Label  # <-- update

YELLOW = (1, 1, 0, 1)

Window.clearcolor = (0, 0.31, 0.31, 1.0)

class ApplicationFormApp(App):
    def build(self):
        layout = BoxLayout(orientation="vertical", padding=[20, 30])

        logo_path = (
            Path(kivy.__file__).parent / "data" / "logo" / "kivy-icon-512.png"
        )

        # updated -->
        title_label = Label(
            text="Application Form", color=YELLOW, font_size=24
        )
        fullname_label = Label(text="Full Name", color=YELLOW, font_size=20)
        about_label = Label(text="About Yourself", color=YELLOW, font_size=20)
        status_label = Label(
            text="[size=18][i]Progress: Page 1/2[/i][/size]",
            color=YELLOW,
            markup=True,
        )
        # <-- updated

        layout.add_widget(Image(source=str(logo_path)))
        # updated -->
        layout.add_widget(title_label)
        layout.add_widget(fullname_label)
        layout.add_widget(about_label)
        layout.add_widget(status_label)
        # <-- updated
        return layout

ApplicationFormApp().run()
In this update, we add four labels to our app. These labels will display the "Application Form", the "Full Name", the "About Yourself" and the "Progress: Page 1/2" text. To define each label, we use the text, color, and font_size arguments.
When creating the object you can pass various arguments to to alter the label's appearance. For example:
textfont_sizecolormarkup
In Kivy, the properties of a widget class are also arguments to the class constructor. So, in this tutorial, we call them either properties or arguments.
The text argument is a Python string whose value will be displayed on your screen. The color argument determines the color of your text. Its value must be a tuple or list of three or four numbers in (red, green, blue, alpha) or (red, green, blue) format, with each value in the range of 0 to 1. By default, the display color is white or (1, 1, 1, 1).
The font_size argument controls how large your text will be and accepts a string, float, or integer value. If you use a string value, then it must have a unit, say font_size="14sp". Otherwise, a default unit (px for pixels) is used. Other units available include pt, mm, cm, in, and dp.
The markup argument in the status label introduces HTML-like tags for styling a label's appearance. You can use this feature to achieve the same effect as you would have gotten using other individual properties. In this example, we have used the markup property to render its text in italics and also to set its font size to 18.
Run the updated code. You'll see a window like the following:
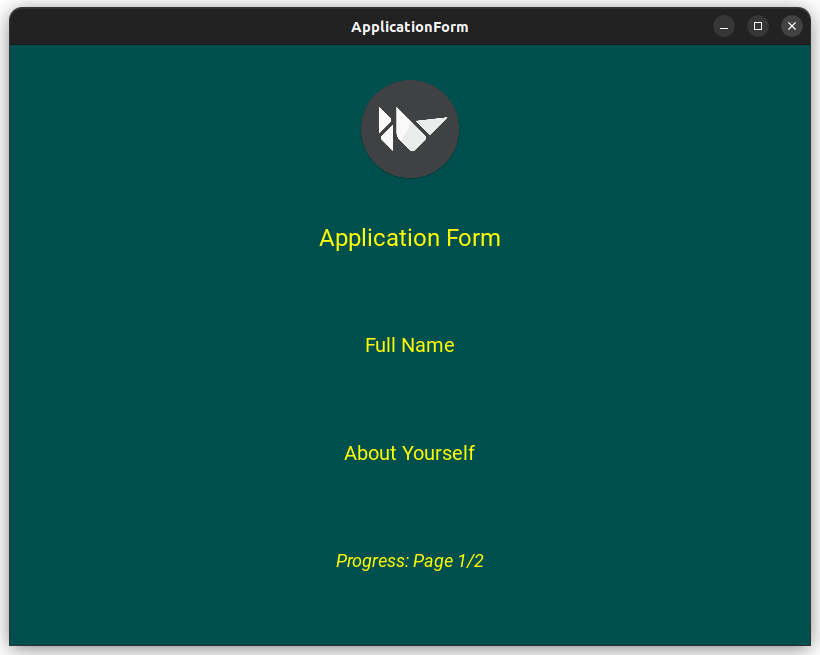 The Kivy demo app with four additional labels
Now, your sample app has the logo at the top and the labels all the way to the bottom. Note that all the objects are spaced uniformly and the logo we added has now shrunk to take the same amount of space as the other elements. This is the default behavior of Kivy's BoxLayout.
Collecting Text Input Data with the TextInput Widget
For an application form to work, users need to be able to enter their information. Next we'll add some input fields, which we'll define using the TextInput class. As the name suggests, this widget provides a way for users to input text.
Let's modify our code to add the fields for "Full Name" and "About Yourself" so we can now accept information from an applicant:
from pathlib import Path

import kivy
from kivy.app import App
from kivy.core.window import Window
from kivy.uix.boxlayout import BoxLayout
from kivy.uix.image import Image
from kivy.uix.label import Label
from kivy.uix.textinput import TextInput  # <-- update

YELLOW = (1, 1, 0, 1)

Window.clearcolor = (0, 0.31, 0.31, 1.0)

class ApplicationFormApp(App):
    def build(self):
        layout = BoxLayout(orientation="vertical", padding=[20, 30])

        logo_path = (
            Path(kivy.__file__).parent / "data" / "logo" / "kivy-icon-512.png"
        )
        title_label = Label(
            text="Application Form", color=YELLOW, font_size=24
        )
        fullname_label = Label(text="Full Name", color=YELLOW, font_size=20)
        about_label = Label(text="About Yourself", color=YELLOW, font_size=20)
        status_label = Label(
            text="[size=18][i]Progress: Page 1/2[/i][/size]",
            color=YELLOW,
            markup=True,
        )

        # update -->
        fullname = TextInput(
            hint_text="Full name", padding=[5, 5], multiline=False
        )
        about = TextInput(hint_text="About yourself", padding=[5, 5])
        # <-- update

        layout.add_widget(Image(source=str(logo_path)))
        layout.add_widget(title_label)
        layout.add_widget(fullname_label)
        layout.add_widget(fullname)  # <-- update
        layout.add_widget(about_label)
        layout.add_widget(about)  # <-- update
        layout.add_widget(status_label)

        return layout

ApplicationFormApp().run()
In this update, we've created the fullname and about text inputs, passing the following arguments to TextInput:
hint_textpaddingmultilinefocused
The hint_text argument accepts string values and gives the user an idea of what the text input is meant for. The padding argument holds a list of values that define the padding around the text.
The multiline argument accepts only values of True or False and enables or disables the use of multiple lines of text in a text input widget. Its default value is True, and we have set this to False for the full name field to accept only a single line of input.
If you run the application now, then you'll see the following:
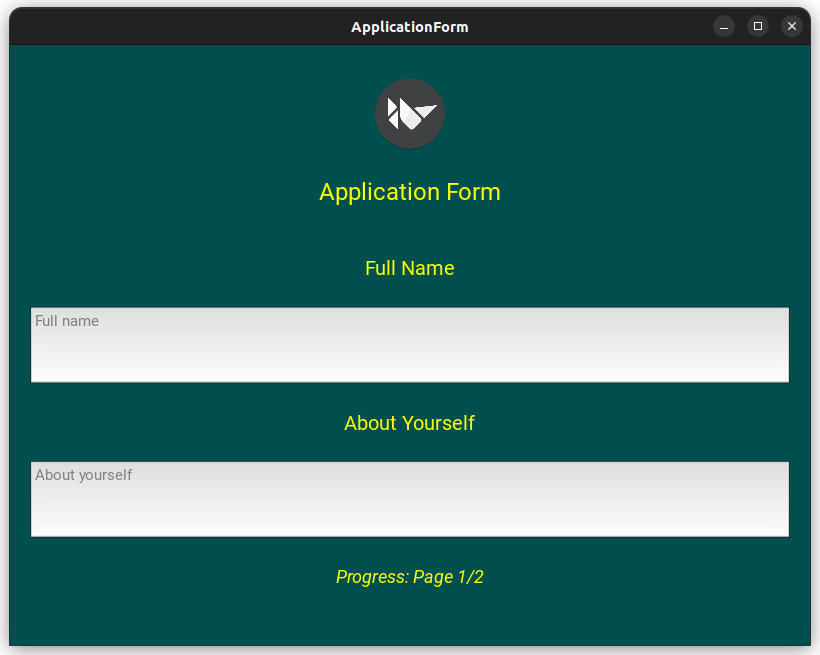 The Kivy demo app with two additional text inputs
While the full name text input allows only a single line of input, you'll notice that it still appears the same as a multi-line input. This can be confusing for users, so we could adjust the size of the widget. To do this, you can set the size_hint_y argument to None and the height argument to an appropriate value in the call to TextInput().
Adding a Save Progress? Option
Now we'll add a Save Progress? option to our app. This is a Boolean option, which we can provide with a few different widgets. In the following sections, we'll add three different UX widgets that allow us to provide Boolean options. We will add a CheckBox, ToggleButton, and Switch widget as a demonstration.
Using a CheckBox Widget
Checkboxes are widgets that give the user the ability to select multiple options from a list of options. You can use these widgets to give the user a choice of disabling/enabling a feature on an interface.
To create checkboxes, we can use the CheckBox widget and instantiate it with a few arguments, including the following:
activegroup
As with have done so far with other widgets, let's update our GUI by adding a checkbox. We'll also add a label displaying the "Save Progress?" text:
from pathlib import Path

import kivy
from kivy.app import App
from kivy.core.window import Window
from kivy.uix.boxlayout import BoxLayout
from kivy.uix.checkbox import CheckBox  # <-- update
from kivy.uix.image import Image
from kivy.uix.label import Label
from kivy.uix.textinput import TextInput

YELLOW = (1, 1, 0, 1)

Window.clearcolor = (0, 0.31, 0.31, 1.0)

class ApplicationFormApp(App):
    def build(self):
        layout = BoxLayout(orientation="vertical", padding=[20, 30])

        logo_path = (
            Path(kivy.__file__).parent / "data" / "logo" / "kivy-icon-512.png"
        )
        title_label = Label(
            text="Application Form", color=YELLOW, font_size=24
        )
        fullname_label = Label(text="Full Name", color=YELLOW, font_size=20)
        about_label = Label(text="About Yourself", color=YELLOW, font_size=20)
        status_label = Label(
            text="[size=18][i]Progress: Page 1/2[/i][/size]",
            color=YELLOW,
            markup=True,
        )
        fullname = TextInput(
            hint_text="Full name", padding=[5, 5], multiline=False
        )
        about = TextInput(hint_text="About yourself", padding=[5, 5])

        # update -->
        save_progress = Label(
            text="Save progress?", font_size=18, color=YELLOW
        )
        save_checkbox = CheckBox(active=False)
        h_layout = BoxLayout(padding=[0, 5])
        h_layout.add_widget(save_progress)
        h_layout.add_widget(save_checkbox)
        # <-- update

        layout.add_widget(Image(source=str(logo_path)))
        layout.add_widget(title_label)
        layout.add_widget(fullname_label)
        layout.add_widget(fullname)
        layout.add_widget(about_label)
        layout.add_widget(about)
        layout.add_widget(h_layout)  # <-- update
        layout.add_widget(status_label)

        return layout

ApplicationFormApp().run()
In this updated version of our app, we add the save_progress label and the save_checkbox check box. Note that we've used a horizontal layout to arrange these widgets in a row under the About Yourself text input.
Here's how the app looks now:
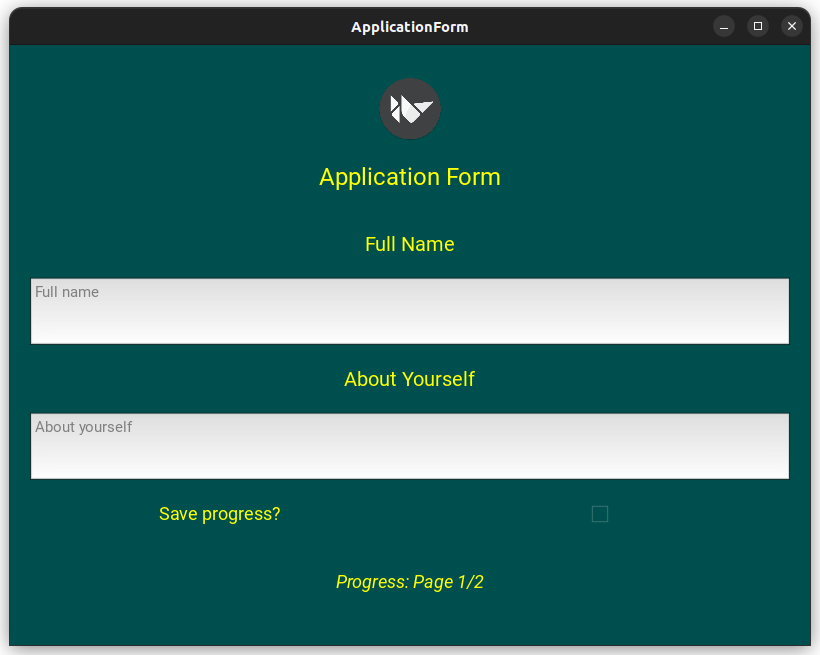 The Kivy demo app with an additional checkbox
The CheckBox class accepts an active argument, which we can use to set its state. The state can be either checked or unchecked. However, active can only take values of True or False.
Using a ToggleButton Widget
A ToggleButton is like a regular button, but it stays either ON or OFF when we click it and remain in the corresponding state until we click it again. We can use this widget to provide a toggle option ON/OFF, much like a CheckBox.
Among others, ToggleButton accepts the state argument, which accepts a string value. The allowed values can be either "down" or "normal".
Once more, let's add to our code to include the toggle button:
Purchasing Power Parity
Developers in [[ country ]] get [[ discount.discount_pc ]]% OFF on all books & courses with code [[ discount.coupon_code ]]from pathlib import Path
import kivy
from kivy.app import App
from kivy.core.window import Window
from kivy.uix.boxlayout import BoxLayout
from kivy.uix.checkbox import CheckBox
from kivy.uix.image import Image
from kivy.uix.label import Label
from kivy.uix.textinput import TextInput
from kivy.uix.togglebutton import ToggleButton # <-- update
YELLOW = (1, 1, 0, 1)
Window.clearcolor = (0, 0.31, 0.31, 1.0)
class ApplicationFormApp(App):
def build(self):
layout = BoxLayout(orientation="vertical", padding=[20, 30])
logo_path = (
Path(kivy.__file__).parent / "data" / "logo" / "kivy-icon-512.png"
)
title_label = Label(
text="Application Form", color=YELLOW, font_size=24
)
fullname_label = Label(text="Full Name", color=YELLOW, font_size=20)
about_label = Label(text="About Yourself", color=YELLOW, font_size=20)
status_label = Label(
text="[size=18][i]Progress: Page 1/2[/i][/size]",
color=YELLOW,
markup=True,
)
fullname = TextInput(
hint_text="Full name", padding=[5, 5], multiline=False
)
about = TextInput(hint_text="About yourself", padding=[5, 5])
save_progress = Label(
text="Save progress?", font_size=18, color=YELLOW
)
save_checkbox = CheckBox(active=False)
h_layout = BoxLayout(padding=[0, 5])
h_layout.add_widget(save_progress)
h_layout.add_widget(save_checkbox)
# update -->
toggle = ToggleButton(text="Yes")
h_layout.add_widget(toggle)
# <-- update
layout.add_widget(Image(source=str(logo_path)))
layout.add_widget(title_label)
layout.add_widget(fullname_label)
layout.add_widget(fullname)
layout.add_widget(about_label)
layout.add_widget(about)
layout.add_widget(h_layout)
layout.add_widget(status_label)
return layout
ApplicationFormApp().run()
In this update, we add a toggle button with the text "Yes". Again, we use the horizontal layout under the About Yourself text input to arrange the widget in our GUI. Here's how the app looks after this update:
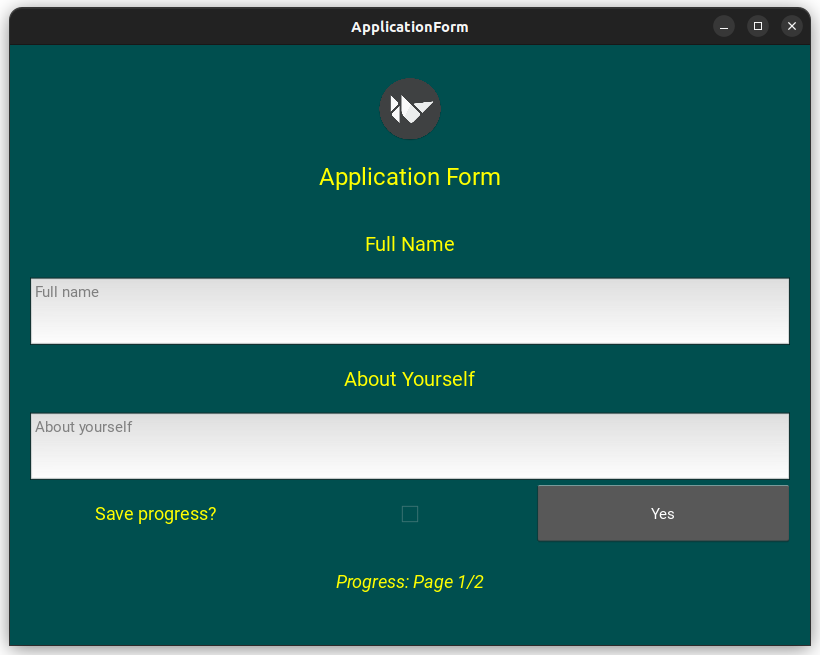 The Kivy demo app with an additional toggle button
Now, when you click the Yes toggle buttons once, you see that it changes to its checked state. You'll know that because the button changes its color to a light blue. If you click the button again, then it gets back to its unchecked or normal state.
Using a Switch Widget to our Form
Just like the CheckBox and ToggleButton, we want to add another way of offering the user an option to save the form's progress. We can do that with a Switch widget.
The key property of a Switch is the active property. This property can have a value of True or False corresponding to an ON/OFF position like a light switch.
So, let's add our switch now:
from pathlib import Path

import kivy
from kivy.app import App
from kivy.core.window import Window
from kivy.uix.boxlayout import BoxLayout
from kivy.uix.checkbox import CheckBox
from kivy.uix.image import Image
from kivy.uix.label import Label
from kivy.uix.switch import Switch  # <-- update
from kivy.uix.textinput import TextInput
from kivy.uix.togglebutton import ToggleButton

YELLOW = (1, 1, 0, 1)

Window.clearcolor = (0, 0.31, 0.31, 1.0)

class ApplicationFormApp(App):
    def build(self):
        layout = BoxLayout(orientation="vertical", padding=[20, 30])

        logo_path = (
            Path(kivy.__file__).parent / "data" / "logo" / "kivy-icon-512.png"
        )
        title_label = Label(
            text="Application Form", color=YELLOW, font_size=24
        )
        fullname_label = Label(text="Full Name", color=YELLOW, font_size=20)
        about_label = Label(text="About Yourself", color=YELLOW, font_size=20)
        status_label = Label(
            text="[size=18][i]Progress: Page 1/2[/i][/size]",
            color=YELLOW,
            markup=True,
        )
        fullname = TextInput(
            hint_text="Full name", padding=[5, 5], multiline=False
        )
        about = TextInput(hint_text="About yourself", padding=[5, 5])
        save_progress = Label(
            text="Save progress?", font_size=18, color=YELLOW
        )
        save_checkbox = CheckBox(active=False)
        h_layout = BoxLayout(padding=[0, 5])
        h_layout.add_widget(save_progress)
        h_layout.add_widget(save_checkbox)
        toggle = ToggleButton(text="Yes")
        h_layout.add_widget(toggle)

        # update -->
        switch = Switch(active=True)
        h_layout.add_widget(switch)
        # <-- update

        layout.add_widget(Image(source=str(logo_path)))
        layout.add_widget(title_label)
        layout.add_widget(fullname_label)
        layout.add_widget(fullname)
        layout.add_widget(about_label)
        layout.add_widget(about)
        layout.add_widget(h_layout)
        layout.add_widget(status_label)

        return layout

ApplicationFormApp().run()
In this new update, we've added a Switch widget. The active argument allows you to define whether the switch is ON or OFF. In this example, we set it to True so the switch is ON. Here's how the application looks at this point:
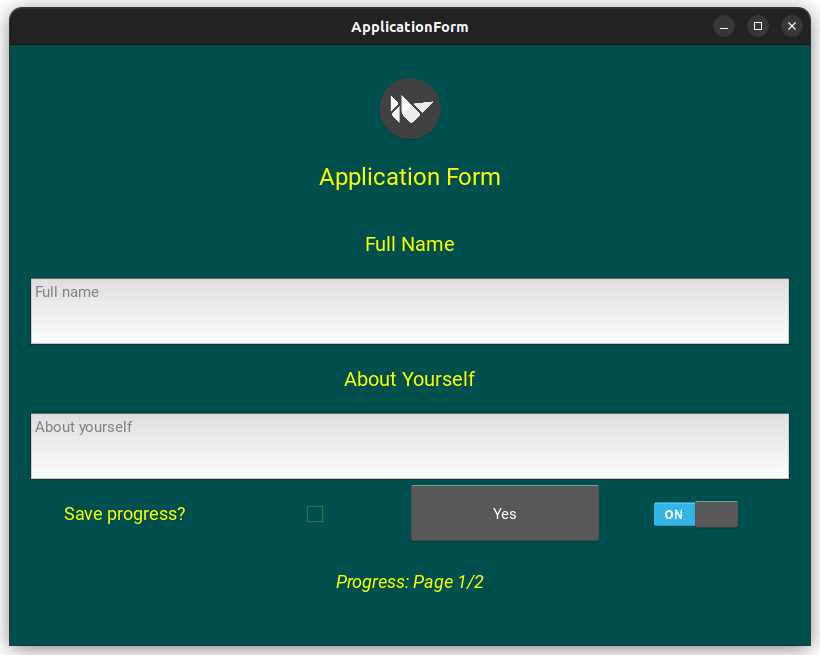 The Kivy demo app with an additional switch
So now we have three different ways of selecting options. In a regular application, we definitely would need only one of these, preferably the CheckBox widget.
Creating a Button Widget With the Button Class
The Button class comes next. It is one of the most common components of any user interface. It inherits from the Label class directly, which means it possesses all the properties of a label. Of course, together with some button-specific properties.
We can use the Button widget to call methods and functions when the user presses or releases the button itself. Around this specific capability, the Button class has two properties to handle that, which are:
on_presson_release
On our form, we will create a Submit button to attach a method that will close the app when we click the button. Here's the updated code:
from pathlib import Path

import kivy
from kivy.app import App
from kivy.core.window import Window
from kivy.uix.boxlayout import BoxLayout
from kivy.uix.button import Button  # <-- update
from kivy.uix.checkbox import CheckBox
from kivy.uix.image import Image
from kivy.uix.label import Label
from kivy.uix.switch import Switch
from kivy.uix.textinput import TextInput
from kivy.uix.togglebutton import ToggleButton

YELLOW = (1, 1, 0, 1)

Window.clearcolor = (0, 0.31, 0.31, 1.0)

class ApplicationFormApp(App):
    def build(self):
        layout = BoxLayout(orientation="vertical", padding=[20, 30])

        logo_path = (
            Path(kivy.__file__).parent / "data" / "logo" / "kivy-icon-512.png"
        )
        layout.add_widget(Image(source=str(logo_path)))
        title_label = Label(
            text="Application Form", color=YELLOW, font_size=24
        )
        fullname_label = Label(text="Full Name", color=YELLOW, font_size=20)
        about_label = Label(text="About Yourself", color=YELLOW, font_size=20)
        status_label = Label(
            text="[size=18][i]Progress: Page 1/2[/i][/size]",
            color=YELLOW,
            markup=True,
        )
        fullname = TextInput(
            hint_text="Full name", padding=[5, 5], multiline=False
        )
        about = TextInput(hint_text="About yourself", padding=[5, 5])
        save_progress = Label(
            text="Save progress?", font_size=18, color=YELLOW
        )
        save_checkbox = CheckBox(active=False)
        h_layout = BoxLayout(padding=[0, 5])
        h_layout.add_widget(save_progress)
        h_layout.add_widget(save_checkbox)
        toggle = ToggleButton(text="Yes")
        h_layout.add_widget(toggle)
        switch = Switch(active=True)
        h_layout.add_widget(switch)

        # update -->
        submit_button = Button(text="Submit")
        submit_button.bind(on_press=self.stop)
        # <-- update

        layout.add_widget(title_label)
        layout.add_widget(fullname_label)
        layout.add_widget(fullname)
        layout.add_widget(about_label)
        layout.add_widget(about)
        layout.add_widget(h_layout)
        layout.add_widget(submit_button)  # <-- update
        layout.add_widget(status_label)

        return layout

ApplicationFormApp().run()
Here, we've created a button with the text Submit. Then, we use the .bind() method to connect the on_press argument to the stop() method. This connection makes it possible to call the method when we click the button. This method terminates the app's execution.
Now your app looks like in the following screenshot:
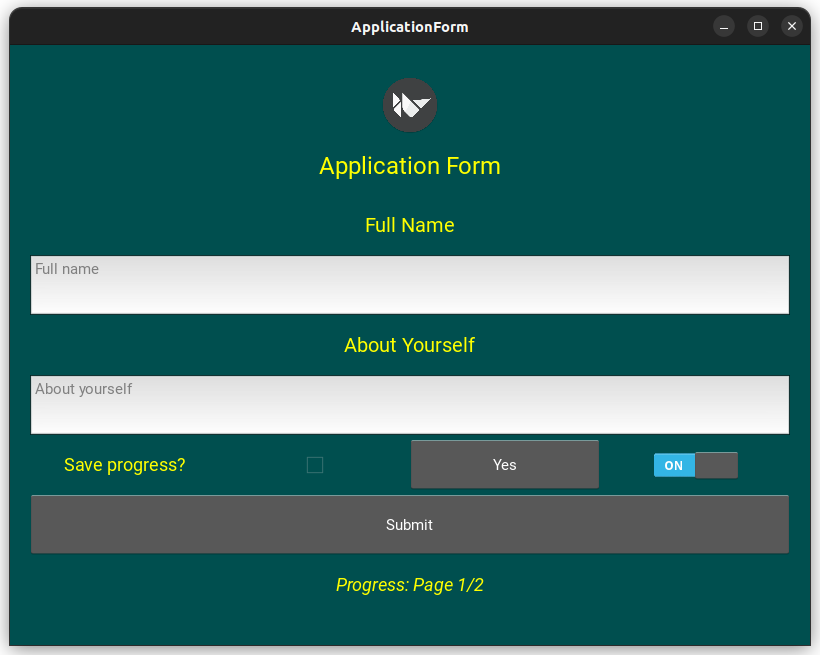 The Kivy demo app with an additional button
To close a Kivy app, we use the .stop() method. This method will gracefully shut down the application and exit the program. It stops all scheduled events, closes the windows, and cleans up any allocated resources.
Adding a Progress Bar With ProgressBar
The ProgressBar widget is a horizontal bar that displays the progress of an ongoing process, as the name suggests. According to the official documentation, only horizontal progress bars are currently officially supported.
The following arguments are useful when creating a ProgressBar widget:
valuevalue_normalizedmax
We can use the value_normalized and value arguments to set the current progress of the progress bar to a numerical value between 0 and max. The difference between these two arguments is that value allows us to set the value directly, while value_normalized normalizes value inside the range between 0 and 1.
The max argument allows us to set the maximum value of a progress bar. For example, let's say that we have two pages of forms to fill out in our sample app. In this case, we can set max to 2. If we're working with percentage, then the max argument can be 100, which is the default.
Adding a progress bar to our previous code, we now have the final code:
from pathlib import Path

import kivy
from kivy.app import App
from kivy.core.window import Window
from kivy.uix.boxlayout import BoxLayout
from kivy.uix.button import Button
from kivy.uix.checkbox import CheckBox
from kivy.uix.image import Image
from kivy.uix.label import Label
from kivy.uix.progressbar import ProgressBar  # <-- update
from kivy.uix.switch import Switch
from kivy.uix.textinput import TextInput
from kivy.uix.togglebutton import ToggleButton

YELLOW = (1, 1, 0, 1)

Window.clearcolor = (0, 0.31, 0.31, 1.0)

class ApplicationFormApp(App):
    def build(self):
        layout = BoxLayout(orientation="vertical", padding=[20, 30])

        logo_path = (
            Path(kivy.__file__).parent / "data" / "logo" / "kivy-icon-512.png"
        )
        title_label = Label(
            text="Application Form", color=YELLOW, font_size=24
        )
        fullname_label = Label(text="Full Name", color=YELLOW, font_size=20)
        about_label = Label(text="About Yourself", color=YELLOW, font_size=20)
        status_label = Label(
            text="[size=18][i]Progress: Page 1/2[/i][/size]",
            color=YELLOW,
            markup=True,
        )
        fullname = TextInput(
            hint_text="Full name", padding=[5, 5], multiline=False
        )
        about = TextInput(hint_text="About yourself", padding=[5, 5])
        save_progress = Label(
            text="Save progress?", font_size=18, color=YELLOW
        )
        save_checkbox = CheckBox(active=False)
        h_layout = BoxLayout(padding=[0, 5])
        h_layout.add_widget(save_progress)
        h_layout.add_widget(save_checkbox)
        toggle = ToggleButton(text="Yes")
        h_layout.add_widget(toggle)
        switch = Switch(active=True)
        h_layout.add_widget(switch)
        submit_button = Button(text="Submit")
        submit_button.bind(on_press=self.stop)

        # update -->
        status_progress = ProgressBar(value=1, max=2)
        # <-- update

        layout.add_widget(Image(source=str(logo_path)))
        layout.add_widget(title_label)
        layout.add_widget(fullname_label)
        layout.add_widget(fullname)
        layout.add_widget(about_label)
        layout.add_widget(about)
        layout.add_widget(h_layout)
        layout.add_widget(submit_button)
        layout.add_widget(status_label)
        layout.add_widget(status_progress)  # <-- update

        return layout

ApplicationFormApp().run()
In the added code, we create a progress bar to track the completion of our hypothetic form. Here's how the app looks after this addition:
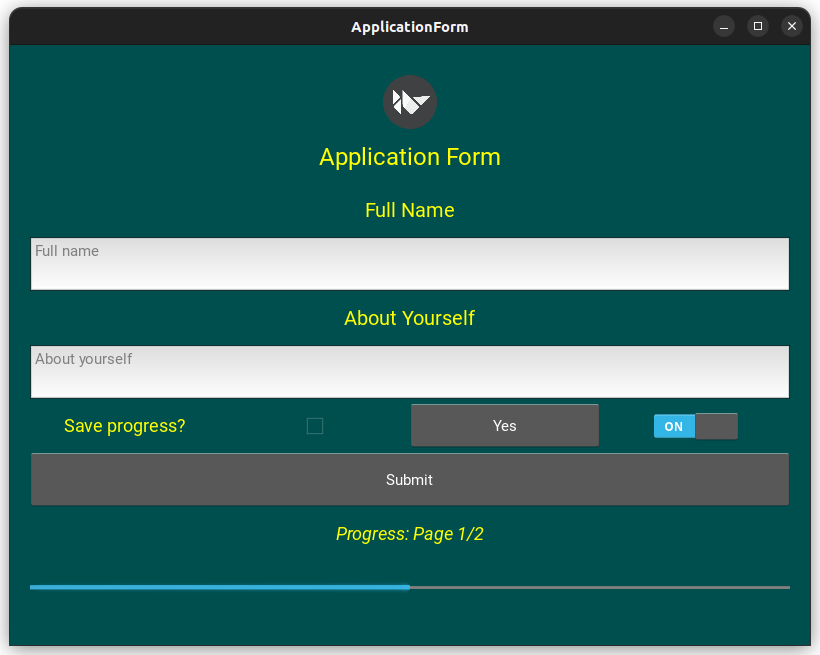 The Kivy demo app with an additional progress bar
Because the form is supposed to have two pages, we set max to 2 and value to 1. So, the progress bar shows that we're on the first page.
Exploring Other UI Widgets
So far we've looked at some of the most common GUI widgets which are useful for building standard forms. However, Kivy also has a few more specialized widgets which you may find useful in your own applications. Next, we'll look at the Video widget for playing videos and the Slider widget, which allows you to select from a range of numerical values.
The Video Widget
The Video widget can be used to play video files. It supports a wide range of video formats. Much like the Image class, the Video widget class accepts a source argument that points to the location of the video file we want to play. We can also pass in a value of "play" to the state argument to make the video start playing once loaded.
The following app shows a window playing the specified video file:
from kivy.app import App
from kivy.uix.video import Video

class MainApp(App):
    def build(self):
        player = Video(source="sample-video.mp4", state="play")
        return player

MainApp().run()
Make sure to change the file name to the file path of a video in your local drive, or move an MP4 video into the same folder as your script and rename it to sample-video.mp4.
Run the above code and you'll see a window playing the video passed in the source argument.
The Video widget comes may come in handy when you want to build a video player app or display an intro video in a game before it starts.
The Slider Widget
We can use the Slider widget to allow users to select from a range of numerical values by moving a thumb along a track. Sliders are commonly used to select numerical values where there are known upper or lower bounds, or for representing progress through a media file.
The Slider class has the following basic arguments:
valuevalue_normalizedminmaxsteporientation
The value, value_normalized, and max arguments work similarly to those in the ProgressBar widget. The min argument allows us to set the minimum numerical value of the slider.
We can use the step argument to make the slider's progression in discrete steps, rather than being continuous. For example, a step value of 10 makes the slider go from minimum to maximum values in steps of 10.
Then, we have the orientation argument, which accepts either "horizontal" or "vertical" as a value. You can use this argument to create either a horizontal or vertical slider. Its default value is "horizontal".
The example below creates two sliders of values ranging from 0 to 100, set at a current value of halfway in this range:
from kivy.app import App
from kivy.core.window import Window
from kivy.uix.boxlayout import BoxLayout
from kivy.uix.slider import Slider

Window.clearcolor = (0, 0.31, 0.31, 1.0)

class MainApp(App):
    def build(self):
        vertical_slider = Slider(
            min=0,
            max=100,
            value=50,
            step=10,
            orientation="vertical",
        )
        horizontal_slider = Slider(
            min=0,
            max=100,
            value=50,
        )

        layout = BoxLayout()
        layout.add_widget(vertical_slider)
        layout.add_widget(horizontal_slider)

        return layout

MainApp().run()
The first slider is vertically oriented, and it progresses in steps of 10. You can try it out by holding the click on the slider indicator and dragging it up and down. The second slider is horizontally oriented, which is the default orientation. In this case, you have a continuous slider.
Go ahead and run the app. You'll get the following window on your screen:
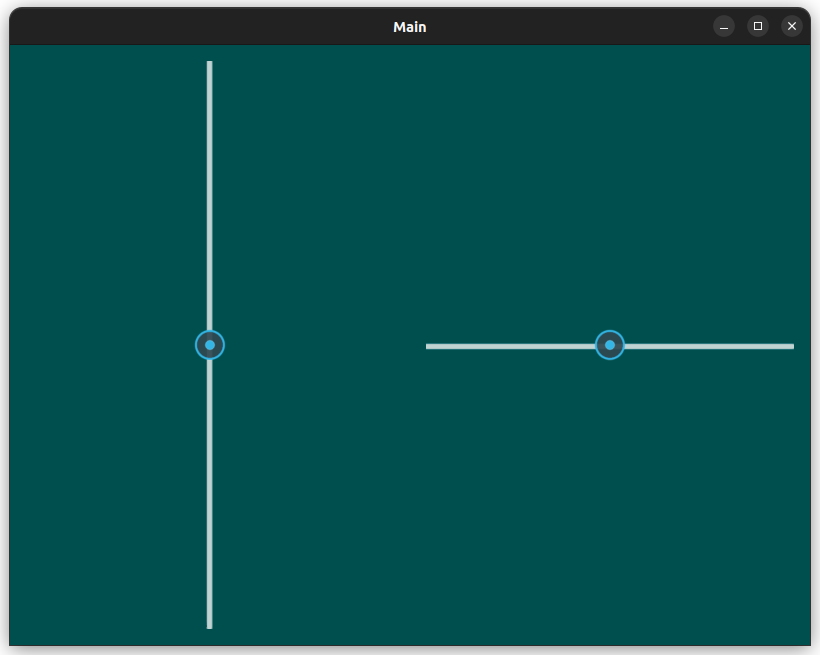 A Kivy app showing a vertical and a horizontal slider
We can use sliders for a variety of purposes. For example, you can use it to provide volume controls in a media player app. You can also use it in image editing apps for tweaking an image's properties like brightness and contrast.
Conclusion
In this tutorial, we've learned about some of the widgets that Kivy provides. From buttons and labels to images and videos, these widgets provide the basic building block for creating GUI applications with Kivy.
With these few widgets you will be able to start building your own applications with Kivy!
Remember to refer to the widgets documentation as you continue to create apps with Kivy. Each widget discussed here has many useful properties that give you wide control over the appearance and functionality to offer in your GUIs.
Never miss an update
Enjoyed this? Subscribe to get new updates straight in your Inbox.
