Next, we'll look at some of the common user interface elements you've probably seen in many other applications — toolbars and menus. We'll also explore the neat system Qt provides for minimizing the duplication between different UI areas — QAction.
Basic App
We'll start this tutorial with a simple skeleton application, which we can customize. Save the following code in a file named app.py -- this code all the imports you'll need for the later steps:
from PyQt6.QtCore import QSize, Qt
from PyQt6.QtGui import QAction, QIcon, QKeySequence
from PyQt6.QtWidgets import (
    QApplication,
    QCheckBox,
    QLabel,
    QMainWindow,
    QStatusBar,
    QToolBar,
)

class MainWindow(QMainWindow):
    def __init__(self):
        super().__init__()
        self.setWindowTitle("My App")

app = QApplication([])
window = MainWindow()
window.show()
app.exec()
This file contains the imports and the basic code that you'll use to complete the examples in this tutorial.
If you're migrating to PyQt6 from PyQt5, notice that QAction is now available via the QtGui module.
Toolbars
One of the most commonly seen user interface elements is the toolbar. Toolbars are bars of icons and/or text used to perform common tasks within an application, for which access via a menu would be cumbersome. They are one of the most common UI features seen in many applications. While some complex applications, particularly in the Microsoft Office suite, have migrated to contextual 'ribbon' interfaces, the standard toolbar is usually sufficient for the majority of applications you will create.
 Standard GUI elements
Adding a Toolbar
Let's start by adding a toolbar to our application.
Purchasing Power Parity
Developers in [[ country ]] get [[ discount.discount_pc ]]% OFF on all books & courses with code [[ discount.coupon_code ]]In Qt, toolbars are created from the QToolBar class. To start, you create an instance of the class and then call addToolbar on the QMainWindow. Passing a string in as the first argument to QToolBar sets the toolbar's name, which will be used to identify the toolbar in the UI:
class MainWindow(QMainWindow):
    def __init__(self):
        super().__init__()
        self.setWindowTitle("My App")

        label = QLabel("Hello!")
        label.setAlignment(Qt.AlignmentFlag.AlignCenter)

        self.setCentralWidget(label)

        toolbar = QToolBar("My main toolbar")
        self.addToolBar(toolbar)
Run it! You'll see a thin grey bar at the top of the window. This is your toolbar. Right-click the name to trigger a context menu and toggle the bar off.
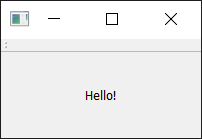 A window with a toolbar.
How can I get my toolbar back? Unfortunately, once you remove a toolbar, there is now no place to right-click to re-add it. So, as a general rule, you want to either keep one toolbar un-removeable, or provide an alternative interface in the menus to turn toolbars on and off.
We should make the toolbar a bit more interesting. We could just add a QButton widget, but there is a better approach in Qt that gets you some additional features — and that is via QAction. QAction is a class that provides a way to describe abstract user interfaces. What this means in English is that you can define multiple interface elements within a single object, unified by the effect that interacting with that element has.
For example, it is common to have functions that are represented in the toolbar but also the menu — think of something like Edit->Cut, which is present both in the Edit menu but also on the toolbar as a pair of scissors, and also through the keyboard shortcut Ctrl-X (Cmd-X on Mac).
Without QAction, you would have to define this in multiple places. But with QAction you can define a single QAction, defining the triggered action, and then add this action to both the menu and the toolbar. Each QAction has names, status messages, icons, and signals that you can connect to (and much more).
In the code below, you can see this first QAction added:
class MainWindow(QMainWindow):
    def __init__(self):
        super().__init__()
        self.setWindowTitle("My App")

        label = QLabel("Hello!")
        label.setAlignment(Qt.AlignmentFlag.AlignCenter)

        self.setCentralWidget(label)

        toolbar = QToolBar("My main toolbar")
        self.addToolBar(toolbar)

        button_action = QAction("Your button", self)
        button_action.setStatusTip("This is your button")
        button_action.triggered.connect(self.toolbar_button_clicked)
        toolbar.addAction(button_action)

    def toolbar_button_clicked(self, s):
        print("click", s)
To start with, we create the function that will accept the signal from the QAction so we can see if it is working. Next, we define the QAction itself. When creating the instance, we can pass a label for the action and/or an icon. You must also pass in any QObject to act as the parent for the action — here we're passing self as a reference to our main window. Strangely, for QAction the parent element is passed in as the final argument.
Next, we can opt to set a status tip — this text will be displayed on the status bar once we have one. Finally, we connect the triggered signal to the custom function. This signal will fire whenever the QAction is triggered (or activated).
Run it! You should see your button with the label that you have defined. Click on it, and then our custom method will print "click" and the status of the button.
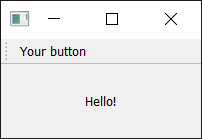 Toolbar showing our
 QAction button.
Why is the signal always false? The signal passed indicates whether the button is checked, and since our button is not checkable — just clickable — it is always false. We'll show how to make it checkable shortly.
Next, we can add a status bar.
We create a status bar object by calling QStatusBar to get a new status bar object and then passing this into setStatusBar. Since we don't need to change the status bar settings, we can also just pass it in as we create it, in a single line:
class MainWindow(QMainWindow):
    def __init__(self):
        super().__init__()
        self.setWindowTitle("My App")

        label = QLabel("Hello!")
        label.setAlignment(Qt.AlignmentFlag.AlignCenter)

        self.setCentralWidget(label)

        toolbar = QToolBar("My main toolbar")
        self.addToolBar(toolbar)

        button_action = QAction("Your button", self)
        button_action.setStatusTip("This is your button")
        button_action.triggered.connect(self.toolbar_button_clicked)
        toolbar.addAction(button_action)

        self.setStatusBar(QStatusBar(self))

    def toolbar_button_clicked(self, s):
        print("click", s)
Run it! Hover your mouse over the toolbar button, and you will see the status text in the status bar.
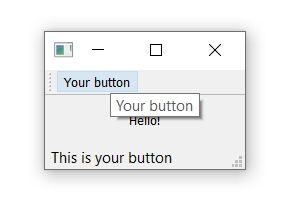 Status bar text updated as we hover over the action.
Next, we're going to turn our QAction toggleable — so clicking will turn it on, and clicking again will turn it off. To do this, we simply call setCheckable(True) on the QAction object:
class MainWindow(QMainWindow):
    def __init__(self):
        super().__init__()
        self.setWindowTitle("My App")

        label = QLabel("Hello!")
        label.setAlignment(Qt.AlignmentFlag.AlignCenter)

        self.setCentralWidget(label)

        toolbar = QToolBar("My main toolbar")
        self.addToolBar(toolbar)

        button_action = QAction("Your button", self)
        button_action.setStatusTip("This is your button")
        button_action.triggered.connect(self.toolbar_button_clicked)
        button_action.setCheckable(True)
        toolbar.addAction(button_action)

        self.setStatusBar(QStatusBar(self))

    def toolbar_button_clicked(self, s):
        print("click", s)
Run it! Click on the button to see it toggle from checked to unchecked state. Note that the custom slot method we create now alternates outputting True and False.
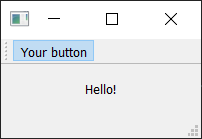 The toolbar button toggled on.
There is also a toggled signal, which only emits a signal when the button is toggled. But the effect is identical, so it is mostly pointless.
Things look pretty shabby right now — so let's add an icon to our button. For this, I recommend you download the fugue icon set by designer Yusuke Kamiyamane. It's a great set of beautiful 16x16 icons that can give your apps a nice professional look. It is freely available with only attribution required when you distribute your application — although I am sure the designer would appreciate some cash too if you have some spare.
![]() Fugue Icon Set — Yusuke Kamiyamane
Fugue Icon Set — Yusuke Kamiyamane
Select an image from the set (in the examples here, I've selected the file bug.png) and copy it into the same folder as your source code.
We can create a QIcon object by passing the file name to the class, e.g. QIcon("bug.png") -- if you place the file in another folder, you will need a full relative or absolute path to it.
Finally, to add the icon to the QAction (and therefore the button), we simply pass it in as the first argument when creating the QAction.
You also need to let the toolbar know how large your icons are. Otherwise, your icon will be surrounded by a lot of padding. You can do this by calling setIconSize() with a QSize object:
PyQt/PySide 1:1 Coaching with Martin Fitzpatrick — Get one on one help with your Python GUI projects. Working together with you I'll identify issues and suggest fixes, from bugs and usability to architecture and maintainability.
class MainWindow(QMainWindow):
    def __init__(self):
        super().__init__()
        self.setWindowTitle("My App")

        label = QLabel("Hello!")
        label.setAlignment(Qt.AlignmentFlag.AlignCenter)

        self.setCentralWidget(label)

        toolbar = QToolBar("My main toolbar")
        toolbar.setIconSize(QSize(16, 16))
        self.addToolBar(toolbar)

        button_action = QAction(QIcon("bug.png"), "Your button", self)
        button_action.setStatusTip("This is your button")
        button_action.triggered.connect(self.toolbar_button_clicked)
        button_action.setCheckable(True)
        toolbar.addAction(button_action)

        self.setStatusBar(QStatusBar(self))

    def toolbar_button_clicked(self, s):
        print("click", s)
Run it! The QAction is now represented by an icon. Everything should work exactly as it did before.
![]() Our action button with an icon.
Our action button with an icon.
Note that Qt uses your operating system's default settings to determine whether to show an icon, text, or an icon and text in the toolbar. But you can override this by using setToolButtonStyle(). This slot accepts any of the following flags from the Qt namespace:
| Flag | Behavior |
|---|---|
Qt.ToolButtonStyle.ToolButtonIconOnly |
Icon only, no text |
Qt.ToolButtonStyle.ToolButtonTextOnly |
Text only, no icon |
Qt.ToolButtonStyle.ToolButtonTextBesideIcon |
Icon and text, with text beside the icon |
Qt.ToolButtonStyle.ToolButtonTextUnderIcon |
Icon and text, with text under the icon |
Qt.ToolButtonStyle.ToolButtonFollowStyle |
Follow the host desktop style |
The default value is Qt.ToolButtonStyle.ToolButtonFollowStyle, meaning that your application will default to following the standard/global setting for the desktop on which the application runs. This is generally recommended to make your application feel as native as possible.
Finally, we can add a few more bits and bobs to the toolbar. We'll add a second button and a checkbox widget. As mentioned, you can literally put any widget in here, so feel free to go crazy:
from PyQt6.QtCore import QSize, Qt
from PyQt6.QtGui import QAction, QIcon
from PyQt6.QtWidgets import (
    QApplication,
    QCheckBox,
    QLabel,
    QMainWindow,
    QStatusBar,
    QToolBar,
)

class MainWindow(QMainWindow):
    def __init__(self):
        super().__init__()
        self.setWindowTitle("My App")

        label = QLabel("Hello!")
        label.setAlignment(Qt.AlignmentFlag.AlignCenter)

        self.setCentralWidget(label)

        toolbar = QToolBar("My main toolbar")
        toolbar.setIconSize(QSize(16, 16))
        self.addToolBar(toolbar)

        button_action = QAction(QIcon("bug.png"), "&Your button", self)
        button_action.setStatusTip("This is your button")
        button_action.triggered.connect(self.toolbar_button_clicked)
        button_action.setCheckable(True)
        toolbar.addAction(button_action)

        toolbar.addSeparator()

        button_action2 = QAction(QIcon("bug.png"), "Your &button2", self)
        button_action2.setStatusTip("This is your button2")
        button_action2.triggered.connect(self.toolbar_button_clicked)
        button_action2.setCheckable(True)
        toolbar.addAction(button_action2)

        toolbar.addWidget(QLabel("Hello"))
        toolbar.addWidget(QCheckBox())

        self.setStatusBar(QStatusBar(self))

    def toolbar_button_clicked(self, s):
        print("click", s)

app = QApplication([])
window = MainWindow()
window.show()
app.exec()
Run it! Now you see multiple buttons and a checkbox.
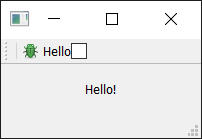 Toolbar with an action and two widgets.
Menus
Menus are another standard component of UIs. Typically, they are at the top of the window or the top of a screen on macOS. They allow you to access all standard application functions. A few standard menus exist — for example File, Edit, Help. Menus can be nested to create hierarchical trees of functions, and they often support and display keyboard shortcuts for fast access to their functions.
 Standard GUI elements - Menus
Adding a Menu
To create a menu, we create a menubar we call menuBar() on the QMainWindow. We add a menu to our menu bar by calling addMenu(), passing in the name of the menu. I've called it '&File'. The ampersand defines a quick key to jump to this menu when pressing Alt.
This won't be visible on macOS. Note that this is different from a keyboard shortcut — we'll cover that shortly.
This is where the power of actions comes into play. We can reuse the already existing QAction to add the same function to the menu. To add an action, you call addAction() passing in one of our defined actions:
class MainWindow(QMainWindow):
    def __init__(self):
        super().__init__()
        self.setWindowTitle("My App")

        label = QLabel("Hello!")
        label.setAlignment(Qt.AlignmentFlag.AlignCenter)

        self.setCentralWidget(label)

        toolbar = QToolBar("My main toolbar")
        toolbar.setIconSize(QSize(16, 16))
        self.addToolBar(toolbar)

        button_action = QAction(QIcon("bug.png"), "&Your button", self)
        button_action.setStatusTip("This is your button")
        button_action.triggered.connect(self.toolbar_button_clicked)
        button_action.setCheckable(True)
        toolbar.addAction(button_action)

        toolbar.addSeparator()

        button_action2 = QAction(QIcon("bug.png"), "Your &button2", self)
        button_action2.setStatusTip("This is your button2")
        button_action2.triggered.connect(self.toolbar_button_clicked)
        button_action2.setCheckable(True)
        toolbar.addAction(button_action2)

        toolbar.addWidget(QLabel("Hello"))
        toolbar.addWidget(QCheckBox())

        self.setStatusBar(QStatusBar(self))

        menu = self.menuBar()

        file_menu = menu.addMenu("&File")
        file_menu.addAction(button_action)

    def toolbar_button_clicked(self, s):
        print("click", s)
Run it! Click the item in the menu, and you will notice that it is toggleable — it inherits the features of the QAction.
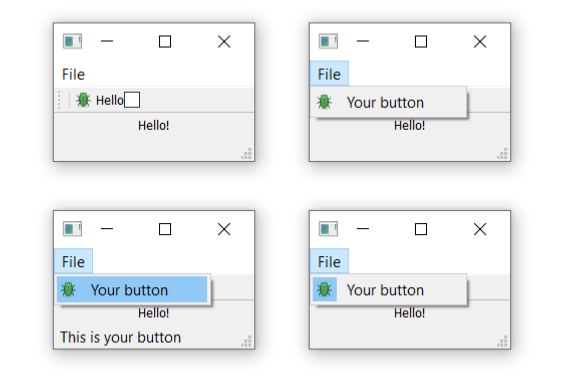 Menu shown on the window -- on macOS this will be at the top of the screen.
Let's add some more things to the menu. Here, we'll add a separator to the menu, which will appear as a horizontal line in the menu, and then add the second QAction we created:
class MainWindow(QMainWindow):
    def __init__(self):
        super().__init__()
        self.setWindowTitle("My App")

        label = QLabel("Hello!")
        label.setAlignment(Qt.AlignmentFlag.AlignCenter)

        self.setCentralWidget(label)

        toolbar = QToolBar("My main toolbar")
        toolbar.setIconSize(QSize(16, 16))
        self.addToolBar(toolbar)

        button_action = QAction(QIcon("bug.png"), "&Your button", self)
        button_action.setStatusTip("This is your button")
        button_action.triggered.connect(self.toolbar_button_clicked)
        button_action.setCheckable(True)
        toolbar.addAction(button_action)

        toolbar.addSeparator()

        button_action2 = QAction(QIcon("bug.png"), "Your &button2", self)
        button_action2.setStatusTip("This is your button2")
        button_action2.triggered.connect(self.toolbar_button_clicked)
        button_action2.setCheckable(True)
        toolbar.addAction(button_action2)

        toolbar.addWidget(QLabel("Hello"))
        toolbar.addWidget(QCheckBox())

        self.setStatusBar(QStatusBar(self))

        menu = self.menuBar()

        file_menu = menu.addMenu("&File")
        file_menu.addAction(button_action)
        file_menu.addSeparator()
        file_menu.addAction(button_action2)

    def toolbar_button_clicked(self, s):
        print("click", s)
Run it! You should see two menu items with a line between them.
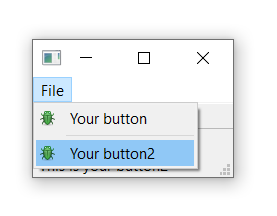 Our actions showing in the menu.
You can also use ampersand to add accelerator keys to the menu to allow a single key to be used to jump to a menu item when it is open. Again this doesn't work on macOS.
To add a submenu, you simply create a new menu by calling addMenu() on the parent menu. You can then add actions to it as usual. For example:
class MainWindow(QMainWindow):
    def __init__(self):
        super().__init__()
        self.setWindowTitle("My App")

        label = QLabel("Hello!")
        label.setAlignment(Qt.AlignmentFlag.AlignCenter)

        self.setCentralWidget(label)

        toolbar = QToolBar("My main toolbar")
        toolbar.setIconSize(QSize(16, 16))
        self.addToolBar(toolbar)

        button_action = QAction(QIcon("bug.png"), "&Your button", self)
        button_action.setStatusTip("This is your button")
        button_action.triggered.connect(self.toolbar_button_clicked)
        button_action.setCheckable(True)
        toolbar.addAction(button_action)

        toolbar.addSeparator()

        button_action2 = QAction(QIcon("bug.png"), "Your &button2", self)
        button_action2.setStatusTip("This is your button2")
        button_action2.triggered.connect(self.toolbar_button_clicked)
        button_action2.setCheckable(True)
        toolbar.addAction(button_action2)

        toolbar.addWidget(QLabel("Hello"))
        toolbar.addWidget(QCheckBox())

        self.setStatusBar(QStatusBar(self))

        menu = self.menuBar()

        file_menu = menu.addMenu("&File")
        file_menu.addAction(button_action)
        file_menu.addSeparator()

        file_submenu = file_menu.addMenu("Submenu")
        file_submenu.addAction(button_action2)

    def toolbar_button_clicked(self, s):
        print("click", s)
Run it! You will see a nested menu in the File menu.
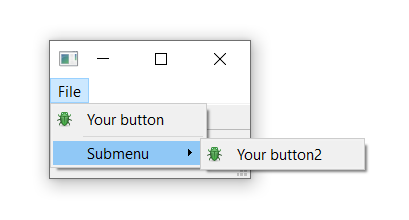 Submenu nested in the File menu.
Finally, we'll add a keyboard shortcut to the QAction. You define a keyboard shortcut by passing setKeySequence() and passing in the key sequence. Any defined key sequences will appear in the menu.
Note that the keyboard shortcut is associated with the QAction and will still work whether or not the QAction is added to a menu or a toolbar.
Key sequences can be defined in multiple ways - either by passing as text, using key names from the Qt namespace, or using the defined key sequences from the Qt namespace. Use the latter wherever you can to ensure compliance with the operating system standards.
The completed code, showing the toolbar buttons and menus, is shown below:
from PyQt6.QtCore import QSize, Qt
from PyQt6.QtGui import QAction, QIcon, QKeySequence
from PyQt6.QtWidgets import (
    QApplication,
    QCheckBox,
    QLabel,
    QMainWindow,
    QStatusBar,
    QToolBar,
)

class MainWindow(QMainWindow):
    def __init__(self):
        super().__init__()
        self.setWindowTitle("My App")

        label = QLabel("Hello!")

        # The `Qt` namespace has a lot of attributes to customize
        # widgets. See: http://doc.qt.io/qt-6/qt.html
        label.setAlignment(Qt.AlignmentFlag.AlignCenter)

        # Set the central widget of the Window. Widget will expand
        # to take up all the space in the window by default.
        self.setCentralWidget(label)

        toolbar = QToolBar("My main toolbar")
        toolbar.setIconSize(QSize(16, 16))
        self.addToolBar(toolbar)

        button_action = QAction(QIcon("bug.png"), "&Your button", self)
        button_action.setStatusTip("This is your button")
        button_action.triggered.connect(self.toolbar_button_clicked)
        button_action.setCheckable(True)
        # You can enter keyboard shortcuts using key names (e.g. Ctrl+p)
        # Qt.namespace identifiers (e.g. Qt.CTRL + Qt.Key_P)
        # or system agnostic identifiers (e.g. QKeySequence.Print)
        button_action.setShortcut(QKeySequence("Ctrl+p"))
        toolbar.addAction(button_action)

        toolbar.addSeparator()

        button_action2 = QAction(QIcon("bug.png"), "Your &button2", self)
        button_action2.setStatusTip("This is your button2")
        button_action2.triggered.connect(self.toolbar_button_clicked)
        button_action2.setCheckable(True)
        toolbar.addAction(button_action2)

        toolbar.addWidget(QLabel("Hello"))
        toolbar.addWidget(QCheckBox())

        self.setStatusBar(QStatusBar(self))

        menu = self.menuBar()

        file_menu = menu.addMenu("&File")
        file_menu.addAction(button_action)

        file_menu.addSeparator()

        file_submenu = file_menu.addMenu("Submenu")

        file_submenu.addAction(button_action2)

    def toolbar_button_clicked(self, s):
        print("click", s)

app = QApplication([])
window = MainWindow()
window.show()
app.exec()
Experiment with building your own menus using QAction and QMenu.
Packaging Python Applications with PyInstaller by Martin Fitzpatrick — This step-by-step guide walks you through packaging your own Python applications from simple examples to complete installers and signed executables.
