In GUI applications the window's position & size are known as the window geometry. Saving and restoring the geometry of a window between executions is a useful feature in many applications. With persistent geometry users can arrange applications on their desktop for an optimal workflow and have the applications return to those positions every time they are launched.
In this tutorial, we will explore how to save and restore the geometry and state of a PyQt window using the QSettings class. With this functionality, you will be able to give your applications a usability boost.
To follow along with this tutorial, you should have prior knowledge of creating GUI apps with Python and PyQt. Additionally, having a basic understanding of using the QSettings class to manage an application's settings will be beneficial.
Understanding a Window's Geometry
PyQt defines the geometry of a window using a few properties. These properties represent a window's position on the screen and size. Here's a summary of PyQt's geometry-related properties:
| Property | Description | Access Method |
|---|---|---|
x |
Holds the x coordinate of a widget relative to its parent. If the widget is a window, x includes any window frame and is relative to the desktop. This property defaults to 0. |
x() |
y |
Holds the y coordinate of a widget relative to its parent. If the widget is a window, y includes any window frame and is relative to the desktop. This property defaults to 0. |
y() |
pos |
Holds the position of the widget within its parent widget. If the widget is a window, the position is relative to the desktop and includes any frame. | pos() |
geometry |
Holds the widget's geometry relative to its parent and excludes the window frame. | geometry() |
width |
Holds the width of the widget, excluding any window frame. | width() |
height |
Holds the height of the widget, excluding any window frame. | height() |
size |
Holds the size of the widget, excluding any window frame. | size() |
In PyQt, the QWidget class provides the access methods in the table above. Note that when your widget is a window or form, the first three methods operate on the window and its frame, while the last four methods operate on the client area, which is the window's workspace without the external frame.
Additionally, the x and y coordinates are relative to the screen of your computer. The origin of coordinates is the upper left corner of the screen, at which point both x and y are 0.
Let's create a small demo app to inspect all these properties in real time. To do this, go ahead and fire up your code editor or IDE and create a new Python file called geometry_properties.py. Then add the following code to the file and save it in your favorite working directory:
Purchasing Power Parity
Developers in [[ country ]] get [[ discount.discount_pc ]]% OFF on all books & courses with code [[ discount.coupon_code ]]from PyQt5.QtWidgets import (
QApplication,
QLabel,
QMainWindow,
QPushButton,
QVBoxLayout,
QWidget,
)
class Window(QMainWindow):
def __init__(self):
super().__init__()
self.setWindowTitle("Window's Geometry")
self.resize(400, 200)
self.central_widget = QWidget()
self.global_layout = QVBoxLayout()
self.geometry_properties = [
"x",
"y",
"pos",
"width",
"height",
"size",
"geometry",
]
for prop in self.geometry_properties:
self.__dict__[f"{prop}_label"] = QLabel(f"{prop}:")
self.global_layout.addWidget(self.__dict__[f"{prop}_label"])
button = QPushButton("Update Geometry Properties")
button.clicked.connect(self.update_labels)
self.global_layout.addWidget(button)
self.central_widget.setLayout(self.global_layout)
self.setCentralWidget(self.central_widget)
def update_labels(self):
for prop in self.geometry_properties:
self.__dict__[f"{prop}_label"].setText(
f"{prop}: {getattr(self, prop)()}"
)
if __name__ == "__main__":
app = QApplication([])
window = Window()
window.show()
app.exec()
Wow! There's a lot of code in this file. First, we import the required classes from PyQt5.QtWidgets. Then, we create our app's main window by inheriting from QMainWindow.
In the initializer method, we set the window's title and size using setWindowTitle() and resize(), respectively. Next, we define a central widget and a layout for our main window.
We also define a list of properties. We'll use that list to add some QLabel objects. Each label will show a geometry property and its current values. The Update Geometry Properties button allows us to update the value of the window's geometry properties.
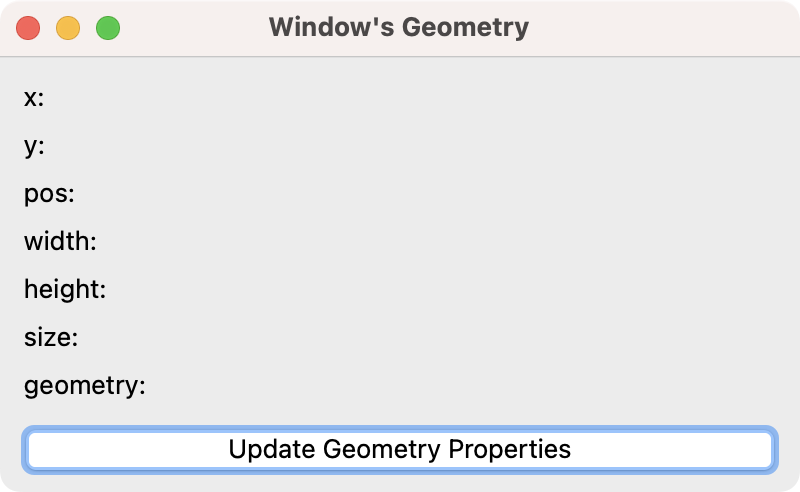
Finally, we define the update_labels() method to update the values of all the geometry properties using their corresponding access methods. That's it! Go ahead and run the app. You'll get the following window on your screen:
 A Window Showing Labels for Every Geometry Property
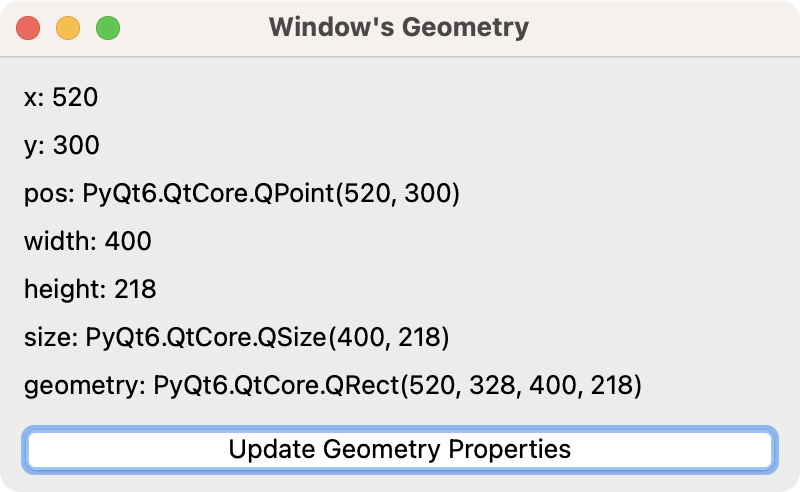
Looking good! Now go ahead and click the Update Geometry Properties button. You'll see how all the properties get updated. Your app's window will look something like this:
 A Window Showing the Current Value of Every Geometry Property
As you can see, x and y are numeric values, while pos is a QPoint object with x and y as its coordinates. These properties define the position of this window on your computer screen.
The width and height properties are also numeric values, while the size property is a QSize object defined after the current width and height.
Finally, the geometry property is a QRect object. In this case, the rectangle comprises x, y, width, and height.
Great! With this first approach to how PyQt defines a window's geometry, we're ready to continue digging into this tutorial's main topic: restoring the geometry of a window in PyQt.
Keeping an App's Geometry Settings: The QSetting Class
Users of GUI apps will generally expect the apps to remember their settings across sessions. This information is often referred to as settings or preferences. In PyQt applications, you'll manage settings and preferences using the QSettings class. This class allows you to have persistent platform-independent settings in your GUI app.
A commonly expected feature is that the app remembers the geometry of its windows, particularly the main window.
In this section, you'll learn how to save and restore the window's geometry in a PyQt application. Let's start by creating a skeleton PyQt application to kick things off. Go ahead and create a new Python file called geometry.py. Once you have the file opened in your favorite code editor or IDE, then add the following code:
from PyQt5.QtWidgets import QApplication, QMainWindow

class Window(QMainWindow):
    def __init__(self):
        super().__init__()
        self.setWindowTitle("Window's Geometry")
        self.move(50, 50)
        self.resize(400, 200)

if __name__ == "__main__":
    app = QApplication([])
    window = Window()
    window.show()
    app.exec()
This code creates a minimal PyQt app with an empty main window. The window will appear at 50 pixels from the upper left corner of your computer screen and have a size of 400 by 200 pixels.
We'll use the above code as a starting point to make the app remember and restore the main window's geometry across sessions.
First, we need to have a QSettings instance in our app. Therefore, you have to import QSettings from PyQt5.QtCore and instantiate it as in the code below:
from PyQt5.QtCore import QSettings
from PyQt5.QtWidgets import QApplication, QMainWindow

class Window(QMainWindow):
    def __init__(self):
        super().__init__()
        self.setWindowTitle("Window's Geometry")
        self.move(50, 50)
        self.resize(400, 200)
        self.settings = QSettings("PyhonGUIs", "GeometryApp")
When instantiating QSettings, we must provide the name of our company or organization and the name of our application. We use "PyhonGUIs" as the organization and "GeometryApp" as the application name.
Now that we have a QSettings instance, we should implement two methods. The first method should allow you to save the app's settings and preferences. The second method should help you read and load the settings. In this tutorial, we'll call these methods write_settings() and read_settings(), respectively:
class Window(QMainWindow):
    # ...

    def write_settings(self):
        # Write settings here...

    def read_settings(self):
        # Read settings here...
Note that our methods don't do anything yet. You'll write them in a moment. For now, they're just placeholders.
The write_settings() method must be called when the user closes or terminates the application. This way, you guarantee that all the modified settings get saved for the next session. So, the appropriate place to call write_settings() is from the main window's close event handler.
Let's override the closeEvent() method as in the code below:
class Window(QMainWindow):
    # ...

    def closeEvent(self, event):
        self.write_settings()
        super().closeEvent(event)
        event.accept()
In this code, we override the closeEvent() handler method. The first line calls write_settings() to ensure that we save the current state of our app's settings. Then, we call the closeEvent() of our superclass QMainWindow to ensure the app's window closes correctly. Finally, we accept the current event to signal that it's been processed.
Now, where should we call read_settings() from? In this example, the best place for calling the read_settings() method is .__init__(). Go ahead and add the following line of code to the end of your __init__() method:
class Window(QMainWindow):
    def __init__(self):
        super().__init__()
        self.setWindowTitle("Window's Geometry")
        self.move(50, 50)
        self.resize(400, 200)
        self.settings = QSettings("PythonGUIs", "GeometryApp")
        self.read_settings()
By calling the read_settings() method from __init__(), we ensure that our app will read and load its settings every time the main window gets created and initialized.
Great! We're on the way to getting our application to remember and restore its window's geometry. First, you need to know that you have at least two ways to restore the geometry of a window in PyQt:
PyQt/PySide 1:1 Coaching with Martin Fitzpatrick — Save yourself time and frustration. Get one on one help with your Python GUI projects. Working together with you I'll identify issues and suggest fixes, from bugs and usability to architecture and maintainability.
- Using the
posandsizeproperties - Using the
geometryproperty
In both cases, you need to save the current value of the selected property and load the saved value when the application starts. To kick things off, let's start with the first approach.
Restoring the Window's Geometry With pos and size
In this section, we'll first write the required code to save the current value of pos and size by taking advantage of our QSettings object. The code snippet below shows the changes that you need to make on your write_settings() method to get this done:
class Window(QMainWindow):
    # ...

    def write_settings(self):
        self.settings.setValue("pos", self.pos())
        self.settings.setValue("size", self.size())
This code is straightforward. We call the setValue() method on our setting object to set the "pos" and "size" configuration parameters. Note that we get the current value of each property using the corresponding access method.
With the write_settings() method updated, we're now ready to read and load the geometry properties from our app's settings. Go ahead and update the read_settings() method as in the code below:
class Window(QMainWindow):
    # ...

    def read_settings(self):
        self.move(self.settings.value("pos", defaultValue=QPoint(50, 50)))
        self.resize(self.settings.value("size", defaultValue=QSize(400, 200)))
The first line inside read_settings() retrieves the value of the "pos" setting parameter. If there's no saved value for this parameter, then we use QPoint(50, 50) as the default value. Next, the move() method moves the app's window to the resulting position on your screen.
The second line in read_settings() does something similar to the first one. It retrieves the current value of the "size" parameter and resizes the window accordingly.
Great! It's time for a test! Go ahead and run your application. Then, move the app's window to another position on your screen and resize the window as desired. Finally, close the app's window to terminate the current session. When you run the app again, the window will appear in the same position. It will also have the same size.
If you have any issues completing and running the example app, then you can grab the entire code below:
from PyQt5.QtCore import QPoint, QSettings, QSize
from PyQt5.QtWidgets import QApplication, QMainWindow

class Window(QMainWindow):
    def __init__(self):
        super().__init__()
        self.setWindowTitle("Window's Geometry")
        self.move(50, 50)
        self.resize(400, 200)
        self.settings = QSettings("PyhonGUIs", "GeometryApp")
        self.read_settings()

    def write_settings(self):
        self.settings.setValue("pos", self.pos())
        self.settings.setValue("size", self.size())

    def read_settings(self):
        self.move(self.settings.value("pos", defaultValue=QPoint(50, 50)))
        self.resize(self.settings.value("size", defaultValue=QSize(400, 200)))

    def closeEvent(self, event):
        self.write_settings()
        super().closeEvent(event)
        event.accept()

if __name__ == "__main__":
    app = QApplication([])
    window = Window()
    window.show()
    app.exec()
Now you know how to restore the geometry of a window in a PyQt app using the pos and size properties. It's time to change gears and learn how to do this using the geometry property.
Restoring the Window's Geometry With geometry
We can also restore the geometry of a PyQt window using its geometry property and the restoreGeometry() method. To do that, we first need to save the current geometry using our QSettings object.
Go ahead and create a new Python file in your working directory. Once you have the file in place, add the following code to it:
from PyQt5.QtCore import QByteArray, QSettings
from PyQt5.QtWidgets import QApplication, QMainWindow

class Window(QMainWindow):
    def __init__(self):
        super().__init__()
        self.setWindowTitle("Window's Geometry")
        self.move(50, 50)
        self.resize(400, 200)
        self.settings = QSettings("PythonGUIs", "GeometryApp")
        self.read_settings()

    def write_settings(self):
        self.settings.setValue("geometry", self.saveGeometry())

    def read_settings(self):
        self.restoreGeometry(self.settings.value("geometry", QByteArray()))

    def closeEvent(self, event):
        self.write_settings()
        super().closeEvent(event)
        event.accept()

if __name__ == "__main__":
    app = QApplication([])
    window = Window()
    window.show()
    app.exec()
There are only two changes in this code compared to the code from the previous section. We've modified the implementation of the write_settings() and read_settings() methods.
In write_settings(), we use the setValue() to save the current geometry of our app's window. The saveGeometry() allows us to access and save the current window's geometry. In read_settings(), we call the value() method to retrieve the saved geometry value. Then, we use restoreGeometry() to restore the geometry of our window.
Again, you can run the application consecutive times and change the position and size of its main window to ensure your code works correctly.
Restoring the Window's Geometry and State
If your app's window has toolbars and dock widgets, then you want to restore their state on the parent window. To do that, you can use the restoreState() method. To illustrate this, let's reuse the code from the previous section.
Update the content of write_settings() and read_settings() as follows:
class Window(QMainWindow):
    # ...

    def write_settings(self):
        self.settings.setValue("geometry", self.saveGeometry())
        self.settings.setValue("windowState", self.saveState())

    def read_settings(self):
        self.restoreGeometry(self.settings.value("geometry", QByteArray()))
        self.restoreState(self.settings.value("windowState", QByteArray()))
In write_settings(), we add a new setting value called "windowState". To keep this setting, we use the saveState() method, which saves the current state of this window's toolbars and dock widgets. Meanwhile, in read_settings(), we restore the window's state by calling the value() method, as usual, to get the state value back from our QSettings object. Finally, we use restoreState() to restore the state of toolbars and dock widgets.
Now, to make sure that this new code works as expected, let's add a sample toolbar and a dock window to our app's main window. Go ahead and add the following methods right after the __init__() method:
from PyQt5.QtCore import QByteArray, QSettings, Qt
from PyQt5.QtWidgets import QApplication, QDockWidget, QMainWindow

class Window(QMainWindow):
    def __init__(self):
        super().__init__()
        self.setWindowTitle("Window's State")
        self.resize(400, 200)
        self.settings = QSettings("PythonGUIs", "GeometryApp")
        self.create_toolbar()
        self.create_dock()
        self.read_settings()

    def create_toolbar(self):
        toolbar = self.addToolBar("Toolbar")
        toolbar.addAction("One")
        toolbar.addAction("Two")
        toolbar.addAction("Three")

    def create_dock(self):
        dock = QDockWidget("Dock", self)
        dock.setAllowedAreas(
            Qt.DockWidgetArea.LeftDockWidgetArea
            | Qt.DockWidgetArea.RightDockWidgetArea
        )
        self.addDockWidget(Qt.DockWidgetArea.LeftDockWidgetArea, dock)

    # ...
In this new update, we first import the Qt namespace from PyQt5.QtCore and QDockWidget from PyQt5.QtWidgets. Then we call the two new methods from __init__() to create the toolbar and dock widget at initialization time.
In the create_toolbar() method, we create a sample toolbar with three sample buttons. This toolbar will show at the top of our app's window by default.
Next, we create a dock widget in create_dock(). This widget will occupy the rest of our window's working area.
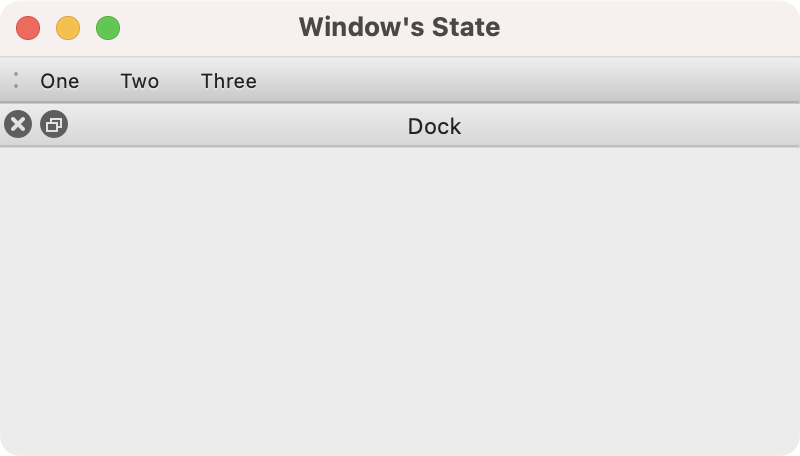
That's it! You're now ready to give your app a try. You'll see a window like the following:
 A Window Showing a Sample Toolbar and a Dock Widget
Play with the toolbar and the dock widget. Move them around. Then close the app's window and run the app again. Your toolbar and dock widget will show in the last position you left them.
Conclusion
Through this tutorial, you have learned how to restore the geometry and state of a window in PyQt applications using the QSettings class. By utilizing the pos, size, geometry, and state properties, you can give your users the convenience of persistent position and size on your app's windows.
With this knowledge, you can enhance the usability of your PyQt applications, making your app more intuitive and user-friendly.
Packaging Python Applications with PyInstaller by Martin Fitzpatrick — This step-by-step guide walks you through packaging your own Python applications from simple examples to complete installers and signed executables.

